Pages

Wednesday, October 14, 2020

Stampin' Up! Arrange a Wreath

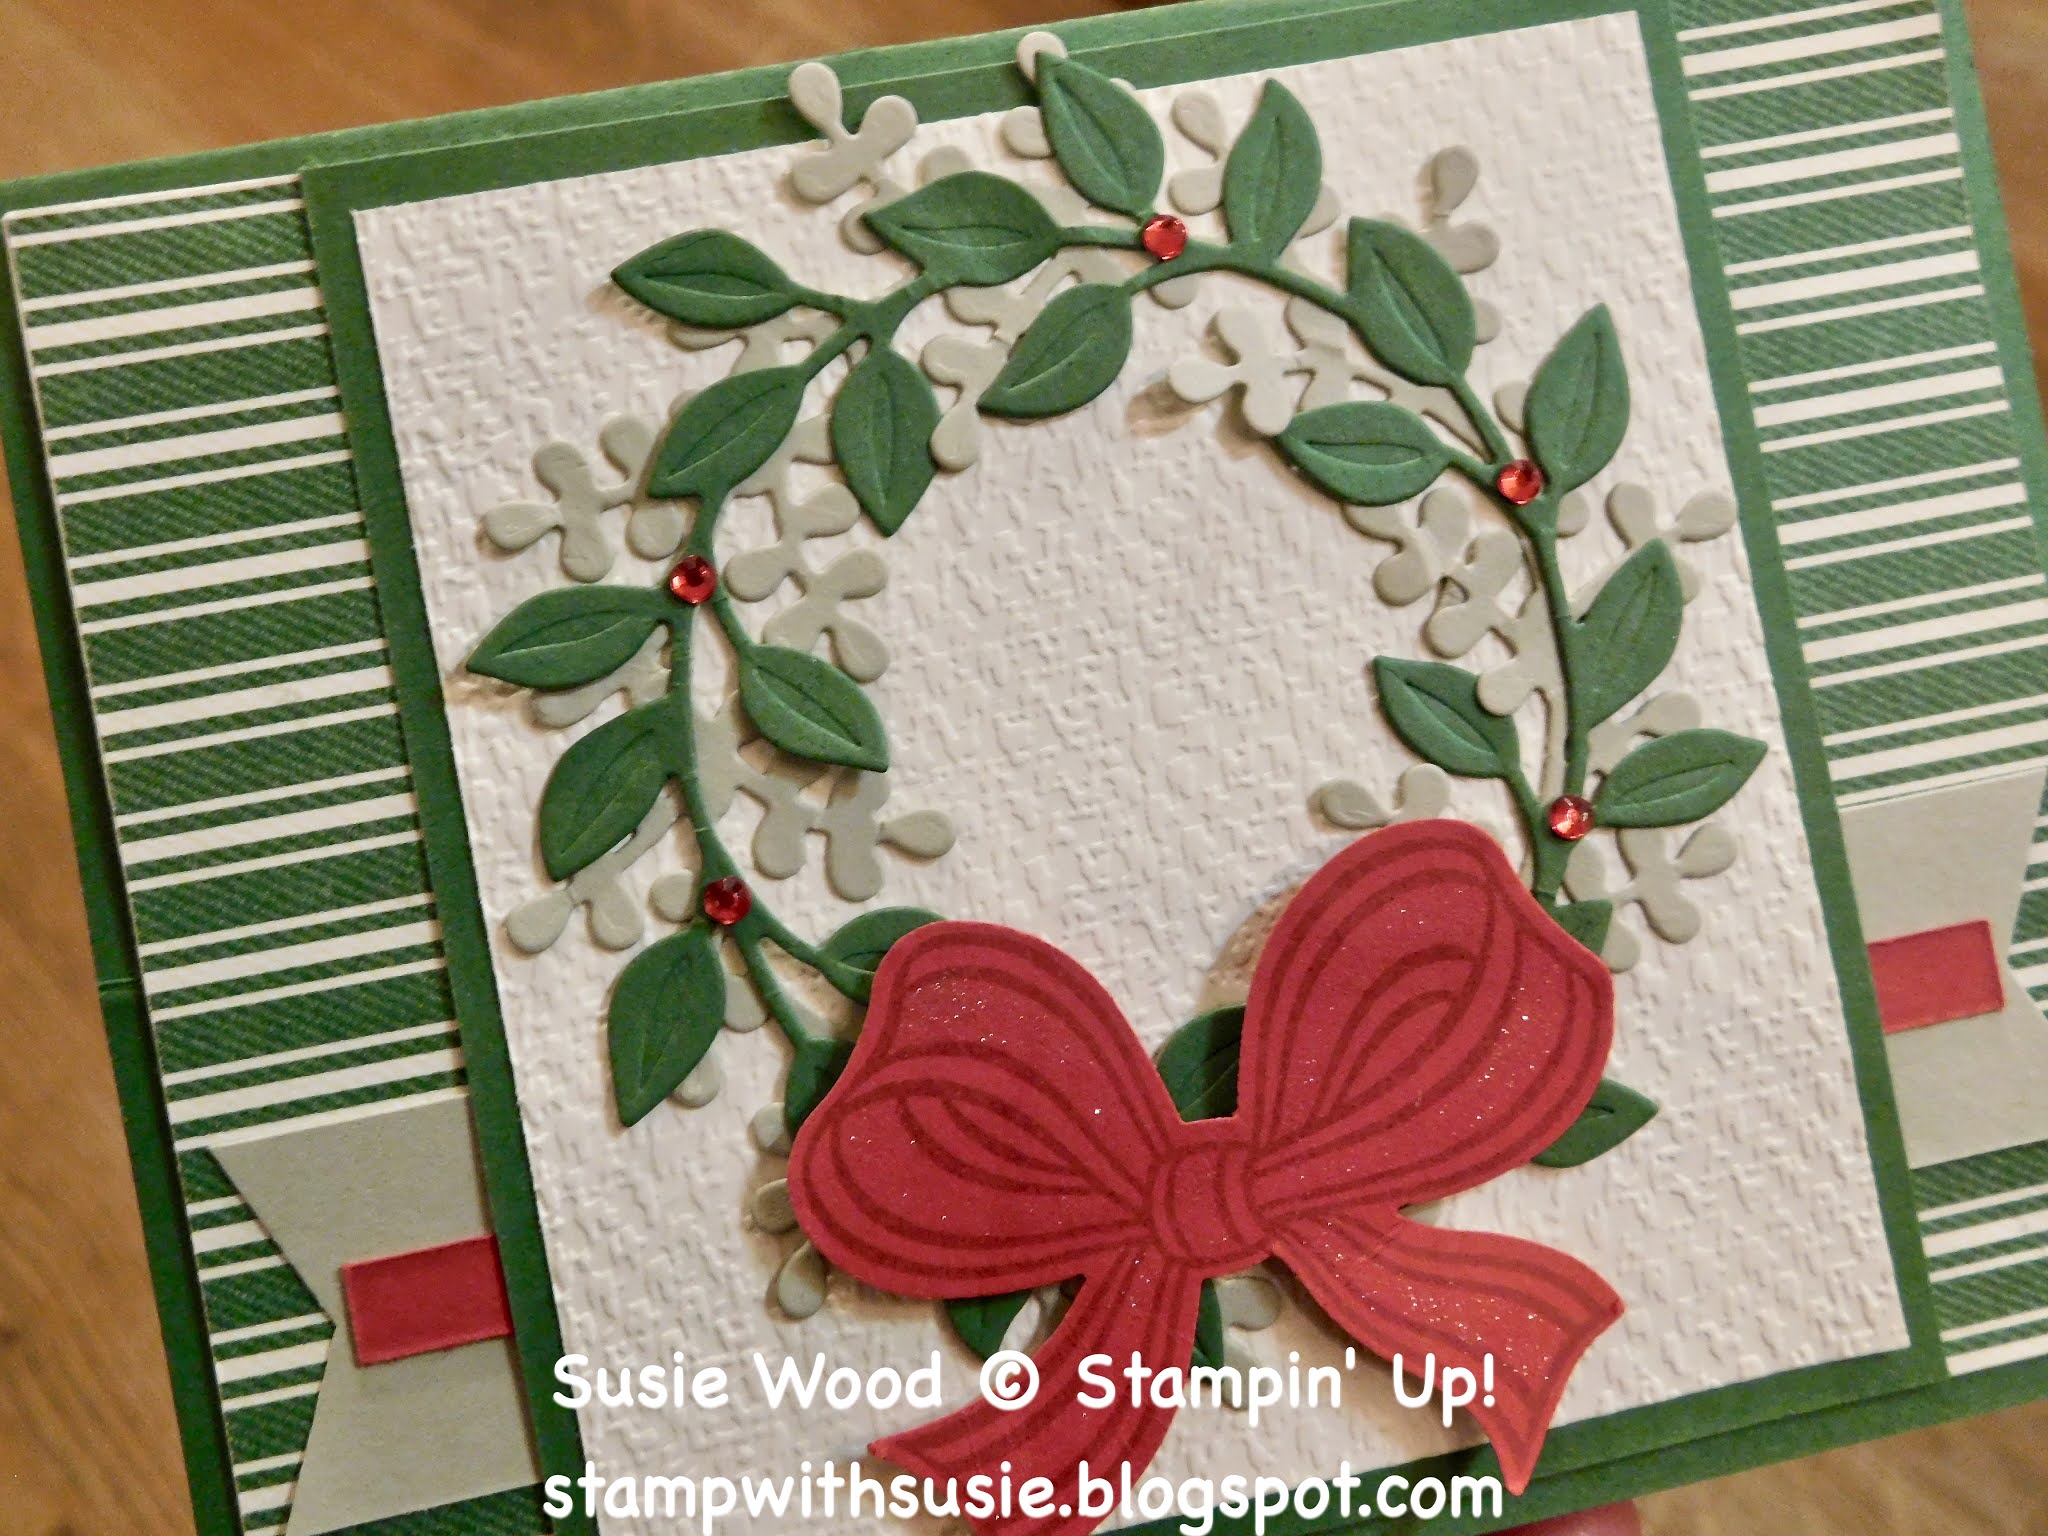
Here is a beautiful Christmas wreath!
I used the 'Arrange A Wreath' stamp set & coordinating Wreath Builder Dies.
 
If you checked my blog yesterday, you saw this card made as a fall wreath!
I just changed the color of the bow, the card stock strip & added some Red Rhinestones!
WOW HUH!
  
This is what it looks like stamping up as an easel card!
 It is amazing that just adding the red accents with the bow & rhinestones 
really make it a great Christmas card.

stamp set:  'Arrange A Wreath'
card stock:
  • Garden Green- 5 1/2 x 8 1/2"- score at 2 1/8" & 4 1/4"; 4 x 5 1/4"- for front of card; 4 1/4" strip- die cut leaf wreath; 3 3/4 x 4"
  • Real Red- 1/2 x 4 1/2"; 2" strip- stamp bow onto & punch out
  • Very Vanilla- 3 1/2 x 3 3/4"- emboss with the Tasteful Textures Embossing Folder; 4 x 5 1/4"- for inside of card; 1 1/2" strip- stamp words onto & die cut out
  • Sahara Sand- 1 x 5 1/4"- flag both ends with the Banners Pick A Punch; 4 1/4" strip- die cut wreath
designer paper:  Toile Tidings DSP- 1 x 4"; 1 x 4"
ink:  Garden Green
other:  Stampin' Cut & Emboss Machine; Layering Oval Dies; Tasteful Textures Embossing Folder; Wreath Builder Dies; Banners Pick A Punch; Bow Builder Punch; Wink of Stella; dimensionals; glue dots; Red Rhinestones
 
 Here they are shown together.
 
These are the exact same card except-
  • DSP was cut different direction.
  • Bow is different color. 
  • Card stock thin strip is different color.
  • Words are different & stamped in different colors.  
  • And Red Rhinestones are added to the Christmas wreath!

 I can honestly say that I love both of these.
But that red bow just really pops!
It is actually almost breath taking in person.

Which one do you like the better?
Leave me a comment!
I would love to hear what you think!
 
I hope you have a WONDERFUL Wednesday!!
Happy Stamping!
Hugs-
SUSIE

Tuesday, October 13, 2020

Stampin' Up! Arrange a Wreath

 Check out my wreath!!
It is so pretty!
It is a fun fold easel card too!

I used the 'Arrange a Wreath' bundle (stamp set & dies).
Along with the Toile Tidings DSP on page 34 in the Holiday Mini Catalog.
This DSP is one of the many that are on SALE this month!
 I added one of my favorite new punches to it- 
the Bow Builder Punch!
And I embossed the background with the awesome 
Tasteful Textures Embossing Folder!
This is what the easel card looks like standing up.  
I love it!

stamp set:  'Arrange A Wreath'
card stock:
  • Garden Green- 5 1/2 x 8 1/2"- score at 2 1/8" & 4 1/4"; 4 x 5 1/4"- for front of card; 2" strip- stamp bow onto & punch out; 4 1/4" strip- die cut leaf wreath; 1/2 x 4 1/2"; 3 3/4 x 4"
  • Very Vanilla- 3 1/2 x 3 3/4"- emboss with the Tasteful Textures Embossing Folder; 4 x 5 1/4"- for inside of card; 1 1/2" strip- stamp words onto & die cut out
  • Sahara Sand- 1 x 5 1/4"- flag both ends with the Banners Pick A Punch; 4 1/4" strip- die cut wreath
designer paper:  Toile Tidings DSP- 1 x 4"; 1 x 4"
ink:  Garden Green
other:  Stampin' Cut & Emboss Machine; Layering Oval Dies; Tasteful Textures Embossing FOlder; Wreath Builder Dies; Banners Pick A Punch; Bow Builder Punch; Wink of Stella; dimensionals; glue dots

I hope you have a TERRIFIC Tuesday!!
Happy Stamping!
Hugs-
SUSIE

Monday, October 12, 2020

Stampin' Up! Halloween card

I love Fall!
And I love Halloween too!
 
Check out my spooky slim line Halloween card!!
I love it!
It was fun & easy to make with the help of my Stamparatus!

Look at the moon!
I die cut a 1" circle out of Smoky Slate card stock, sponged around it with my 
Memento ink pad & then added Wink of Stella over the top of it!
I also added Wink of Stella to the windows too!
 I love how this Plaid Tidings DSP!
It is on SALE this month!
 
stamp set:  'Coming Home' & 'Festive Corners'
card stock:
  • Basic Black-7 x 8 1/2"- score at 3 1/2"- length wise & fold in half for card base; 1/4 x 3 1/2"
  • Smoky Slate- 1 1/4" strip- die cut circle; 3 1/4 x 8 1/4"
  • Whisper White- 2 1/4 x 3 3/4"; 8 1/4 x 3 1/4"- for inside of card
designer paper:  Plaid Tidings- 3 x 3"
ink:  Memento
Stampin' Blends;  Light Smoky Slate, Light Pumpkin Pie, Light Daffodil Delight
other:  Stampin' Cut & Emboss Machine; Layering Circle Dies; Black Glittered Organdy Ribbon; dimensionals; glue dots

I hope you have a MARVELOUS Monday!!
Happy Stamping!
Hugs-
SUSIE

Saturday, October 10, 2020

Stampin' Up! Flight of Fancy

 Today is Simple Saturday!!
 And I love my simple card for today.

Check out this CUTE little witch!
She is from the 'Flight of Fancy' stamp set on 
page 59 in the Mini (Holiday) Catalog.  

Aren't the corner words cool!
They are from the 'Festive Corners' stamp set on 
page 66 in the Mini (Holiday) Catalog.
 I just think she is adorable!
This Magic in the Night DSP is on sale this month.
 
stamp sets:  'Flight of Fancy' & 'Festive Corners'
card stock:
  • Rich Razzleberry- 5 1/2 x 8 1/2"- score at 4 1/4"- fold in half for card base
  • Basic Black- 2 1/2 x 3 1/4"
  • Whisper White- 2 1/4 x 3"-stamp witch onto; 4 x 5 1/4"- for inside of card
designer paper:  Magic in the Night- 1 x 5 1/2"; 2 x 4"
ink:  Memento
Stampin' Blends:  Dark Daffodil Delight; Light Smoky Slate; Dark Crumb Cake; Ivory; Light & Dark Rich Razzleberry;
other:  Dimensionals; Glue Dots; Black Glitter Organdy Ribbon; Wink of Stella
 
I hope you have a SUPER Saturday!!
Happy Stamping!
Hugs-
SUSIE

Friday, October 9, 2020

Stampin' Up! Poinsettia/Daisy

I LOVE THIS CARD!
It is so pretty!
It is a totally Susie card.
It is just a gorgeous fall card!
 
This is one of the cards that everyone stamping with me at my clases
this coming weekend will be making! 
I hope they all love it as much as I do.

I made a card where I combined these Daisy Punches with the 
Poinsettia Dies a month ago for my mom's birthday.  
 This woodgrain DSP is from the Poinsettia Place DSP.
This is one of the DSP packs that are on sale this month.
 
stamp sets:  'Daisy Lane'(2 daisies) & 'Bloom & Grow' (words)
card stock:
  • Soft Suede- 4 1/4 x 11"- score at 5 1/2"- fold in half for card base; 4 1/4 x 1/4"; 2 3/4" strip- die cut sprigs; 1" strip- die cut center of flowers; 1" strip- die cut 1" circle; 1" strip- die cut 3/4" strip
  • Crumb Cake- 4 x 5 1/4"- for outside of card; 2 3/4" strip- stamp words & die cut oval
  • Old Olive- 2 3/4" strip- die cut leaves
  • Bumble Bee-2 3/4" strip- stamp large daisy & punch out; 2" strip- stamp small daisy & punch out
  • Whisper White- 4 x 5 1/4"- for inside of card
designer paper:  Poinsettia Place DSP- 4 x 4"- diagonal cut off from lower corner to 1" on opposite side, off of one end of the DSP
inks:  Bumble Bee; Soft Suede
other:  Stampin' Cut & Emboss Machine; Poinsettia Dies; Layering Circle Dies; Stitched Shapes Dies (oval); Daisy Punch; Medium Daisy Punch; Square Vellum Doilies; dimensionals; glue dots
 
I hope you have a FABULOUS Friday!
Happy Stamping!
Hugs-
SUSIE

Thursday, October 8, 2020

Stampin' Up! Gather Together

 Have you noticed the neat plaid DSP colors & combinations 
that are in the Plaid Tidings DSP?
It can be found in the Mini (Holiday) Catalog on page 57.

This Plaid Tidings DSP is one of the DSP packs that are SALE.
 
Can you see you see a little sparkle in the photo?
I used the Champagne Shimmer Paint, along with some rubbing alcohol 
& sprayed it onto the card to make it sparkle!
Read on to see how I mixed this.......
 
 How did I do this?
  • Stampin' Spritzer 
  • Fill Spritzer about 3/4 full of Rubbing Alcohol- leaving room so that you can shake & mix the Shimmer Paint, as it settles to the bottom.
  • Add Champagne Shimmer Paint- 5-8 drops (approx. 1/8 teaspoon)
  • Shake well so it is well mixed.
  • Hold the Spritzer about 6-8" away from your card & lightly spray!
  • LESS is better than more.  You can always go back & spray more onto your card, but you can't take it off.  
  • Be sure you shake up your Stampin' Spritzer each time before you use it. 
 You know I like cards to be other occasions too.
Even though this is a great fall or even a great Thanksgiving card-
it could be a great guy birthday card, get well, thinking of you or even sympathy card.
 
Did you see my Sketch for this week?
You can check it out by CLICKING HERE!
I just turned the sketch on it's side to get this layout!
 
Here are the supplies & the measurements for this card- 
stamp set:  'Gather Together'
card stock:
  • Pretty Peacock- 4 1/4 x 11"- score at 5 1/2"- fold in half for card base; 1 1/2 x 3 1/4"
  • Whisper White- 3 1/2 x 4 1/2"; 2 3/4" strip- stamp leaf & die cut it out; 1 3/4" strip- stamp words onto & die cut out; 4 x 5 1/4"- for inside of card
designer paper:  Plaid Tidings DSP- 3 x 4"
ink:  Pretty Peacock
other:  Stampin' Cut & Emboss Machine; Gathered Leaves Dies; Wrapped in Texture Embossing Folder; Tasteful Labels Dies; dimensionals; glue dots; 3/8" Reversible Ribbon (Pretty Peacock/Old Olive); Champagne Shimmer Paint/Rubbing Alcohol Spray; Stampin' Spritzer

I hope you have a GREAT Thursday!!
Happy Stamping!
Hugs-
SUSIE

Wednesday, October 7, 2020

Stampin' Up! Stitched Leaves Dies

 Here is a beautiful fall leaf card with lots of Gold accents!
 
I used all of these products for my Gold accents-
  • Gold Hoops
  • Gold Foil for the leaves
  • Gold Gems
  • Gold cord for the bow
Last weekend, I created all my October monthly class cards.
This card is one that everyone stamping with me this month will be making.
 
I posted a card the other day using this same layout for this weeks-
TRY THIS SKETCH!
You can 
This is a totally Susie card!
I love the way it turned out.

REMINDER:  Don't forget about the awesome Designer Paper SALE that is going on right now!
 
NOTE:  This Gilded Autumn DSP is NOT on the sale list. 
The Gilded Autumn DSP & the Gold Foil that I used here are both currently on back order until approximately the middle of October.  But you can still order them now & they will ship as soon as they are available. 

stamp set:  'Seaside Notions'
card stock:
  • Early Espresso- 4 1/4 x 11"- score at 5 1/2"- fold in half for card base; 4 1/4 x 1"
  • Crumb Cake- 3 3/4 x 5"- emboss leaves along the outside right edge of the card stock.
  • Very Vanilla- 2 1/2" strip- punch out circle & stamp words onto it; 4 x 5 1/4" for inside of card
  • Gold Foil- 2" strip- die cut out leaves
designer paper:  Gilded Autumn 2 x 5"- flag one end with the Triple Banner Punch
ink:  Early Espresso
other:  Stampin' Cut & Emboss Machine; Stitched Leaves Dies; Meadow Moments Embossing Folder; Gold Gilded Gems; Gold Hoop; Wonder of the Season Ribbon Combo (Gold Cord); 2 1/4" Circle Punch; Triple Banner Punch; dimensionals; glue dots; multipurpose glue to adhere Gold Hoop (or you could roll some glue dots & used them too instead)

I hope you have a WONDERFUL Wednesday!!
Happy Stamping!
Hugs-
SUSIE

Tuesday, October 6, 2020

Stampin' Up! Tag Buffet Project Kit

 Check out these adorable Tags!
They are from the Tag Buffet Project Kit.
It is on page 5 in the Mini Holiday Catalog.
All of the supplies, except for the 'Tag Buffet" stamp set, are included in this kit!
 Did you see this pretty Christmas tree card that I posted last week?
It was the extra Christmas tree in this kit that I used.
 So out this Tag Buffet kit I got 30 tags (5 of each of these 6 different designs), 
plus the extra Christmas tree to make this card 
(with other supplies I already had on hand).
 
supplies:  
  • Tag Buffet Project Kit
  • 'Tag Buffet' stamp set
  • Garden Green stamp pad
  • Real Red stamp pad
  • Shaded Spruce stamp pad
I hope you have a TERRIFIC Tuesday!!
Happy Stamping!
Hugs-
SUSIE

Monday, October 5, 2020

Stampin' Up! Lots to Celebrate

 Here is another fun card using my 'Lots to Celebrate' stamp set.
I have snowflakes spilling out of the jar.
 
I coordinated the 'Snowflake Wishes' stamp set with it, for the large snowflakes.
And I also cut out a couple of snowflakes 
with the coordinating So Many Snowflakes Dies.
 I love the combination of these two blues- Seaside Spray & Misty Moonlight together!

stamp set:  'Lots to Celebrate' & 'Snowflake Wishes'
card stock:
  • Misty Moonlight- 5 1/2 x 8 1/2"- score at 4 1/4"- fold in half for card base; 1 1/4 x 4 1/4"
  • Seaside Spray- 3 3/4 x 5"- 1 x 4"
  • Whisper White- 2 3/4" strip- stamp jar onto & punch out; 1 1/2" strip- die cut snowflakes; 1" strip- stamp jar lid onto & cut out with scissors
ink:  Misty Moonlight & Smoky Slate
other:  Stampin' Cut & Emboss Machine; So Many Snowflakes Dies; Jar Punch; Scissors; Seaside Spray Ribbon; Snowflake Adhesive Backed Embellishments; dimensionals; glue dots
 
I hope you have a MARVELOUS Monday!
Happy Stamping!
Hugs-
SUSIE

Sunday, October 4, 2020

TRY THIS SKETCH!

 WOO HOO!
Happy Sunday to you all!!
 
Here is this weeks TRY THIS SKETCH!
Check out how I "stepped up" this layout.
I have 3 different samples to share with you, so keep on reading.
 Yesterday I had a bunch of thank you cards I needed to get made & sent out.
So I used today's sketch & this is what I ended up making.
 Check out these 3 cards that are=Stepped UP!
They are all the same layout, but I just a little more added to each one.
 Adding the embossed leaves along the edge- using the Greenery Embossing Folder;
 flagging the DSP- using the Triple Banner Punch;
& putting on the Elegant Faceted Gems- just completed my card!
This Forever Greenery DSP is on sale for 15% off during this month!
 
Adding this die cut circle too from the Tasteful Labels Dies,
 just really helped to dress this up too & make it a Totally Susie card.
 
stamp set:  'Massive Thanks'
card stock:
  • Garden Green- 4 1/4 x 11"- score at 5 1/2"- fold in half for card base; 1 x 4 1/4"; 2 1/2" strip- punch out circle using 2" Circle Punch
  • Pear Pizzazz- 3 3/4 x 5"- emboss this along the right edge
  • Whisper White- 2" strip- stamp words onto & die cut out using Tasteful Labels Dies; 4 x 5 1/4" for inside of card
designer paper:  Forever Greenery DSP- 2 x 5"- flag one end using the Triple Banner Punch
ink:  Garden Green
other:  Stampin' Cut & Emboss Machine; Tasteful Label Dies; Greenery Embossing Folder; Elegant Faceted Gems; 3/8" Old Olive/Pretty Peacock Reversible Ribbon; 2" Circle Punch; Triple Banner Punch; dimensionals; glue dots
 Here are just some of the cards I made & mailed out yesterday!

I hope you have a SUPER Sunday!!
Happy Stamping!
Hugs-
SUSIE

Saturday, October 3, 2020

"Happy National Card Making Day" on this Simple Saturday!!

Today is Simple Saturday!
And it is ALSO NATIONAL CARD MAKING DAY!
 
I hope you find time today to make a card & send it to someone.
Let's all continue to share our love of stamping with each other!
I know I'll be stamping all day/night/weekend!
I have several Thank You cards that I need to get made & mailed out. 
And I am also creating & getting ready for my 2 stamp classes that I have next weekend.

Today's card is clean & simple.
It is also a monochromatic card, using the leaf from the 'Rooted in Nature' stamp set.
I did the "block stamping technique" over the top of the leaf too for some added dimension!

I think that this card is a great all occasion card,
 that could be used for many different occasions.
The word HELLO is from my 'Lots to Celebrate' stamp set.
 
This In Good Tate DSP is on sale right now!
 
stamp set:  'Rooted in Nature' & 'Lots to Celebrate'
card stock:
  • Gray Granite- 4 1/4 x 11"- score at 5 1/2"- fold in half for card base; 3 x 3 1/4"
  • Early Espresso- 3 1/4 x 3 1/2"; 4 1/4 x 3/4"
  • Whisper White- 2 1/2 x 2 3/4"; 1/2" strip- stamp words onto & punch out with the Classic Label Punch.  I then snipped both ends with my scissors, as shown; 4 x 5 1/4"- for inside of card
designer paper:  In Good Taste DSP- 5 1/2 x 2 1/2"
ink: Early Espresso & Gray Granite
other:  Metallic Pearls (silver); Classic Label Punch; 3/16" Braided Linen Thread- cut approx. 6 ", fold in half, tie knot & snip ends; dimensionals; glue dots; Clear Block C
 
I hope you have a SUPER Saturday!
Happy Stamping!!
Hugs-
SUSIE

Friday, October 2, 2020

Stampin' Up! Life is Beautiful

 Here is a fun easel fold fall tree card, using the 'Life is Beautiful' stamp set!
 
Oh how I love this time of year & love the fall colors!
I combined the gorgeous Plaid Tidings DSP, to coordinate with the color of the leaves!
This Plaid Tidings DSP is on sale this month!
Check out how I cut the top corners of this card.
I just slid the card stock into the corner of the Everyday Label Punch like this!
 This is what it looks like when I have the card standing up!
Notice how I used the Classic Label Punch to hold up the easel.
Neat huh!

stamp set:  'Life is Beautiful' & 'Beautiful Autumn'
card stock:
  • Cajun Craze- 4 1/4 x 11"- score at 2 3/4 & 5 1/2"- fold; 4 1/4 x 1/2"; 1" strip- stamp leaf onto & punch out
  • Early Espresso- 4 x 5 1/4"
  • Very Vanilla- 3 3/4 x 4"- stamp tree onto; 3 3/4 x 5"- for inside of card; 2" strip- stamp words along bottom edge & punch out with 1 1/2" Circle Punch
  • Bumble Bee- 1" strip- stamp leaf onto & punch out
designer paper:  Plaid Tidings DSP- 3 3/4 x 1"
ink:  Early Espresso, Bumble Bee & Cajun Craze
other:  Everyday Label Punch; Gold Enamel Dots; 1 1/2" Circle Punch; Autumn Punch Pack (leaves); 3/8" Embroidered Ribbon; Classic Label Punch; dimensionals; glue dots

I hope you have a FABULOUS Friday!
Happy Stamping!
Hugs-
SUSIE

Thursday, October 1, 2020

Stampin' Up! Trimming the Town Suite

The Stampin' Up! Designer Paper SALE starts today!
October 1-31, 2020
+++++++++++++++
 
CHECK OUT THIS CUTE Wooden Star decor!
OH my gosh.....I so love how this project turned out!

I just love crafting!
And making 3D projects like this one is so much fun!

I used the Trimming the Town DSP to make this star decor!
Yes- the house, wreath & pine trees are all from the Trimming the Town DSP.
I use the 'Coming Home' stamp set to stamp the trees.
And I cut all of these images out using the Home Together Dies!
It was so fast & easy to cut these out.
 
This Trimming the Town DSP is on sale this month!
 
I embossed 2 pieces of 4 1/4 x 5 1/2" pieces of Whisper White
card stock using the Winter Snow Embossing Folder.
I then used the curved die from the Home Together Dies to get the snow hills.
 
For some added sparkle, I added some Wink of Stella to the snow edges; 
over the pine trees; on the wreath bow & 
in the center of the embossed snowflakes in the snow.
 Don't you think that this wooden star is cool!
Are you wondering how big it is?
It is 12" across from point to point.
 
  How did I do it?
  • I traced around the star onto the back side of the snowflake DSP.
  • I cut out the star with my scissors.
  • I used the Multipurpose Glue & glued the DSP star directly over the top of the wooden star.
  • I found a round bowl that was approximately 6" in diameter, traced around it- directly onto my Misty Moonlight card stock.
  • I used my scissors & cut out this circle.
  • I made the hills of snow with the Home Together Dies.
  • I cut out the house, wreath & trees with the Home Together Dies.
  • I cut a white snowflake from the So Many Snowflakes Dies.
  • I added several Snowflake Adhesive-Backed Embellishments. 
  • I added Wink of Stella to the trees, snow edge, center of embossed snowflakes (in the snow) & the bow on the wreath.
stamp set:  'Coming Home'
card stock:  Whisper White, Misty Moonlight
designer paper:  Trimming the Town DSP
ink:  Early Espresso
other:  Stampin' Cut & Emboss Machine; Home Together Dies; Winter Snow Embossing Folder; Snowflake Adhesive-Backed Embellishments; Wink of Stella; dimensionals; glue dots 

I hope you have a great Thursday!!
Happy Stamping!
Hugs-
SUSIE

Wednesday, September 30, 2020

Stampin' Up! Lots to Celebrate

 Here is a pretty holiday card using my 'Lots to Celebrate' stamp set!
 
There are a lot of products on this card that I love!
  • Many images from my 'Lots to Celebrate' stamp set-
  1. Seasons Greetings words
  2. Jar image
  3. Doily image
  4. Lid image
  5. Stars
  6. Dangling dots
  •  Jar Punch
  • Heartwarming Hugs DSP banner strips
  • Wrapped in Texture Embossing Folder 
  • Bow from the 'Gift Wrapped' stamp set.
  • Fancy Tag Topper Punch
This is a totally Susie card!
I hope you love it as much as I do!
Below are all of the supplies & measurements I used so that you can make it!
 
This Heartwarming Hugs DSP is on sale now!

stamp set:  'Lots to Celebrate' & 'Gift Wrapped'
card stock:
  • Mossy Meadow- 4 1/4 x 11"- score at 5 1/2"- fold in half for card base
  • Real Red- 4 x 5 1/4"; 2 x 3 1/2"- punch with Tag Topper Punch & Emboss using the Wrapped in Texture Embossing Folder
  • Whisper White-  3 3/4 x 5"; 2 3/4" strip- stamp Jar & punch out; 1" strip- stamp Doily & cut out with scissors; 1" strip- stamp jar lid 7 cut out with scissors
designer paper:  Heart Warming Hugs DSP- 1 x 4"; 1 x 5"; 1 x 5 1/2- use Triple Banner Punch & punch one end of each strip
ink:  Real Red & Mossy Meadow
other:  Stampin' Cut & Emboss Machine; Wrapped in Texture Embossing Folder; Jar Punch; Fancy Tag Topper Punch; Paper Snips; Gilded Gems; Triple Banner Punch; dimensionals; glue dots;
 
I hope you have a WONDERFUL Wednesday!!
Happy Stamping!
Hugs-
SUSIE

Tuesday, September 29, 2020

October Paper Pumpkin Kit- check it out!

 Here is some information about the October 2020 Paper Pumpkin Kit!
Make sure you subscribe by October 10th, 2020- 
if you want this kit sent to you!
 
I can add this to a workshop order for you & you'll get a code in an email to activate it!

This holiday season, share the joy of Paper Pumpkin! The Joy to the World Paper Pumpkin Kit is an exclusive holiday kit that provides a specially-designed box, enough supplies to create eight elegant cards!

With October’s magical kit, not only will you get a head start on your holiday crafting—you’ll get to create Christmas cards, share project ideas, and spread holiday cheer with Stampin’ Up! around the world!

About the October Kit -Joy to the World

  • Kit contains enough supplies to create eight cards—four each of two designs—and coordinating envelopes.
  • Kit includes die-cut pieces in English, French, and German. This will allow you to create cards you can use to connect with friends around the world—in their language!
    • Card size: 4-1/4" x 5-1/2" (10.8 x 14 cm)
    • Envelope size: 4-1/2" x 5-3/4" (11.4 x 14.6 cm)
  • Coordinating Colors: Cherry Cobbler, Crumb Cake, Early Espresso, Just Jade, Soft Sea Foam