Pages

Wednesday, April 14, 2021

Stampin' Up! Love You Always Specialty DSP

 I think that this card is a simple elegance one.
There are lots of little details that add that wow to it!
 
I combined some NEW with some OLD when making this card.

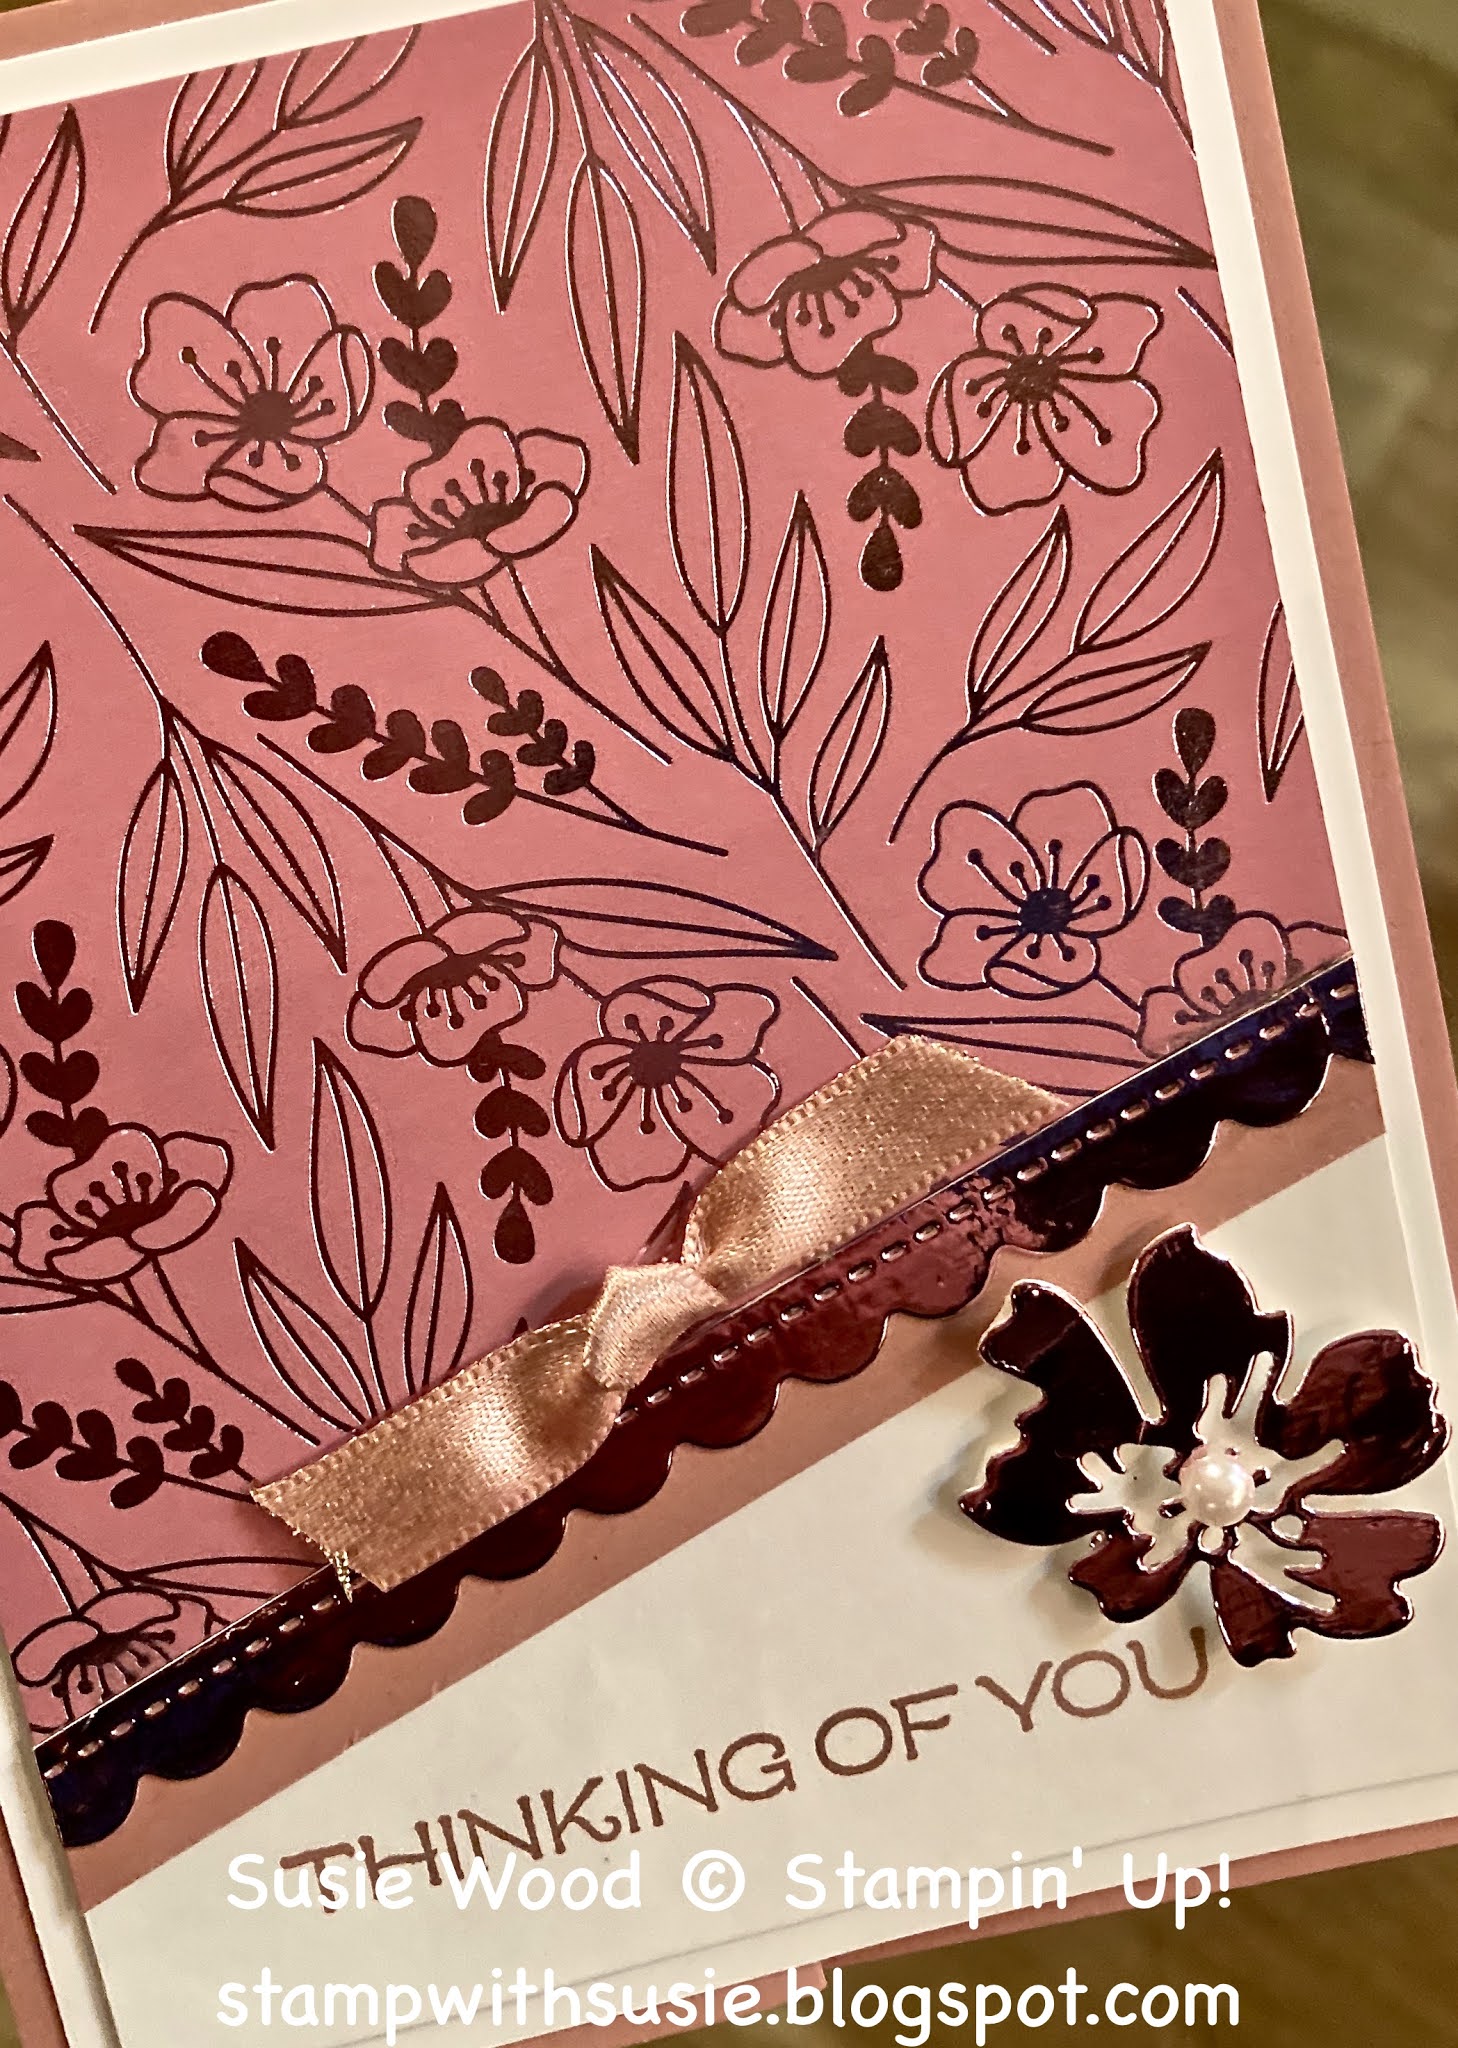
Check out this fun z fold card I made using the 
Love You Always Specialty DSP & coordinating Love You Always Foil Sheets.

Look at the scalloped edge & the die cut flower!
WOO HOOO!
These are NEW sneak peeks from the upcoming Annual Catalog.
They are the NEW Penned Flowers Dies.
I am in love with stitching on dies & this scalloped edge 
is going to be well used by me!
 This is what the NEW Penned Flowers Dies looks like!

Our of these specialty papers I made a Rococo Rose card & a Blushing Bride card.
 They are both just stunning in person!
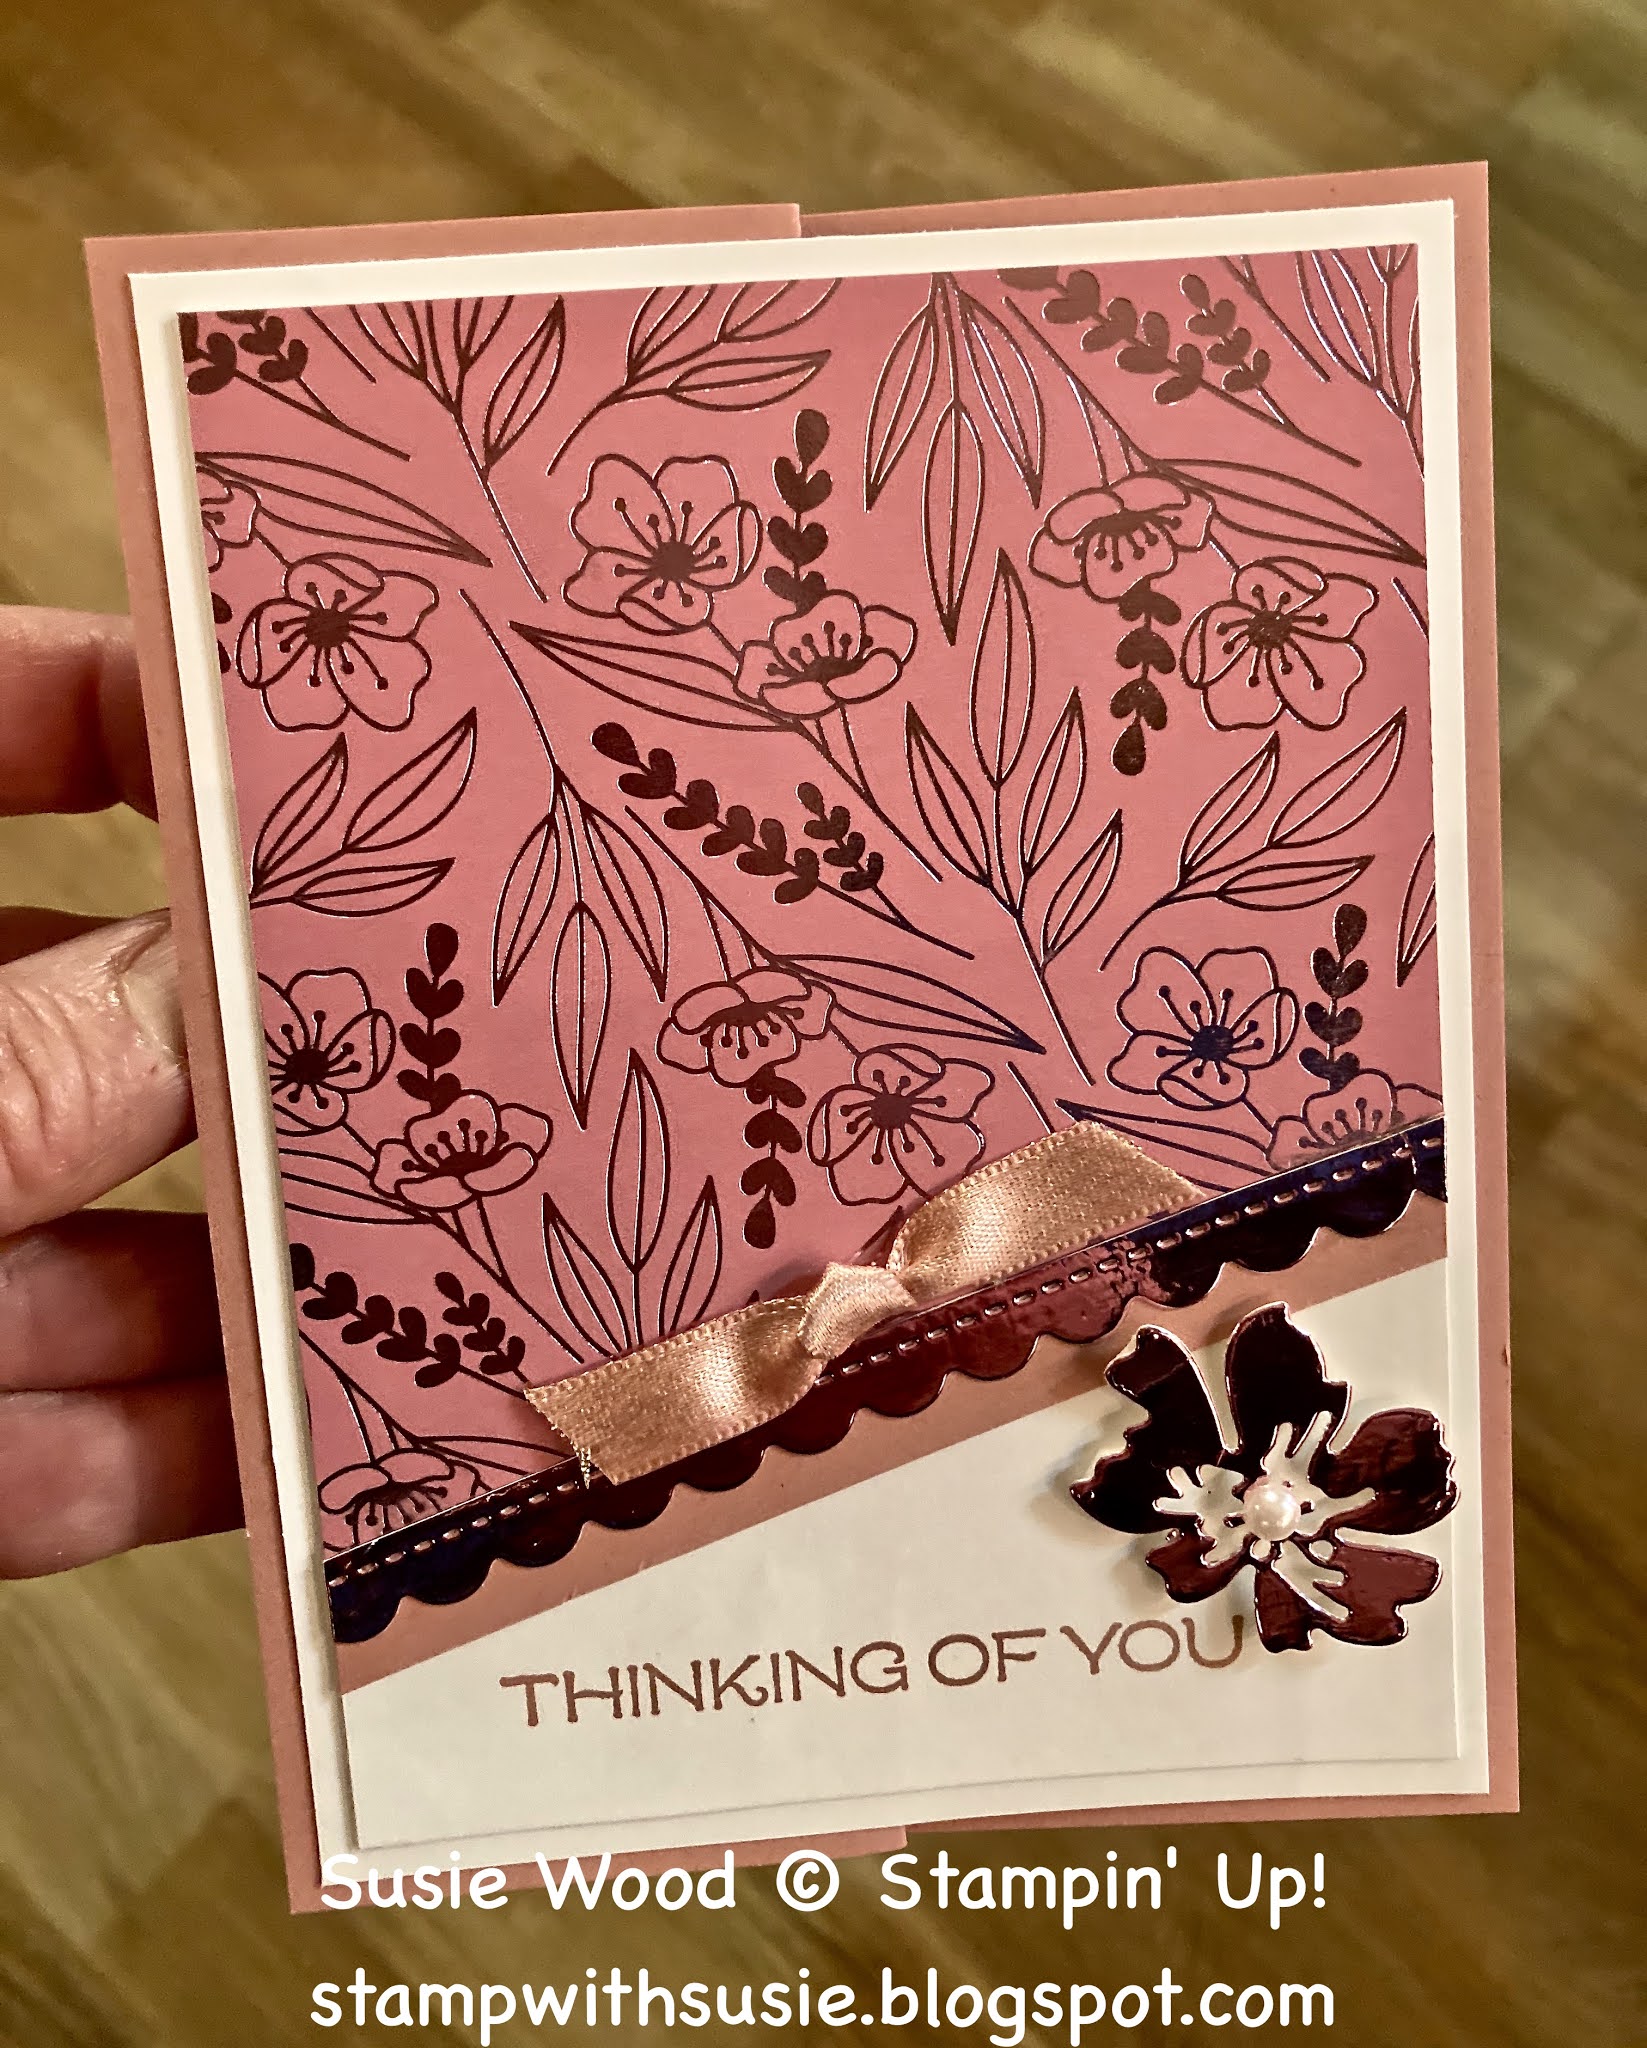
It is oh so pretty!

Here are the supplies & measurements.
stamp set:  'Vine Design' (words)
card stock:
  • Rococo Rose- 5 1/2 x 8 1/2'- score 2 1/8" & 4 1/4" to make a z fold for the card base
  • Basic White- 4 x 5 1/4"
  • Basic White- 3 3/4  5"- stamp words on the bottom edge & adhere the flower DSP to the part of this.
  • Basic White- 4 x 5 1/4"- for inside of card
designer paper:  
  • Love You Always Specialty DSP- 3 3/4 x 4"- diagonal cut a little off the bottom.  I measured it at the 1 1/4" mark on the right outside edge of my paper cutter & cut up.
  • Love You Always Foil Sheets- 1 1/2" strip- die cut flower; 1/2 x 5"- die cut scalloped edge
ink: Rococo Rose
other:  Stampin' Cut & Emboss Machine; Penned Flower Dies- AVAILABLE on 5/3/21; Basic Pearl; Blushing Bride Metallic Ribbon; dimensionals; glue dots

I hope you have a WONDERFUL Wednesday!!
Happy Stamping!
Hugs-
SUSIE

Tuesday, April 13, 2021

Clearance Rack Refresh!! Check it out!!

WOO HOO!!!  I know that some of you have been waiting for some more items to be added to the Clearance Rack!!  Your wish has been granted.....check it out by clicking on the link below at my on line store Clearance Rack!

Or go to- susiewood.stampinup.net

  • CLICK-  Shop Now
  • Under Sales & Specials CLICK - Clearance

Here is the current hostess code- H9MMMX9A

Or you can contact ME & I'll get it ordered for you as soon as I can.  

Happy Shopping!!  Hugs- SUSIE

Monday, April 12, 2021

Stampin Up Butterfly Gala

 I love this card!
It is a totally Susie card.
And I used LOTS of RETIRING products on it.

One of my favorite punches is this Butterfly Duet Punch.
I am sad to see it go!
 Check out how I stamped & colored the butterflies!
 
How did I do it?
1. Stamp the butterflies onto a piece of 2 1/2" Basic White card stock using Memento ink.
2. Color the Butterflies using a Blender Brush & Just Jade Ink Pad.
3.  Using the Blender Brush then add some Shaded Spruce ink along the wing edges.
4.  Add Wink of Stella over the butterflies.
5. Punch out with the Butterfly Duo Punch.
 
 For the sentiments I used the 'Woven Heirlooms' stamp set.
AND the words fit perfectly into the Stitched Shapes (Oval) Die cut.
 I choose the colors for this card to go with the Forever Greenery DSP.
Here are the supplies & measurements.
stamp sets:  'Woven Heirlooms' & 'Butterfly Gala'- RETIRING!
card stock:
  • Shaded Spruce- 5 1/2 x 8 1/2"- score at 4 1/4"- fold in half for card base
  • Just Jade- 4 x 5 1/4"- emboss with Subtle 3D Embossing Folder
  • Shaded Spruce- 3 x 4 1/4"
  • Just Jade- 3 1/2" strip- die cut scalloped oval
  • Basic White- 3" strip- stamp words & die cut stitched oval
  • Basic White- 2 1/2" strip- stamp butterflies with Memento ink
  • Basic White- 4 x 5 1/4"- for inside of card
designer paper:  Forever Greenery DSP-
inks:  Just Jade & Shaded Spruce
other:  Butterfly Duet Punch- RETIRING!; Blending Brushes; Wink of Stella; Just Jade Ribbon- RETIRING!; Stampin' Cut & Emboss Machine; Subtle 3D Embossing Folder-RETIRING!; Stitched Shapes (oval)- RETIRING!; Stitched Oval Dies (scalloped)- RETIRING!; dimensionals; glue dots
 
I hope you have a MARVELOUS Monday!!
Happy Stamping!
Hugs-
SUSIE

Sunday, April 11, 2021

This weeks TRY THIS SKETCH!

 Here is this weeks TRY THIS SKETCH!!!

Basic Black- 5 1/2 x 8 1/2"
Smoky Slate- 4 1/4 x 1/2 (x3)
Basic White- 2 1/2 x 3" 
 Check out the pretty shell card I made, casing this weeks sketch!!

What do you think?
Notice all of the details!
I think it turned out very pretty!
I love it!
Look closely at this shell, as I embossed it & then stamped over the top of it!
 
YES- this Seashells Embossing Folder is now available again to order.
As it had been out of stock, because it was so popular!
So you can now add it to your wish list!
 
Wow- look at all of the details here!
  1. embossed Shells 
  2. ribbon
  3. stamp & emboss the shell
  4. Opal Round embellishment

Here are the supplies & measurements.
stamp set:  'Friends are Life Seashells'
card stock:
  • Crumb Cake- 5 1/2 x 8 1/2"- score at 4 1/4"- fold in half for card base
  • Seaside Spray- 4 x 5 1/4"- emboss with the Seashells 3D Embossing Folder
  • Basic White- 2 3/4" strip- die cut stitched circle & stamp words onto it
  • Crumb Cake- 4 x 5 1/4"- die cut & then fussy cut out the shell with your scissors.
  • Basic White- 4 x 5 1/4"- for inside of card
ink:  Crumb Cake
other:  Stampin' Cut & Emboss Machine; Seaside Shells Dies; Seashells 3D Embossing Folder; Stitched Shapes Dies (circle)- RETIRING!; Opal Rounds; Seaside Spray Scalloped Linen Ribbon- RETIRING!; dimensionals; Tear & Tape (or strong adhesive to add ribbon onto the card front.
Look at this Seashells 3D Embossing Folder!
And check out how this die fits perfectly over the top of it to cut it out!
It is all connected, so for me to use just this single shell on this card,
I had to take my Paper Snips & fussy cut out the shell.
It wasn't hard!

I did end up stamping then with the shell stamp, directly over
the top of the shell to give it some added color!
 
Wow- this is one of the cards that everyone joining me for my 
upcoming 40 Card Spring Class will be making!

I hope you have a SUPER SPECIAL Sunday!!
Happy Stamping!
Hugs-
SUSIE

Saturday, April 10, 2021

Stampin' Up! Forever Fern

 It is SIMPLE SATURDAY!
Check out today's simple card!
 
I used the 'Forever Fern' stamp set.
 This is the color of the leaves in order as they appear above-
Just Jade
Old Olive
Shaded Spruce  
Pretty Peacock

My inspiration for this card is a version of a card I got 
from my demonstrator friend Judy Garza.

Here are the supplies & measurements.
stamp set:  'Forever Fern'
card stock:
  • Thick Basic White- 5 1/2 x 8 1/2"- score at 4 1/4"- fold in half for card base
  • Old Olive- 2 x 5 1/2"
  • Basic White- 2" strip- stamp leaves & die cut
  • Old Olive- 1/4 x 5 1/2"
  • Basic White- 4 x 5 1/4"- for inside of card
inks:  Just Jade; Old Olive; Shaded Spruce & Pretty Peacock
other:  Stampin' Cut & Emboss Machine; Stitched Shapes; Ornate Garden Ribbon (Old Olive); glue dot

I hope you have a SPECIAL Saturday!!
Happy stamping!
Hugs-
SUSIE

Friday, April 9, 2021

Stampin' Up! Baby Pull Toys

 What a cute stamp set this is!
I used the 'Baby Pull Toys' that is on page 64 in the Spring Mini Catalog.

You won't believe what pack this Gray Granite DSP is from!
It is from the Peony Garden DSP pack & I combined it
with the Gray Granite & Balmy Blue card stock!
I love the way it turned out!
 
This baby boy card is just one of the many cards that everyone 
joining me for my upcoming Annual 40 Card Class will be making.
I have been super busy & stamping away every spare minute I have!
I literally have stamps everywhere in piles,
as I've been creating & getting ready for this Annual event.

My Annual 40 card classes are on 4/24/21 & 5/1/21.
The deadline to sign up for them is tomorrow- 4/10/21.
If you want to join me for this event in person or get a card pieces in the mail-
you can find out more about it by CLICKING HERE!
Here are the supplies & measurements.
stamp set:  'Baby Pull Toys'
card stock: 
  • Gray Granite- 4 1/4 x 11"- score at 5 1/2"- fold in half for card base
  • Balmy Blue- 3 3/4 x 5"
  • Gray Granite- 1 x 5 1/2"
  • Gray Granite- 3" strip- die cut scalloped circle
  • Basic White- 2 1/2" strip- stamp elephant & punch out with 2" circle punch
  • Basic White- 1" strip- stamp words & die cut
  • Basic White- 4 x 5 1/4"- for inside of card
designer paper:  Peony Garden DSP- 4 x 2"
ink:  Basic Gray & Balmy Blue
Stampin' Blends:  Light & Dark Smoky Slate
other:  Stampin' Cut & Emboss Machine; Layering Circle Dies (Scalloped Circle); Sweetly Stitched Dies (stitched rectangle); 2" Circle Punch- RETIRING!; Well Dressed Combo Twine (Basic Gray); dimensionals; glue dots

I hope you have a FABULOUS Friday!!
Happy Stamping!
Hugs-
SUSIE

Thursday, April 8, 2021

Stampin' Up! Sneak Peek!

 Oh my GOSH!!!!
I have several NEW Sneak Peeks for you today!!
 
I am SO EXCITED to show you these NEW 2021-2021 In Colors!!
Aren't they all just gorgeous!!!
 
PLUS check out several other upcoming new products too! 
These NEW products can be ordered starting on May 4th, 2021!!

I just got these new products & made this card last night.
I can't wait to play with them some more.

I also used a NEW bundle that is a stamp set & punch!
(And you all know how I LOVE punches!)
Plus I used some coordinating ribbon, little flower embellishments 
& a NEW die too!
So check them out!!!!
FUN!  FUN!  FUN!
 
*NOTE-
LOOK at the flowers in bottom of the photos above.
I put both of them together on the same block so 
that I could punch them both out at the same time too!
 2021-2021 In Colors
Polished Pink
Fresh Freesia
Evening Evergreen
Soft Succulent
Pale Papaya

Here are the supplies & measurements.
stamp set:  'Flowers of Friendship'- AVAILABLE 5/4/21
*These NEW card stock colors & ink are AVAILABLE 5/4/21
card stock:
  • Thick Basic White- 5 1/2 x 8 1/2"- score at 4 1/4"- fold in half for card base
  • Basic White- 3 3/4 x 5"- use to layer the 1" strips of color onto
  • Polished Pink- 3" strip- stamped both flowers & punched out together
  • Fresh Freesia- 3" strip- stamp both flowers & punch out together
  • Evening Evergreen- 1" strip- stamp leaves & punch out
  • Soft Succulent- 1" strip- stamp leaves & punch out
  • Pale Papaya- 3" strip- stamp both flowers & punch out together
  • Basic White- 1 1/2" strip- stamp words onto & die cut out
  • Basic White-  4 x 5 1/4"- for inside of card
ink:  Polished Pink; Fresh Freesia; Evening Evergreen; Soft Succulent; Pale Papaya
other:  Stampin Cut & Emboss Machine; Scalloped Contour Dies- AVAILABLE 5/4/21; Flowers & Leaves Punch- AVAILABLE 5/4/21; Loose Flower Flourishes- AVAILABLE 5/4/21; Evening Evergreen Ribbon- AVAILABLE 5/4/21; dimensionals; glue dots

So what do you think?
Are you excited about these NEW products!!
 
I hope you have a GREAT Thursday!!
Happy Stamping!
Hugs-
SUSIE

Wednesday, April 7, 2021

Stampin' Up! Danelion Wishes

 Check out my dandelions!
They are from the 'Dandelion Wishes' stamp set & are RETIRING!
 I colored directly onto my Clear Block D using 
my Old Olive & Pool Party Stampin' Write Markers.
I then lightly sprayed the block with water 
& pressed the wet block down over my dandelions.
The one on the right I thought I got too much water onto & it smeared bad.
Maybe I should have added a tiny bit more water to the one on the left???
I used Old Olive to make it look more like grass.
And Pool Party to make it look more like sky.
 
I added Wink of Stella over the dandelions to make the sparkle!
They are really pretty in person.
 
Here are the supplies & measurements.
stamp set:  'Dandelion Wishes'-
card stock:
  • Old Olive- 5 1/2 x 8 1/2'- score at 2 1/8 x 4 1/4"- fold in half to make z fold card base
  • Pool Party- 3 3/4 x 5"
  • Basic White- 3 1/4 x 4 1/2"- stamp dandelions onto
  • Old Olive- 3/4 x 4"
  • Old Olive-2 1/2" strip- punch out Label Me Lovely Punch
  • Pool Party- stamp words & die cut out with 1 3/4" Circle
  • Basic White-  3 1/4 x 4 1/2"- for inside of card
ink:  Memento & Pool Party
Stampin' Write Markers:  Pool Party & Old Olive
other:  Stampin' Cut & Emboss Machine; Subtle 3D Embossing Folder- RETIRING!; Layering Circle Dies (1 3/4" circle); Black Matte Dots; Ornate Garden Ribbon (Old Olive)- RETIRING!; Label Me Lovely Punch; dimeensionals; glue dots

I hope you have a WONDERFUL Wednesday!!
Happy Stamping!
Hugs-
SUSIE

Tuesday, April 6, 2021

Stampin' Up! You are Amazing

 Here is another fun card I made with some of my 1/2" strips 
of card stock in my scrap box. 

I think it turned out really cute!!
It is a bright & cheery retro card!
And it could be for so many different occasions!
 I used the Playing With Patterns DSP.
Notice how I used the extra piece of DSP to cover the envelope flap,
so that it coordinated.

The words are from the 'You Are Amazing' stamp set
that is on page 7 in the Spring Mini Catalog.

Here are the supplies & measurements.
stamp set:  'You Are Amazing'
card stock:
  • Night of Navy- 5 1/2 x 8 1/2"- score at 4 1/4'- fold in half for card base
  • Coastal Cabana- 3 3/4 x 4 1/4"- add strips to this & then trim off at a diagonal
  • Bumblebee- 1/2 x 6"
  • Night of Navy-1/2 x 5 1/2"
  • Purple Posy- 1/2 x 4"
  • Calypso Coral- 1/2 x 2"
  • Night of Navy- 2 1/4 x 2 3/4"
  • Basic White-  2 x 2 1/2"- stamp words onto
  • Basic White- 4 x 5 1/4"- for inside card
designer paper:  Playing with Patterns- 2 3/4 x 3 1/4"
ink:  Night of Navy
other:  Playing with Patterns Resin Dots; Dimensionals

I hope you have a TERRIFIC Tuesday!!
Happy stamping!
Hugs-
SUSIE

Monday, April 5, 2021

Stampin' Up! Pampered Pets

 I am a huge animal lover & love this Playful Pets Suite.
Check out this pretty kitty!!
 
Our pets are part of of our families & when something happens 
to them we grieve & miss them terribly!
This stamp set has some great sympathy words in it!

I made this card into a fun fold!
The front part flips up.
This is what it looks like when it is opened up.
Check out all of the coordinating products in this Playful Pets Suite!
They can be found in the Annual Catalog on pages 40-42.
 
For this card I used these products in the suite.
  • 'Pampered Pets' stamp set
  • Pets Dies
  • Playful Pets DSP
Are you wondering where I got this cool label shape?
It is from thee Tasteful Label Dies. 

Here are the measurements & supplies.
stamp set: 'Pampered Pets'
card stock:
  • Basic Black- 4 1/4 x 5 1/2"- for card base
  • Real Red- 4 x 5 1/4"-emboss with Subtle 3D Embossing Folder
  • Basic Black- 3 1/4 x 8 1/2"- score at 4 1/4"- fold in half
  • Real Red-  3 x 4"
  • Basic White-2 1/4" strip
  • Basic White- 1 1/2" strip- stamp kitty & die cut
  • Basic White- 3 x 4"- for inside of card
designer paper: Playful Pets DSP- 2 3/4 x 3 3/4"- RETIRING!
ink:  Memento & Real Red
Stampin' Blends:  Light Flirty Flamingo & Light Smoky Slate
other:  Stampin' Cut & Emboss Machine; Pets Dies; Tasteful Label Dies; Subtle 3D Embossing Folder-RETIRING!; dimensionals
 
I hope you have a MARVELOUS Monday!!
Happy Stamping!
Hugs-
SUSIE

Sunday, April 4, 2021

This weeks TRY THIS SKETCH- HAPPY EASTER!

 Here is this weeks TRY THIS SKETCH!

  • Basic Black 4 1/4 x 11"- score at 5 1/2"- fold in half or card base
  • Smoky Slate- 4 x 4"
  • Basic White- 2" circle

Check out my card!
I made this fun floating acetate strip card!
I actually cut a window sheet to 4 x 4" & adhered 1/2" strips of various
colors of card stock directly onto it.
I then popped up the acetate with the Foam Adhesive Strips & 
adhered this to a 4 x 4" Basic White piece of card stock.
 
Note:  The 1/2" strips were all actually in my scrap box!!!
 Check out these 2 cards.
They are REVERSE of each other. 

The top one is layered onto Basic White card stock with a 
Basic Black layer under it & Basic Black words.
The bottom one is layered onto Basic Black card stock with a 
Basic White layer under it & Basic White words.

Which one do you like better?
The top one or the bottom one?
 I wish you could see this in person, as it is really cool 
with the 1/2" strips mounted onto the window sheet!
 This has the Basic Black words & layering.
 I colored the eggs & the basket with my Stampin' Blends & then added some 
Wink of Stella over the top of them for some added sparkle!
 This has the Basic White words & layering.

I used Adhesive Sheets with the die cut words.
How did I do it?
Put the Adhesive Sheet onto the back side of Basic White card stock.
Die cut the words.
Then removed the sheet off of the back of the words & stuck onto the card front.

Here are the supplies & measurements.
stamp set:  'Springtime Joy'
card stock:
  • Highland Heather- 4 1/4 x 11"- score at 5 1/2" & fold in half for card base
  • Basic White- 4 1/4 x 4 1/4"
  • Basic Black- 4 x 4"
  • Window Sheet- 4 x 4"
  • Various colors in 1/2" strips
  • Basic White- 1 1/2" strip- die cut words
  • Basic White- 2" strip- stamp bunny & basket/eggs & fussy cut out with your scissors
  • Basic White- 4 x 5 1/4"- for inside of card
ink:  Memento
Stampin' Blends:  Dark Magneta Madness; Dark Balmy Blue; Dark Daffodil Delight; Dark Highland Heather; Dark Old Olive; Dark Petal Pink
other:  Stampin' Cut & Emboss Machine; Word Wishes; Basic Pearls; Wink of Stella; Foam Adhesive Strips; Seal Plus (to adhere strips to the window sheet); Adhesive Sheet (for words); dimensionals
Here are some more floating acetate strip cards that I will give the kids today.
 
WOW!
It is suppose to be a gorgeous day outside here in Iowa today.
We will be spending the afternoon/evening with our kids outside.
I cooked up a storm last night & have some yummy food prepared!
 
I hope you all have a blessed Easter!!!
Today we celebrate the true meaning of Easter with the
pain & suffering that Jesus had & his rising from the dead.
 Hallelujah!!!

Saturday, April 3, 2021

Stampin' Up! Well Suited

 It is SIMPLE SATURDAY!
And I have another fun guy card to share with you!!
Just change the words and or colors of DSP
& this card could be for any occasion.
I used some of the products form the Well Suited Suite. 
Check out the stripped dsp from the Well Suited DSP pack.
And the words are from the 'Handsomely Suited' stamp set.
 
 So what do you think?
I hope you like it & use this layout to make one too.

Here are the supplies & the measurements.
stamp set:  'Handsomely Suited'
card stock:
  • Basic Gray- 5 1/2 x 8 1/2"- score at 4 1/4"- fold in half for card base.  Emboss the front of the card using the Subtle 3D Embossing Folder
  • Basic Black- 5 1/4 x 1 3/4"
  • Basic Black- 3/4 x 4 1/4"
  • Basic Black- 2" strip- punch out Tailored Tag Punch- cut this is half horizontally & layer behind the words
  • Basic White- 2' strip- stamp words & punch out with the Tailored Tag Punch
  • Basic White- 4 x 5 1/4"- for inside of card
designer paper:  'Well Suited DSP- 5 x 1/2"
ink:  Memento
other:  Stampin' Cut & Emboss Machine; Subtle 3D Embossing Folder; Well Suited Twine Combo; Tailored Tag Punch; Metallic Pearls (Silver); dimensionals; glue dots
 
I hope you have a SPECIAL Saturday!!
Happy Stamping!
Hugs-
SUSIE

Friday, April 2, 2021

Stampin' Up! Well Suited

 We all need a card to give to guys at times throughout the year- don't we.
I often hear comments that guy cards are hard to make & come up with ideas for.
Well- last night I need a guy card & this is what I whipped up!

I used some of the products in the Well Suited Suite
found on pages 66 & 67 in the Spring Mini.
 This is a fun z fold card (my favorite fold)!
And check out the die from the Suit & Tie Dies that I used.
*Bow die *Center of Bow die *and 6 button dies
 
So what do you think? 
If is something fun & different & I like it a lot! 

Here are the supplies & measurements.
stamp set:  'Happy Thoughts'
card stock:
  • Basic Gray- 5 1/2 x 8 1/2"- score at 2 1/8" & 4 1/4"- fold into Z for the card base
  • Basic White- 4 x 5 1/4"
  • Smoky Slate- 3 3/4 x 5"- emboss with Subtle Embossing Folder
  • Basic White- 5/8 x 3"- stamp words onto
  • Basic Gray- 1 1/4" strip- die cut bow; center of bow & 6 buttons
  • Basic White- 4 x 5 1/4"- for the inside of the card
designer paper:  Well Suited DSP- 3 1/2 x 3 1/2"- cut in half diagonally to make 2 triangles
ink:  Basic Gray
other:  Stampin' Cut & Emboss Machine; Suit & Tie Dies; Subtle 3D Embossing Folder Banners Pick A Punch (flag ends of word strip); dimensionals; glue dots

I hope you have a FABULOUS Friday!!
Happy Stamping!
Hugs-
SUSIE

Thursday, April 1, 2021

Stampin' Up! Happy Thoughts Triple Layering

 Last night I was playing with the triple stamping technique
& instead of stamping, I decided to use DSP with it
& make it triple layering!

Check out these 2 cards.
They are exactly the same- just different colors of card stock
for the bases & layers.

Which one do you like better?
THIS ONE OR THAT ONE?
The Misty Moonlight one or the Bumblebee one?
Isn't it neat how this layers!
And it is so easy to do!
I like both of them, but this one is my favorite!
I think that adding the darker color- like the Misty Moonlight here
just makes it pop more!
If you look closely you can see the stitching around the edges that the 
Stitched Rectangle Die made!
Here are the supplies & measurements for these cards.
stamp set:  'Happy Thoughts'
card stock:
  • Bumblebee or Misty Moonlight- 5 1/2 x 8 1/2"- score at 4 1/4"- fold in half for card base
  • Bumblebee or Misty Moonlight- 3 1/4 x 4 5/8"
  • Bumblebee or Misty Moonlight- 2 x 3 3/8"
  • Bumblebee or Misty Moonlight- 1/2 x 3"
  • Basic White- 2" strip- stamp words & punch out with Story Label Punch
  • Basic White- 4 x 5 1/4"- for inside of card
designer paper:  Flowers for Every Season DSP- RETIRING!
  • 4 x 5 1/4"- use 2 of the Stitched Rectangle Dies to cut out center
ink:  Misty Moonlight
other:  Stampin' Cut & Emboss Machine; Stitched Rectangle Dies; Bumblebee or Misty Moonlight Ribbon- RETIRING! 2019-2021 In Color Enamel Dots- RETIRING!; Story Label Punch- RETIRING!; dimensionals; glue dots
 I took a piece of 4 x 5 1/4" DSP & cut out these 2 Stitched Rectangle Dies.
 I then layered them onto card stock pieces like this!

I hope you have a GREAT Thursday!!
Happy Stamping!
Hugs-
SUSIE