Pages

Saturday, October 13, 2018

Spooky little Pumpkin!

Look at this cute little spooky pumpkin!!!

Look how I did the face on this pumpkin!!!  I am so excited about it, as I think he is super cute!!

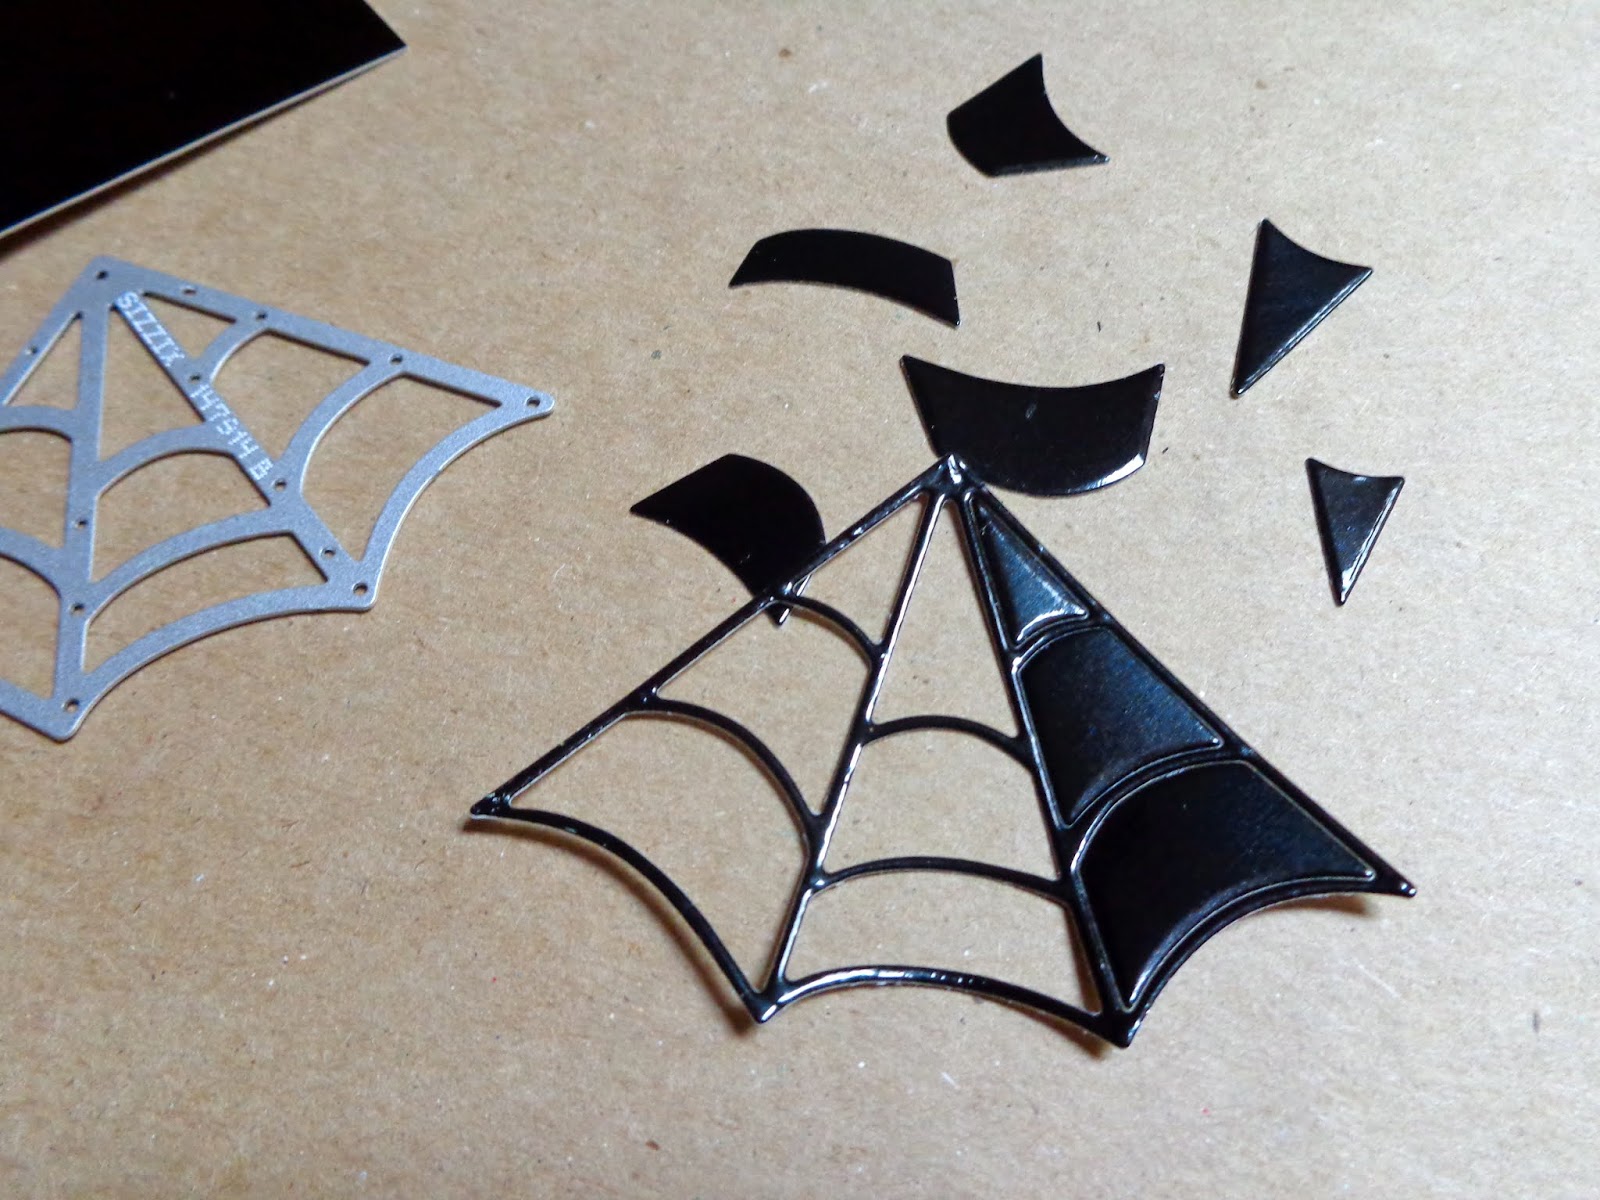
I was cutting out Black Foil Spider Webs & pushing out the (negative) pieces that normally I'd just throw away. But I got to looking at those pieces & decided that they would make an adorable face for my spooky little pumpkin box.

What is the box?  It is from the Takeout Treats Thinlits Dies in the Holiday Catalog on pg. 50.  This box is the perfect size to add a little treat to & give to someone special.

There is a coordinating stamp set that goes with this framlits too......so be sure you check it out.  It has stars, hearts & more in this set!  
Here I'm cutting out the spider webs using my Black Foil paper.
Here is what the pieces look like when you push them out of the web.
And here is my spooky little pumpkin.  I added an Old Olive Leaf & Black Glitter Organdy ribbon to the top of it.  

card stock:
  • Pumpkin Pie- 5 1/2 x 8 1/2"- cut out 2 of the Box pieces
  • Old Olive- 1 1/2" strip to punch out leaf for top of pumpkin 
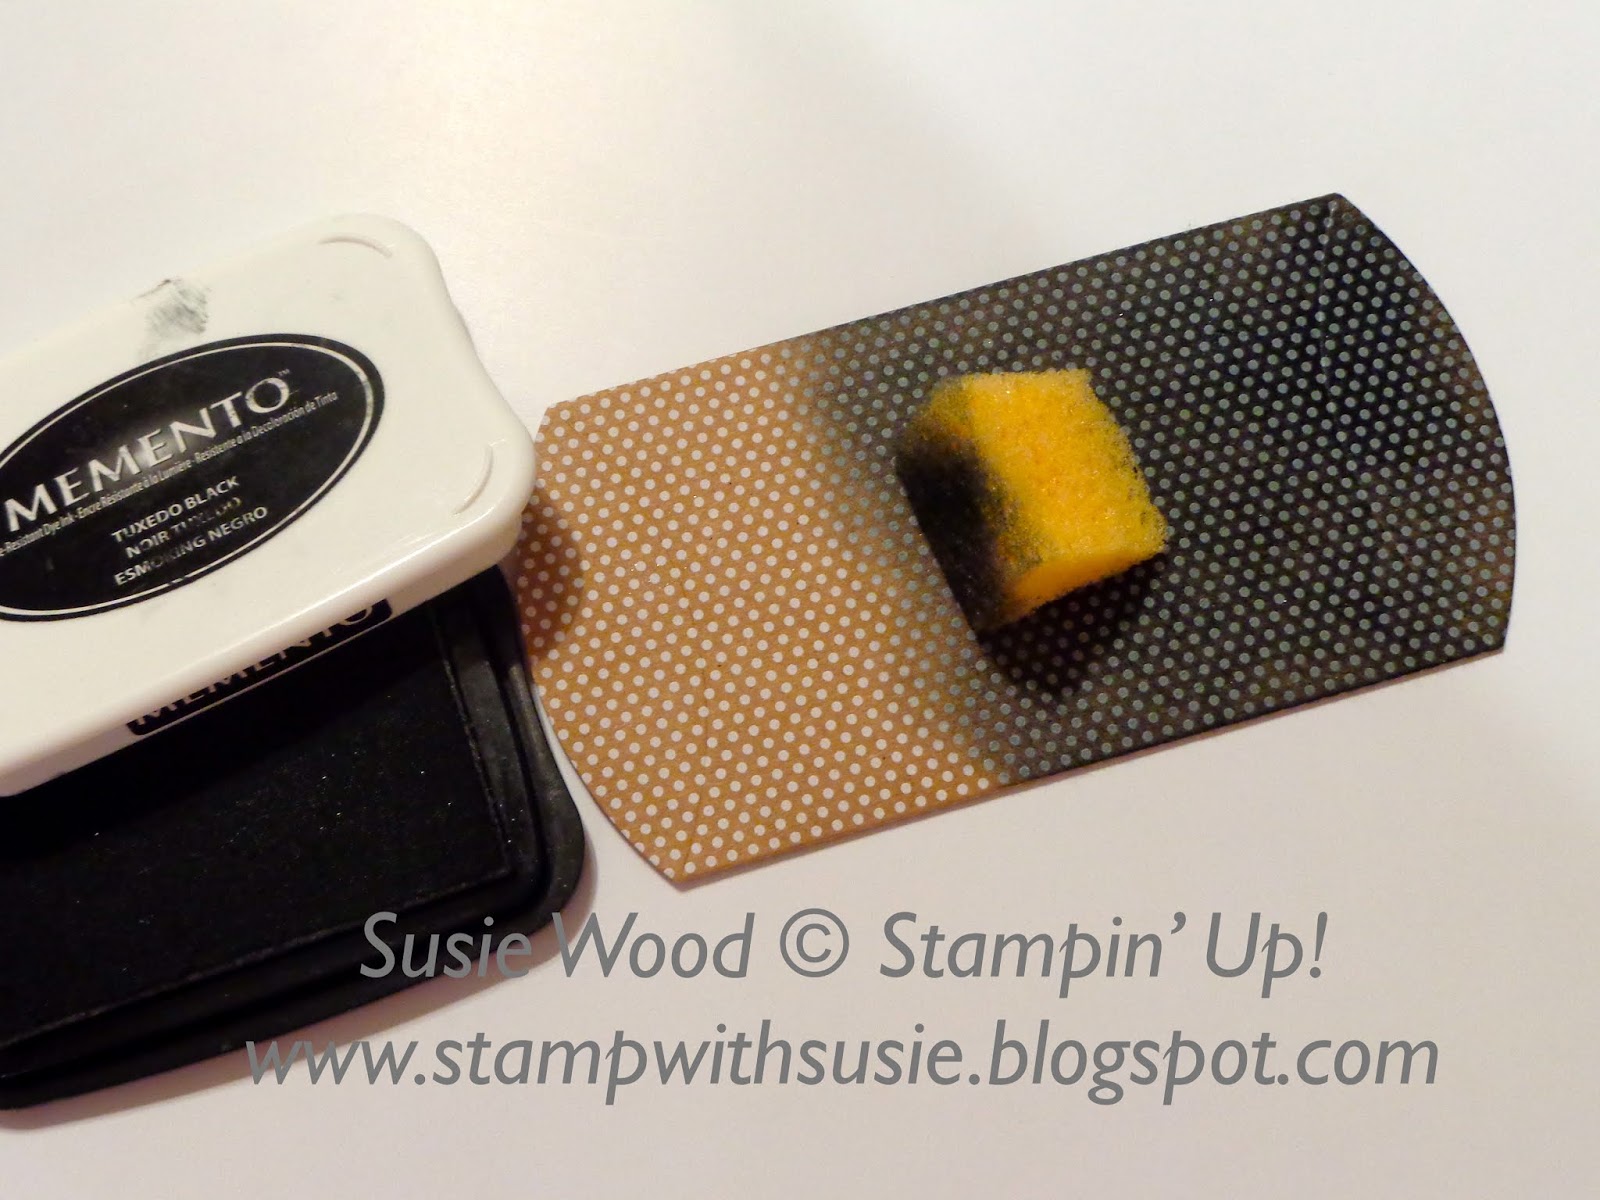
  • Black Foil- 2 3/4" strip to use Spider Web from to cut & use the reverse images for the face of the pumpkin
other:  Takeout Thinlits Dies; dimensionals, Glue Dots, Tear & Tape
+++++++++
I have a super busy weekend full of LOTS of stamping!!

Last night I had one of my monthly stamp classes at our home.
I burnt the midnight oil cutting card stock when everyone went home.  
This morning I'm up early to cut more card stock. 
And I'm having one of my monthly stamp classes here at our home.
This afternoon I'm having one of my Annual Halloween Treats Classes.
And tonight I'll be burning the midnight oil cutting more card stock.
Tomorrow morning I'll leave early & head to Hiawatha for my morning & afternoon monthly classes there. 
And then tomorrow night I'm having my other Annual Halloween Treats Class in Hiawatha!
WOW.......6 stamp classes in 2 1/2 days. 
I can't wait to see everyone joining me & spend our time together stamping!  

Gotta run.....
I hope you have a SENSATIONAL Saturday!!
Happy Stamping!
Hugs-
SUSIE

Friday, October 12, 2018

A cute little witch!

Gosh........have you seen the Toil & Trouble DSP in the Holiday Catalog on pg. 49?  Check it out!  IT has some cute images in it.  And this witch, cat & cauldron are all from the DSP!  I didn't have to stamp them or color them.....I just had to cut them out.  There are several different witch images & one of them coordinates with the Cauldron Framelits Dies.  This cat & cauldron also coordinate with those framelits too!
There is alot of things here.......check out the spider web in the upper left corner & did you notice the spider trinket?  You can't really tell by the photo, but I added my Fine Tip Glue to the green boiling goo in the cauldron.  I stamped the broom, colored it with my Stampin' Blends & cut it out with a framelit.

This card is another one of the projects that everyone coming to my Halloween Treats Classes will be making with me!

I'll share more details about this cards in the next few days.  It has been crazy here with kids, baby piggies, big piggies & LOTS of stamp classes.  

stamp set:  'Cauldron Bubble'
cardstock:
  • Lemon Lime Twist- 4 1/4 x 11"- fold in half for card base
  • Black Foil- 1 x 5 1/2"; 2 3/4" strip (to cut out Spider Web framelit) 
  • Whisper White- 3 1/2 x 3 1/2" (stamp stars coming out of pot); 1 1/2" strip (to stamp broom onto & cut out with framelit); 4 x 5 1/4" (for inside of the card)
  • Basic Black- 3 3/4 x 3 3/4 (for layer on front of card)
designer paper:
  • Broadway Bound DSP- 4 x 2"- stripped piece
  • Toil & Trouble DSP- Witch, Cauldron, Cat images to cut out using the Cauldron Framelits
ink:  Black Memento
Stampin' Blends:  Lemon Lime Twist- to color stars; Dark Crumb Cake to color Broom handle; Dark Daffodil Delight to color Broomother:  Big Shot, Magnetic Plaform, Cauldron Framelits Dies, Spider Trinkets; Lemon Lime Twist Ombre Ribbon; Glitter Enamel Dots (Lemon Lime Twist); Everyday Label Punch, Dimensionals, Glue Dot, Black Twine
+++++++++++
We have another busy day!!  I have kids today & then stamp class here at our home tonight.  Woo Hoo!

I hope you have a FABULOUS Friday!!
Happy Stamping!
Hugs-

SUSIE

Thursday, October 11, 2018

A spooky haunted house!

Is this house now more spooky?
I colored the windows & the shutters using my Stampin' Blends!
And then I added this cute little ghost too!
Oh & I changed the color of the house!
 So when I started cutting card stock last night for this card.......I decided I would add a little more to it.  

You can see the other one that I posted a few days ago BY CLICKING HERE!
I think they are both cute!
Which one do you like better?
I think that this one is a little more spooky for Halloween!
That little ghost just makes me smile.
I had a hard time trying to decide where I wanted to put him. 
I thought he was a little more proportioned coming out the window in the middle of the card instead of the chimney or one of the trees on the other side of the house, as those windows are too close to the tree & the moon.  


I added some Wink of Stella too to the windows & the ghost!  You can't have too much shimmer can you?
 stamp set:  'Farmhouse Christmas', 'Cauldron Bubble' (ghost) & 'September Paper Pumpkin' (words)
card stock:

  • Night of Navy-  4 1/4 x 11" (fold in half for card base)
  • Crushed Curry- 1/2" strip (for words & punch out using Classic Label Punch); 2 1/2" strip (to punch out moon using the 2 1/4" Circle Punch
  • Early Espresso-  3 1/4" strip (to stamp tree onto & cut out with the framelit)
  • Basic Gray- 2 3/4" strip (to stamp house onto & cut out with the framelit)
  • Basic Black- 1 1/2" strip (to cut out fence with the framelit); 4 1/4 x 3 1/4" (for layer piece)
  • Whisper White-5 x 3 3/4"(for inside of the card); 1 1/2" strip (stamp ghost & cut out with the framelit)
designer paper:
  • Twinkle Twinkle DSP- 4 x 3"
ink:  Black Memento
Stampin' Blends:  Dark Daffodil Delight & Light Basic Black
other:  Classic Label Punch, Big Shot, Magnetic Platform, Farmhouse Framelits Dies, Cauldron Framelits Dies, Champagne Shimmer/Rubbing Alcohol mix, Dimensionals, 2 1/4" Circle Punch, Wink of Stella
+++++++++
I hope you have a great Thursday!!!
Happy Stamping!
Hugs-
SUSIE

Wednesday, October 10, 2018

'Trick or Tweet' puppy!

What a cute little puppy this is that is in the 'Trick or Tweet' stamp set. 

This little treat holder is another one of the projects for my upcoming Halloween Treats classes.  
I used the Scalloped Tag Topper Punch for the sides & then made a little "box" for the bottom.  

stamp set:  'Trick or Tweet'
card stock:  
  • Gorgeous Grape - 2 x 5"; 2 x 5"- punch out one end of each of these with the Scalloped Tag Topper Punch; 5 x 5"- score 1 1/2" on all 4 sides to make box
  • Basic Black -  2 1/2" strip (to punch out Starburst Punch)
  • Whisper White-  2 1/2" strip (to stamp puppy onto & punch out using the 2" Circle Punch; 2 1/2 x 3/4" (to stamp words onto & flag the end using your Paper Snips)
designer paper:
  • Toil & Trouble-  2 x 1 1/4"; 2 x 1 1/4" (to put on front & back of box)
ink: Black Memento
Stampin' Blends:  Bronze, Light Gorgeous Grape, Light Basic Black , Light Soft Suede
other:  Starburst Punch, 2" Circle Punch, Tear & Tape, Dimensionals, Glue Dots, Scalloped Tag Topper Punch, Gorgeous Grape Ribbon, Simply Scored Scoring Tool
+++++++++
I hope you have a WONDERFUL Wednesday!!
Happy Stamping!
Hugs-
SUSIE

Tuesday, October 9, 2018

Spooky & Spiders!

I have to be honest.....when I first saw the 'Making Every Day Bright' stamp set I wasn't thrilled about it.  The more I got to looking at it I saw lots of possibilities.  You all know I'm a punch girl- so it is very cool that it coordinates with the Christmas Bulb Builder Punch.  

This card is cute!!  I love the little spiders I added to coordinate with the Light Bulb Spider Web.  The little spiders & the Spooky words are from my September Paper Pumpkin kit.  I stamped the little spiders & then used my Basic Black Stampin' Write Marker to draw the dangles. 

Look in the upper left corner & check out the cute Spider Trinket!  And the Spider web I made out of Vellum using the Cauldron Framelits Dies.  

So this is another one of the cards that everyone will be making at my Halloween Treats classes this coming weekend!  

stamp sets: 'Making Every Day Bright' & 'September Paper Pumpkin'
card stock: 
  • Pumpkin Pie- 4 1/4 x 11" (score at 5 1/2" & fold in half for card base); 1 1/2" strip (to punch out Light Bulbs)
  • Lemon Lime Twist- 2 1/2 x 1 1/4" (to stamp SPOOKY words onto); 1 1/2" strip (to stamp Light Bulb onto & punch out); 4 3/4 x 3 1/2"
  • Smoky Slate- 4 1/2 x 3 1/4"
  • Basic Black- 5 x 3 3/4'; 1/2" strip (for light bulb ends); 2 3/4 x 1 1/2"(to layer SPOOKY words)
  • Vellum-  2 3/4" strip (to cut Spider Web out with framelit);
ink:  Black Moment
Stampin' Write Marker:  Basic Black
other:  Christmas Bulb Builder Punch, Spider Trinkets, Big Shot, Magnetic Platform, Cauldron Framelits Dies, Granny Apple Green ribbon, Dimensionals, Glue Dots, Champagne Shimmer mixed with Rubbing Alcohol
++++++++++
I hope you have a TERRIFIC Tuesday!!
Happy Stamping!
Hugs-
SUSIE

Monday, October 8, 2018

Paper Pumpkin FLASH SALE!!! Don't wait!

CHECK THIS OUT!!!!

Have you been waiting for the perfect time to try out Paper Pumpkin?  You will want to take advantage of this great deal!!

WOW!
Any New Subscribers can get the October Paper Pumpkin kit for just $5!!!

10.08.18_TH_Shareable_PPFlashSale_US
Use promo code FLASH1018

In the October Paper Pumpkin kit this month Stampin' Up! is celebrating Autumn!!!  They are also letting the cat out of the bag about which colors will coordinate with next month’s fall-themed kit! Here is some insider information you can use to coordinate with other Stampin’ Up! products. You can buy the coordinating products before your kit arrives so you are prepared to craft right away. Imagine the possibilities!!!  Here are the coordinating colors: Cajun Craze, Coastal Cabana, Fresh Fig, Grapefruit Grove, and Night of Navy. This “colorful” insider info sneak, combined with a $5 special offer is a great deal you aren't going to want to miss out on!

  • The flash promotion price for new subscribers is $5.
  • The flash promotion starts October 8, 2018 to October 10th or WHILE SUPPLIES LAST ONLY!
  • Your subscription will continue each month at the until you decide to cancel it.  You can choose to cancel or hold a month at a time.
Don't hesitate to CONTACT ME if you have any questions!!!

Spooky house?

Is this a spooky house?  I am not sure is really spooky, but it sure is cute!!

This is one of the cards that everyone will make next weekend at my Annual Halloween classes.  I used the 'Farmhouse Christmas' bundle!  And WOW- check out the fence!  It is super cool!  And it was so easy to cut out!  I was just amazed & really thrilled!

There is alot of sparkle that is showing up on this card.  I didn't realize that I had that much on it, but it sure shows up in this photo.  I sprayed on some of my Champagne Shimmer/Rubbing Alcohol mix on it to make is have some glimmer. 
I went with a non traditional Halloween color for this card.  I thought this night time/star DSP from the Twinkle Twinkle DSP was cool, so made the card base Night of Navy to coordinate with it.

The bats flying around the tree & the words are from my September Paper Pumpkin kit! 

For the measurements for this card CLICK HERE!
stamp set:  'Farmhouse Christmas' & 'September Paper Pumpkin'
card stock:
  • Night of Navy-
  • Crushed Curry- 
  • Early Espresso-
  • Crumb Cake- 
  • Basic Black-
designer paper:
  • Twinkle Twinkle DSP
ink:  Black Memento
other:  Classic Label Punch, Big Shot, Magnetic Platform, Farmhouse Framelits Dies, Champagne Shimmer/Rubbin Alcohol mix, Dimensionals, 2 1/2" Circle Punch
++++++++++
I hope you have a MARVELOUS Monday!!  
Happy Stamping!
Hugs-
SUSIE

Sunday, October 7, 2018

A Halloween Treat'


Here is a little extra treat that everyone at my Halloween Treats class will make.  It is made using the Scalloped Tag Topper Punch!

Isn't this little mummy kitty cute!  

For the words I used the ones from my September Paper Pumpkin kit.


I used my Tear & Tape & stuck a little Hershey's candy bar inside of this.

I added the little pumpkin here too & think it is cute!  

stamp sets:
'Trick or Tweet'
September Paper Pumpkin kit (for words)
card stock:
  • Grapefruit Grove-2 1/2" strip (to punch out Starburst Punch); 3/4" strip (to stamp pumpkin onto & fussy cut out with Paper Snips); 1/2" strip (to stamp words onto- using Paper Snips- cut words in half & attach under knot)
  • Whisper White-  2 1/2" strip (to stamp cat onto & punch out using the 2" Circle Punch)
  • Basic Black- 5 1/2 x 2"- punch both ends using the Scalloped Tag Topper Punch & then score at 2 3/8" & 2 5/8"
ink:  Black Memento
Stampin' Write Black Marker (for the cats nose)
Stampin' Blend:  Light Smoky Slate
other:  Starburst Punch, 2" Circle Punch, Grapefruit Grove Ribbon, Scalloped Tag Topper Punch, Tear & Tape, Dimensionals, Paper Snips
 +++++++++
I hope you have a SUPER Sunday!!
Happy Stamping!
hugs-
SUSIE

Saturday, October 6, 2018

Is it a spooky Owl?

This is a very non-traditional Halloween card.  But this owl from the 'Still Night' stamp set is soooo cute I just could resist!!  

This is a card that everyone coming to my Halloween Treats classes will be making.  

I used the 'Itty Bitty Greetings', so everyone at the class can personalize it to something other than Halloween if they want.  Wouldn't this make a great guy card!
Check out how I used some vellum for the moon in the background!  And I also used my Champagne Shimmer (with rubbing alcohol) spray on the entire card to add some sparkle!

stamp sets:  'Still Night' & Itty Bitty Greetings'
card stock:  
  • Soft Suede- 5 1/2 x 8 1/2" (score at 4 1/4" & fold in half for card base)
  • Early Espresso- 3 1/2 x 4 3/4"; 3 1/2" strip (to cut branch out with framelit); 1/2 x 2 1/2" (to layer words onto)
  • Crumb Cake- 4 1/4 x 3 1/4 (to emboss using the Woodland Embossing Folder); 1/2" strip (to stamp words onto & punch out using the Classic Label Punch)
  • Very Vanilla- 2 1/2" strip (to stamp owl onto, color & cut out using the Framelit); 4 x 5 1/4" (for inside of card)
  • Vellum- 2 1/2" strip (to punch out circle using the 2 1/4" Circle Punch)
ink:  Black Memento
Stampin' Blends:  Dark Daffodil Delight, Light & Dark Soft Suede
other:  Classic Label Punch, Burlap ribbon, Metallic (Gold) Pearls, 2" Circle Punch, Big Shot, Magnetic Platform, Night Owl Thinlits Dies, Standard Platform, Woodland Embossing Folder, Dimensionals, Glue Dots, Champagne Shimmer w/Rubbing Alcohol
++++++++
I hope you have a SENSATIONAL Saturday!!
Happy Stamping!
hugs-
SUSIE

Friday, October 5, 2018

'Spooky Sweets'

Here is a little Halloween treat pouch!  I added a little card in the inside for you to sign.  You can add candy or money or any little treat of your choice in it.  This is another one of my upcoming Halloween Treats projects. 
NOTE:  This is not the normal size of a card, but it will fit into our medium envelopes.  When all put together like this the finished size is:  3 1/4 x  5" .

stamp set:  'Spooky Treats' (for the outside words) & 'Takeout Treats' (for the inside words)
card stock:  
  • Crushed Curry- 9 1/4" x 4 1/4"- score at 5"- then score 1/2" down both sides (the long way)- cut off that 1/2" strip on the 5" back side to fold in & make pocket; 2" strip (to punch out moon & stars); 2" strip (to punch out layered Circle)
  • Basic Black- 2 3/4" strip (to punch out bats); 1 1/4" strip (to punch out Circle Tab)
  • Whisper White- 2" strip (to stamp words onto & punch out); 4 1/2" x 3" (for inside pull out to stamp words onto & attach Circle Tab Punch to)
dsp:
  • Toil & Trouble- 3 1/2 x 3"; 3 x 1/2"
ink:   Black Memento
other:  Spooky Bats  Punch, Twinkle Builder Punch, Black 3/8" Glittered Organdy ribbon, Circle Tab Punch, Dimensionals, Glue Dots, Stapler

++++++++++
I hope you have a FABULOUS Friday!!!
Happy Stamping!
Hugs-
SUSIE

Thursday, October 4, 2018

My Annual Halloween Treats Class projects!!

As promised, today is the day I told my customers I'd post all of my Halloween Treats projects!!!  

Check them out!  Here are the 11 projects for my upcoming Annual Halloween Treats classes!  Some of them are very traditional & some are not.  I used stamp sets & accessories from the Holiday & Annual catalog, plus the stamp set that came in my Paper Pumpkin kit this month too! 

Are you one of my customer that has signed up to come stamp with me & make these projects?  

So what do you think?  Which one is your favorite?  

Honestly I can say that I like them all!!  The Frankenstein box is probably my favorite- as my boys sure liked it!  The owl one is cool & very non traditional.  It is one of the cards that you could easily change the words & make it into a card for many different occasions.  On it I used the 'Itty Bitty Greetings' too- so you could make this a birthday card if you wanted to do so.  

This week kicked off my 12 days of posting my Halloween projects.  For the next 7 days I'll be sharing each of these projects individually, except for the 4 of them that I have already posted earlier this week & shared about.  So be sure you stop back by & find out more details about each of them!!!  

I hope you have a GREAT Thursday!!
Happy Stamping!
hugs-
SUSIE

Wednesday, October 3, 2018

A Frankenstein Halloween Treat!!

 Oh gosh.....the boys are gonna love this little Halloween Treat box!!  It was hard to photograph....but the spike in the back actually goes across the back & what you are seeing just the ends. I used the Classic Label Punch to add the spike!

This is another one of my upcoming Halloween Treats class project!  I used the cute Takeout Thinlits Dies that are on page 50 in the Holiday Catalog! It turned out pretty darn cute!!!  Another demonstrator shared a Frankenstein with this Takeout Thinlits Dies, during our share fair- when we were on our cruise in July.  So this is my version of her box. 
I did cut his 'hair' using my paper snips & his hair does go all of the way around on all 4 sides of the box. 

The box was alot easier to make than I thought it would be!  You cut 2 of them!  The Thinlit cuts & scores.....so all you have to do if fold it on the lines, add  your Tear & Tape & stick it together!
I then stuck these 2  together 1/2 boxes (as shown in the photo above this one)......see how I added some Tear & Tape to the bottom of the one, as it sits into the inside of the other one.

Frankenstein's eyes are made using the 3/4" Circle Punch & the 1/2" Circle Punch.  
Frankstein's nose is the 3/4" Circle Punch & roughed up the edges of it with my fingernail.

So what do you think of him?  I can't wait to see what the boys think of him when they see him after school today.

stamp set:  'Takeout Treats'
card stock:  Granny Apple Green, Basic Black, Whisper White, Basic Gray
Stampin' Write Marker:  Basic Black (to draw his mouth & scars with)
other:  Big Shot, Takeout Thinlits Dies, Magnetic Platform, Paper Snips, 1/2" Circle Punch, 3/4" Circle Punch, Classic Label Punch, Tear & Tape
+++++++++
Life is crazy busy here with kids, pigs & lots of stamping!!

I hope you have a WONDERFUL Wednesday!!
Happy Stamping!
Hugs-
SUSIE

Tuesday, October 2, 2018

'Trick or Tweet'

Check out this cute little elephant!!  He has wings!!  I punched out a bat out- using the Spooky Bats Punch, folded it half & put it over his wings.
 This neat little box is another one of the projects for my upcoming Halloween Treats classes.  I think it turned out super cute!
I used the Lustrous White (shimmery) Mini Gable Boxes.  This box is 4 x 2 1/2 x 2 1/2" & is the perfect sized treat box.  Check it out on page 193 in the Annual Catalog.  
stamp sets:  'Trick or Tweet' & 'Spooky Sweets'
card stock:  
  • Whisper White- 2 3/4" strip (to stamp Elephant on & cut out with Layering Circles Framelits)
  • Basic Black- 3 1/2" strip (for Layering Circles Framelits); 1 3/4" strip (to punch out bat)
  • Pumpkin Pie- 1 1/2" strip (to stamp words on & punch out with 1 1/2" Circle Punch)
designer paper: 
  • Festive Farmhouse- 12x2"- score at 2, 4, 6 & 8"- wrap around box & adhere.  NOTE that there will be a little gap, so make that in front & your layered circle images with cover that up!
ink:  Black Memento
Stampin' Blends: Light Smoky Slate, Light Pumpkin Pie, Light Granny Apple Green
other:  Spooky Bats Punch, Big Shot, Magnetic Platform, Layering Circles Framelits, Stitched Framelits, 1 3/8" Scalloped Circle Punch, 1 1/2" Circle Punch, Dimensionals, Glue Dots, Gray Granite 1/2" Textured Ribbon, Lustrous White Mini Gable Box
++++++++++
I hope you have a TERRIFIC Tuesday!!
Happy Stamping!
hugs-
SUSIE

Monday, October 1, 2018

Today we start celebrating World Card Making Day!

 10.01.18_HEADER_WCMD_ENG

Gather together & get excited to celebrate
World Card Making Day for an entire week!

Dates: October 1–7, 2018
Select products are 10% off.
All order types qualify for this promotion: customer, demonstrator, workshop, and online.


You can CLICK HERE to see the flyer with the discounted items available!  

Order at my on line store-CLICK HERE!
Use Hostess code:   EXUJQAJU
Contact me if you have any questions!

Halloween Pillow Box

This is a cute treat box that I made for my upcoming Halloween Treats Classes.  I used the Cauldron Bubble stamp set, coordinating Cauldron Framelits & coordinating Toil & Trouble DSP!!

Where did I get this black pillow box at?  Check out the Annual catalog on page 193.  It is actually a Kraft Pillow box that I used a sponge & my Memento ink pad & burnished it over the box to change the color of it!  Pretty cool huh!
This is what it looked like when I got it about 1/2 way done.  I loved the way it turned out!
stamp set:  'Cauldron Bubble'
card stock:  Mango Melondy, Whisper White, Vellum
designer paper: Toil & Trouble
ink:  Black Memento
other:  Big Shot, Magnetic Platform, Cauldron Framelits Dies, Black Sharpie Marker to Color my Basic Rhinestone, Dimensionals, Glue Dots, 1/8" Black Cord, Kraft Pillow Box, Starburst Punch, 2" Circle Punch
+++++++++
I hope you have a MARVELOUS Monday!!
Happy Stamping!
Hugs-
SUSIE