Pages

Tuesday, November 6, 2018

A step by step tutorual on how to do the Frosted Clear Block Smooshing Technique!

#1- Ink your clear block in your ink pad.
#2- Add a little bit of shaving cream. 
 #3- Frost your clear block with the shaving cream.  I used an old gift card to do this!
#4- Then SMOOSH it onto your Whisper White card stock.
#5- Take the gift card & scrap off all of the shaving cream.
#6- Wipe off with a paper towel to make sure you have it clean.
 #7- Left dry for a few minutes & then stamp  your snowflakes over it & complete your card. 

Look at all of the different looks you get!!  It is amazing!!!  And they are all beautiful! 

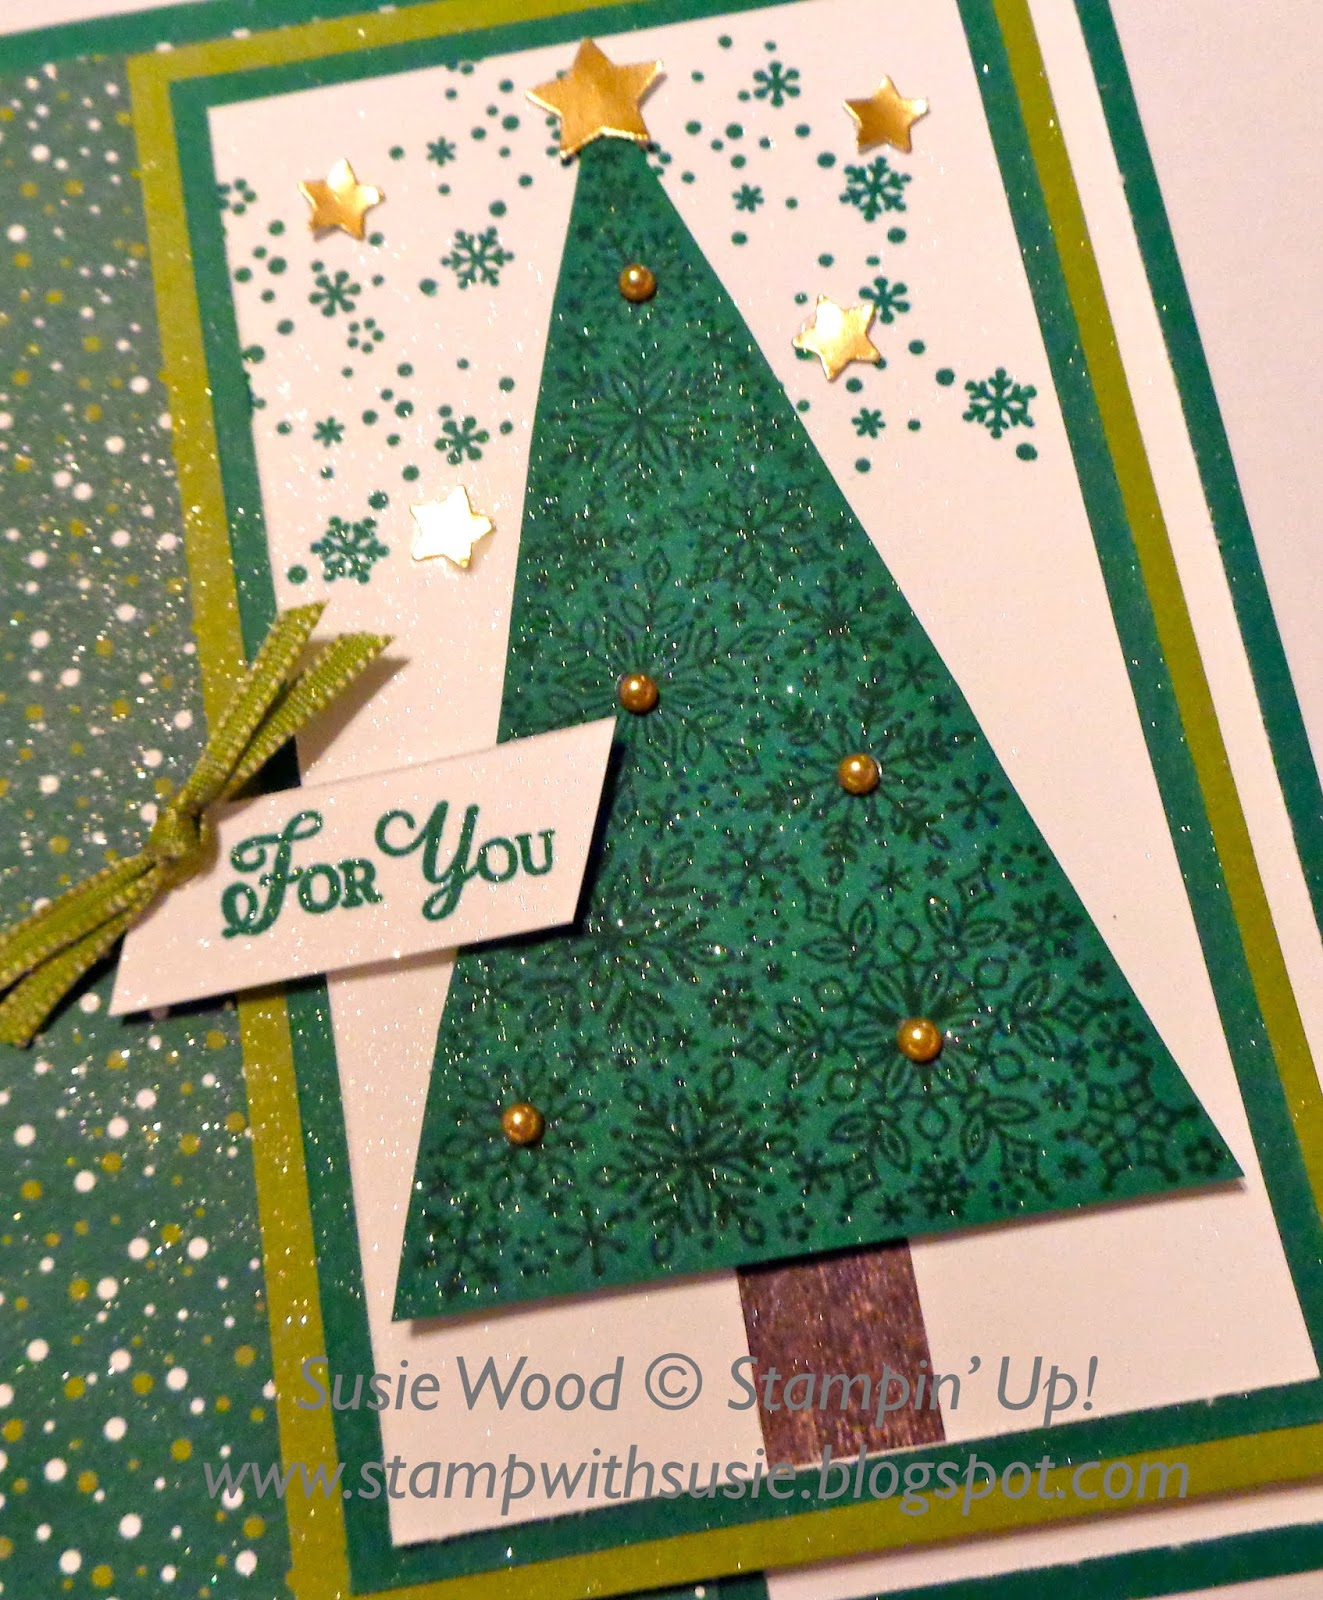
I did this card at my Holiday Extravaganza Stamp Camp a couple of weeks ago.  There were over 40 attendees that made this card.  It was fun to watch them & listen to them as they were doing it!  They all did a great job!!  And it worked out perfectly doing it as a group technique too!

I have previously posted this photo, but I'm sharing it again below.......incase you missed it!  Here is the finished snowflake card using the Snowflake Showcase products that are November EXCLUSIVE only & while supplies last!  If you like this stamp set & the coordinating framelits- don't wait too long to order yours!  Be sure you get them before it is gone!

Here is more details about these EXCLUSIVE Snowflake Showcase Products- 
CLICK HERE!!!

stamp set:  'Snow is Glistening'
card stock:
  • Blueberry Bushel-
  • Whisper White-
ink:  Blueberry Bushel
other:  Big Shot, Magnetic Platform, Precision Plate, Snowfall Thinlits Die, Darling Label Punch, Dimensionals, Glue Dots, Clear Epoxy Droplets, Shaving Cream, Clear Block, Old Gift Card, Paper Towel
++++++++++
This morning I'm off to get the kids for the day!  Late this afternoon I'm headed to the airport & on my way to celebrate Stampin' Up's 30th Anniversary On Stage event in Orlando.  I have 2 downline that will be joining me & several adopted downline.  We fly home really early on Sunday so that I can help Deke work on the farm all day!!  So I'll literally hit the ground running!  

I hope that I will be able to post while I'm gone.  That is my plan anyways- to share a projects every day.  So stay tuned!  If something happens to my lap top or if I have internet problems while there & I can't post- I'll be posting regularly again next Monday.  

I hope you have a TERRIFIC Tuesday!!
Happy Stamping!
Hugs-
SUSIE

Monday, November 5, 2018

More Snowfall Showcase!

Wow!  This is a pretty snowflake card that I made & sent to my friend Rebecca!!!  I got a sweet email from her telling me how much she liked it!!  That just warmed my heart!!  But I have to agree with her- I like this card alot too!!

This is an elegant card!!  And it was created with an awesome new stamp set & framelits!! 

If you want to know more about the EXCLUSIVE Snowflake Showcase products CLICK HERE!!!!

If you purchase any of these products in the Snowflake Showcase from me I'll email you an awesome PDF with 20 different card project tutorials that you to create all of the cards!! 
For some reason I am just lovin' Bermuda Bay cards right now!!  With this one I added some Silver Foil to go along with the beautiful Snowflake Embellishment too!  Did you notice the little snowflakes that I shadow stamped onto the background of the Bermuda Bay layer?

stamp set:  'Snow is Glistening'
card stock:  
  • Bermuda Bay- 5 1/2 x 8 1/2- score at 4 1/4" & fold in half for card base, 5 1/4 x 2"- so stamp little snowflakes on using the Bermuda Bay ink pad
  • Silver Foil- 5 1/4 x 1/4" & 5 1/4 x 1/4"- to slide along the bottom & top edge of the Bermuda Bay strip on the front of the card.
  • Whisper White- 4 x 4" to cut snowflake out of; 4 x 5 1/4" for the front of the card; 4 x 5 1/4"for the inside of the card
ink:  Bermuda Bayother:  Big Shot, Magnetic Platform, Precision Plate, Snowfall Thinlits Dies, Snowflake Trinkets, Dimensionals, Glue Dots
+++++++
Yesterday was a busy day!!  But it was a great day of stamping with a special group of stampers at my North Liberty Christmas Stamp-a-Stack class.  Brooke was a great hostess with yummy snacks & she was wonderful help!  Everyone went home with a bag full of Christmas cards & envelopes that are ready for them to address & mail out!

We are up early this morning at 4:30 to head outside to work on the farm.  We'll mark, sort & load hogs.  I'll then spend my day with Brody, Drake, Trey, Masen & Ainslee!  Deke will chore when we are done with loading hogs & then head to the courthouse  for his weekly Board of Supervisors meeting.  He also has another meeting tonight in Fairfield......and I'll be placing orders & working on stamping stuff when the kids are all gone home. 

I hope you have a MARVELOUS Monday!!
Happy Stamping!
Hugs-
SUSIE

Sunday, November 4, 2018

Product information update (note from Stampin' Up!)

Holiday Catalog Items No Longer Available in North America

147816: Joyous Noel Specialty Designer Series Paper
147890: Festive Farmhouse Elements
147811: Santa’s Workshop Enamel Elements

Sales for the following products have exceeded our forecast. The numbers for these items have been shut off, since these products cannot be sent from the manufacturer in time for the holidays, these item numbers will not be reactivated.

In order to provide you with another holiday-themed option, we’ve decided to make our promotional Dashing Along Designer Series Paper available for sale- #149903= $11.00.  
This beautiful, 12" x 12" traditional Christmas paper has a festive, eclectic feel and is perfect for layering. Coordinating colors are Cherry Cobbler, Garden Green, and Whisper White.

We apologize for any inconvenience this may cause you and/or your customers.

'Signs of Santa'

This stamp set is just adorable!!!  The awesome part of it is that the Santa's Signpost Framelits Dies framelits coordinate with the framelits & that is how I cut out this elf, wagon & presents!  Pretty cool huh!!

This Elf card is one of the many that everyone made at my Holiday Extravaganza Stamp Camp that was last weekend.  
NOTE:  The Santa's Workshop Enamel Shapes I used here are no longer available.  They are sold out!  So sorry for this inconvenience.  

stamp set:  'Signs of Santa'

card stock:
  • Poppy Parade-  5 1/2 x 8 1/2"- score at 4 1/4"& fold in half for card base; 3 1/4 x 3 1/4"; 1 1/4" strip- for 1 1/8" Scalloped Circle Punch
  • Garden Green- 5 1/4 x 1 3/4"
  • Whisper White-1 1/4" strip to stamp words onto & punch out; 3x3"- outside layer with elf, etc. ; 4 x 5 1/4" stamp on for inside of card
  • Sparkle Gimmer- 1" strip for snowflakes, 1 x 3" for snow 
designer paper:  Santa's Workshop Specialty DSP-
ink:  Garden Green
other:  Poppy Parade 1/2" Ribbon, Dimensionals, Glue Dots, Mini Dimensionals, Santa's Workshop Enamel Dots (SOLD OUT NOW), 1" Circle Punch, 1 1/8" Scalloped Circle Punch, Big Shot, Magnetic Platform, Santa's Signpost Framelits Dies
++++++++++
I'm headed out here pretty soon, as I have my monthly class in N. Liberty today!!  Everyone joining me will be making Christmas cards for my Annual Christmas Card Stamp-a-Stack.  I can't wait for them to see them & spend our time together creating!  

I hope you have a SUPER Sunday!!
Happy Stamping!
hugs-
SUSIE

Saturday, November 3, 2018

More snowflakes!!

Here is another card using the 'Snow is Glistening' stamp set & the coordinating Snowfall Thinlits Dies.  Check out how I used the reverse image of the snowflakes here.  I actually cut out the snowflakes from a strip of White Cardstock.  (I didn't use those cut out snowflakes on this card, but saved them for another card project.)  I then punched out that reverse image snowflake piece & mounted it onto another circle of Silver Foil paper.  I added a Clear Epoxy Droplet in the center of each of the snowflakes!  Cool huh!

This cool stamp set & framelits is an EXCLUSIVE Snowflake Showcase offer this month (November 2018) ONLY! You can CLICK HERE to find out more information on this awesome special!!
This is also a little different fold!  The center part flips up!  I added the ribbon & a little tag with the words on it to complete it.  

stamp set:  'Snow Is Glistening'
card stock:
  • Smoky Slate-  4 1/4 x 5 1/2"(for card base); 5 1/2 x 2 3/4"; 1/2 x 1 1/2"- stamp For You on & use Paper Snips to flag end
  • Basic Gray- 11 x 3 3/4"- score at 5 1/2"- fold in half for card base;
  • Whisper White- 5 1/2 x 2 1/2"; 1 3/4" strip to cut out 3 snowflakes- then punch them out using the 1 1/2" Circle Punch; 5 1/4 x 3 1/2"- stamp greeting on for inside of card
  • Silver Foil- 2" strip- use 1 3/4" Circle Punch & punch out
ink:  Basic Gray
other:  Big Shot, Magnetic Platform, Snowfall Thinlits Dies, Whisper White Polka Dot Tulle Ribbon, Clear Epoxy Droplets, Dimensionals, Glue Dots
++++++++++
I hope you have a SENSATIONAL Saturday!!!
Happy Stamping!
Hugs-
SUSIE

Friday, November 2, 2018

'Snow is Glistening'

What a great stamp set this is!!!  This is a big tree that is one of the many images in the exclusive 'Snow is Glistening' stamp set. 

You can CLICK HERE TO FIND OUT MORE INFORMATION ABOUT THIS EXCLUSIVE SNOWFLAKE SHOWCASE PRODUCTS!

This was one of the many cards everyone made at my Holiday Extravaganza last weekend.  There isn't a framelit for this tree, but it is easy to fussy cut out with your Paper Snips!

stamp set:  'Snow is Glistening'
card stock:  
  • Shaded Spruce- 5 1/2 x 6 1/2"- score at 4 1/4"for card base; 4 1/4" strip to stamp Tree onto & fussy cut out with your Paper Snips; 4 3/4 x 2 3/4"
  • Old Olive- 3 x 5"
  • Whisper White- 4 1/2 x 2 1/2"- for card front; 3/8" strip to stamp words onto & snip off at diagonal cuts on both ends; 4 x 5 1/4" for inside of the card
  • Gold Foil- 1/2" strip to punch out stars
  • Wood Textures DSP- 1/2" strip
designer paper:  Under the Mistletoe DSP- 5 1/4 x 2"
ink:  Shaded Spruce
other:  Twinkle Builder Punch (for the stars); Gold Metallic Pearls, Old Olive 1/8" Ribbon, Dimesnionals, Glue Dots, Champagne Shimmer/Rubbing Alcohol Spray
+++++++
I have another full day with the kids today (no school).  And I'll be a stampin fool again tonight!
 
I hope you have a FABULOUS Friday!!
Happy Stamping!
Hugs-
SUSIE

Thursday, November 1, 2018

A Fall 'Winter Woods'

Here is a clean, simple & elegant fall card using the 'Winter Woods' stamp set!  This is a perfect card for soooo many different occasions!  I used the Wood look DSP from the Country Lane DSP stack!

You can't tell by the photo, but I used a Champagne/Rubbing Alcohol mixture to lightly spray over the top of it for that added glimmer & sparkle!
I think that this monochromatic color scheme is just perfect for a pretty fall card!

stamp sets:  'Winter Woods' & 'Merry Christmas to All'
card stock:  
  • Sahara Sand- 5 1/2 x 8 1/2"- score at 4 1/4" & fold in half for the card base; 2 1/4 x 5/8" (to stamp words onto for the front of the card)
  • Early Espresso- 4 1/4 x 3 1/4"
  • Very Vanilla- 4 x 3" (for outside of the card); 4 x 5 1/4" (for the inside of the card)
designer paper:  Country Lane DSP-
ink:  Early Espresso
other:  Festive Farmhouse Cotton Twine (Vanilla), Champagne Shimmer/Rubbing Alcohol Spray, Dimensionals, Glue Dots
+++++++++
I hope you have a GREAT Thursday!!!
Happy Stamping!
Hugs-
SUSIE

Wednesday, October 31, 2018

Happy Halloween!!

Oh my gosh.....I got this adorable little piggy card in the mail this week from my dear friend Teri!  She said she saw one on pinterest & this is her version of it!  I just LOVE IT!!  It is just so fitting for our house!!  She knows I have a soft spot in my heart for piggies!  And this little piggy is precious!
She used the Pinewood Planks Embossing Folder on the background & rubbed it with Crumb Cake ink.  

stamp sets:  'This Little Piggy'
card stock:  Cajun Craze, Crumb Cake, Basic Black
ink:  Black Memento & Crumb Cake
Stampin' Blends:  Dark Crumb Cake, Ivory
other:  Spooky Bat Punch, Cauldron Framelits Dies, Big Shot, Magnetic Platform, Black Glittered Organdy Ribbon, Dimensionals, Glue Dot, Sponge

 +++++++++++
I hope you have all a great Halloween!
Happy Stamping!!
Hugs-
SUSIE

Tuesday, October 30, 2018

Snowflake Showcase SPECIAL!

Oh my gosh.....check out all of these beautiful cards!!
 
Starting this Thursday (on November 1, 2018)- 
Stampin' Up! has 2 EXCLUSIVE stamp sets, framelits, embellishments & velvet paper as a special offer 
called the Snowflake Showcase!!

  When you purchase any of these products from this 
Snowflake Showcase offer from me,
I will email you a special tutorial 
which will include the 20 cards & instructions 
(shown above) 
for you to make, using your new products!!!

And for a special BONUS this month- 
If you purchase one of the stamp sets & the framelits- 
then you will also get a 2 card kit from me.   
 
I know I have fallen in love with these limited time only products 
from the Snowflake Showcase!
And I know you will too! 

They are available November 1-30th, 2018- while supplies last!
 10.01.18_TH_HAPPINESS_SURROUNDS_Q4_OUT_OF_PUB_ENG
#149744- Happiness Surrounds= $17.00 Photopolymer only 
10.01.18_TH_SNOW_IS_GLISTENING_Q4_OUT_OF_PUB_ENG
#149742- Snow Is Glistening= $21.00 Photopolymer only
 10.01.18_TH_SNOWFALL_THINLITS_Q4_OUT_OF_PUB
#149692- Snowfall Thinlits Dies= $39.00
10.01.18_TH_SNOWFLAKE_TRINKETS_Q4_OUT_OF_PUB
#149620- Snowflake Trinkets (20)= $8.00
10.01.18_TH_VELVETEEN_PAPER_Q4_OUT_OF_PUB
 NOW SOLD OUT- NOT AVAILABLE!
White Velvet Sheets (12x12)

More snowflakes & a sled!

I love, love, love this card!  It is just an old fashioned look.  It too is a totally me card. 
Check out the cool background where I embossed the snowflakes & then added some white cut out snowflakes over the embossed ones.    The embossed snowflake background is so cool!
And check out the snow, as it is sparkling with the Sparkle Glimmer Paper!  Wow- that just adds so much to it!

stamp set:  'Alpine Adventure'
card stock:  
  • Crumb Cake-  5 1/2 x 8 1/2"- score at 4 1/4" & fold in half or card base; 4 x 5 1/4"- using Embossing Mat & the Blizzard Thinlits Die to create the snowflakes on this.
  • Cherry Cobbbler-  1 3/4" strip to punch out scalloped Circle; 3 1/2" strip to cut out sled
  • Old Olive-  1 1/4" strip to cut out wreath
  • Whisper White- 4 x 5 1/4" to stamp words on for the inside of the card; 4 x 5 1/4" to cut out snowflake with using the Blizzard Thinlits Die; 1 1/2" strip to stamp words onto & punch out with Scalloped Circle punch.
  • Sparkle Glimmer Paper- 4 x 1 1/4"; 4 x 1 1/4"- using  your Paper Snips, make drifts
ink:  Cherry Cobbler
other:  1 1/8" Scalloped Circle Punch, 1 3/8" Scalloped Circle Punch, Big Shot, Magnetic Platform, Precision Plate, Blizzard Thinlits Die, Standard Platform, Embossing Mats, Twine, Dimensionals, Glue Dots, Paper Snips,
+++++++++
I hope you have a TERRIFIC Tuesday!!
Happy Stamping!
Hugs-
SUSIE

Monday, October 29, 2018

Snowflakes!!

 This is short & sweet........but this is a totally "me" card.  
 I will hopefully get caught up on things this week......as I've been going 100 plus mph lately & behind & exhausted. 

stamp set:  'Cambridge Carols'
card stock:
  • Night of Navy-  4 1/4 x 11"- score at 5 1/2" & fold for card base; 2" strip to punch out Tailored Tag Punch- cut in half vertically & layer behind the words on the top  & bottom of the back side; 5 1/2 x 3/4"
  • Whisper White- 4 x 5 1/4"- cut snowflake thinlits out of; 4 x 5 1/2" for inside of card to stamp words onto; 2" strip to stamp words onto & punch out with the Tailored Tag Punch
ink:  Night of Navy
other:  Big Shot, Magnetic Platform, Precision Plate, Blizzard Thinlits Die, 1/2" Gingham Night of Navy Ribbon, Tailored Tag Punch, Glue Dots, Dimensionals
 ++++++++++
Yesterday was another FULL day of stamping!!  I left home at 9:00 yesterday morning & walked in the door at home again at 10:40 last night.  

We are up early this morning & headed out the door.  We have another crazy busy week!

Here's to a MARVELOUS Monday!
Happy Stamping!
Hugs-

SUSIE

Sunday, October 28, 2018

A Christmas Ornament!

This is a beautiful ornament card.  I used the 'Beautiful Baubles' stamp set in the Holiday Catalog on page 10.

The cool pines are from the 'Christmas Pines' stamp set on page 96 in the Annual Catalog.  I thought the 2 sets coordinated perfectly together!!

I used the Silver Foil- Edged cards & envelopes on page 11.  They worked great for this.

stamp sets:  'Christmas Pines' & 'Beautiful Babbles'
card stock: 
  • Whisper White- 4 x 5 1/4" stamp words onto for the inside of the card; 3 x 4 1/4- stamp pines onto & attach the ornament to this; 3 1/2" strip- stamp ornament onto this & fussy cut out with Paper Snips (there is no framelits that matches this image); 5/8 strip to stamp outside words onto & the snips ends with your Paper Snips for desired length.
  • Merry Merlot-  3 1/2 x 4 3/4"
  • Joyous Noel 6x6 Glimmer Paper- Merry Merlot- 3 x 3/8"
  • Foil Edged Cards & Envelopes- pre-cut, pre-scored & ready to use!
ink:  Shaded Spruce, Merry Merlot
other:  Merry Merlot/Copper Reversible Ribbon, Basic Rhinestones, Glue Dots, Dimensionals,
+++++++++
Yesterday was a great day of stamping!!!  I got everything done & it was a perfect event!  I enjoyed visiting & stamping with everyone that joined me.  I think everyone there enjoyed it!   I know they all went home with a big bag full of cool Christmas & Fall cards & projects!  I can't wait for next years Annual Holiday Extravaganza class. 

I am off this morning & will spend my day stamping all day again today!!!  I can't wait!
I hope you have a SPECIAL Sunday!!
Happy Stamping!
Hugs-
SUSIE

Saturday, October 27, 2018

'Falling for Leaves'

This is a quick post......will update it with more information sometime soon. 

But I wanted to show you this stunning card!!  Talk about sparkle!!  WOW!!
 The card is from the Gold Edged cards & envelopes set on pg. 11 (set of 20 for $9.50) in the Holiday Catalog!  How fun & easy to just add a layer of card stock & your card is complete!  Plus it comes with a coordinating Gold Edged envelope too!  

stamp set:
card stock:
ink:

other:

I hope you have  SUPER DAY!  I know I will......today is my Annual Holiday Extravaganza!!!  I cant' wait to spend my day stamping with everyone joining me.

Gotta run.....
Happy Stamping!
Hugs-
SUSIE

Friday, October 26, 2018

A 'Spirited Snowman' hinge card!

I do love snowmen & I do love this stamp set!  Isn't he just so cute!  He just looks like he is smiling & have a great time skating!

This is another one of the many cards everyone will be making tomorrow at my upcoming Holiday Extravaganza!  
This is a fun hinge card!  Look how it opens up!  

Check out the bottom half of it......I used the awesome 'Buffalo Check' background stamp on it.  

Notice how I added some falling snowflakes on the inside part of this card too!

I colored him with my Stampin' Blends. 

*TIP:  On his hat & scarf I used the Light & Dark Bermuda Bay Blends.  Some of the stripes on them are close together.  So I colored the entire hat & scarf with my Light Bermuda Bay Stampin' Blend & then just added some of the Dark Bermuda Stampin' Blend, on a few of the stripes. 

This is what it looks like opened up! 

I like making things that are 'different'- especially fun folds!  This is a card layout that learned years ago......but I love making it!!  

We now have brads again in our accessories (in the back of the annual Catalog), so when I saw we had those again I just knew I had to make a hinge card sometime! 
stamp set:
card stock:
ink:
Stampin' Blends:
other:
++++++++++++
This week has been long days/nights for me.  And last night was no different.  I burnt the midnight oil cutting card stock.  And then I will be heading outside at 5:00 a.m. to help Deke mark, sort & load hogs.  And then I'll go get the kids & spend my day with the 3 little ones.  

But the final hours of my count down are here!!!  The clock is ticking away!!  I can't wait to stamp tomorrow with everyone joining me for my annual Holiday Extravaganza event.  They will be going home with a whole big bag of LOTS of projects!!  Oh & the bag tag is cute too!  

Tonight when the kids go home Deke & I will head to South English & set up all of the tables/chairs & things for tomorrow's class.  We'll then come home to get the meat & cheesy potatoes mixed up.  And then I'll burn the midnight oil cutting card stock again!

Gotta go.......
I hope you have a FABULOUS Friday!!
Happy Stamping!
Hugs-
SUSIE

Thursday, October 25, 2018

A Christmas Bakers Box!

I saw a decorated Baker's Box on line like this & just thought it was adorable!  It is the perfect size for all kinds of gifts- baked, hand made or boughten.  And the super cool thing about it is that the 4x4 desk calendars that everyone makes for gifts at my December classes fit just perfectly in this box!  I know I'm going to buy a bunch of them & decorate them for all of the calendars that I give for Christmas gifts.  I usually just wrap them in Christmas paper- but this packaging will be sooooo much cutter!!  It will be like getting 2 gifts in one! 

Yes- this is another one of my Holiday Extravaganza projects!!!  Wow- everyone joining me on Saturday for this annual event is going to go home with LOTS of cool fall, Christmas & winter projects!!!  I can't wait to share this day- but I still have LOTS of things to finish cutting & getting ready for yet.  

Ok.........stop back by tomorrow to see more of my Holiday Extravaganza projects.

I hope you have a SUPER Thursday!!
Happy Stamping!
Hugs-

SUSIE