Pages

Friday, September 4, 2020

Stampin' Up! Lots to Celebrate with hearts in a jar

OH wow!  Check out this CUTE fun fold jar card!  I used my 'Lots to Celebrate' stamp set, along with the Jar Punch!  Just look at the hearts floating out of the jar!  And did you notice the words on the banner?  I love these words!!  They are my favorite ones in this whole 'Lots to Celebrate' stamp set!


I made this a fun fold card, called a Dutch Door fold!  

This is what it looks like when it is opened up!  Neat huh!  
 This is such a totally Susie card!!  I just love the way it turned out!!

________

Here are the supplies & measurements I used, so that you can re-create this card too!  I hope you love it as much as I do!

NOTE:  I used only the Real Red ink pad to get the lighter & darker shades of red & pink of the hearts!  I stamped them full strength using the Real Red ink & then without reinking, I stamped them again to make the pink.  This is a technique called "STAMPING OFF"! 


 stamp set:  'Lots to Celebrate' 

card stock:
  • Basic Black- 4 1/4 x 5 1/2"- for card base; 2 3/4 x 8 1/2"- score at 4 1/4"- fold in half & then adhere to the bottom of the Basic Black card base; 4 1/4 x 2 1/2"- for layering of jar
  • Real Red- 4 x 2 1/4"- for layering of jar; 4 x 2 1/2"- Emboss using the Wrapped in Texture Embossing folder & adhere to the front piece of the Basic Black folded card stock; 4 x 5 1/4"- for inside of card, adhere this over where you adhered the smaller folded piece at the bottom of the Basic Black card base.
  • Whisper White- 2 3/4" strip- stamp jar & punch out; 1 x 1 3/4"- stamp words onto & Banners Pick A Punch to flag the one end; 1/2" strip- stamp lid onto & fussy cut out with your Paper Snips (scissors); 2 x 3 3/4"- shadow stamp some hearts at the top of this piece of card stock & then using dimensionals, pop up the jar below them, along the bottom edge of these hearts. 
designer paper:   Heartwarming Hugs DSP- 4 x 1"
ink:  Memento & Real Red

other:  Stampin' Cut & Emboss Machine; Wrapped in Texture Embossing Folder; Jar Punch; Red 1" Sheer Ribbon; dimensionals; glue dots; Paper Snips; Banners Pick A Punch

I hope you have a FABULOUS Friday!!
Happy Stamping!
Hugs-
SUSIE

Thursday, September 3, 2020

Stampin' Up! Press On

This 'Press On' stamp set is on page 68 in the August-December (Holiday) Mini Catalog, is so fun & cute!! I made this card using it, along with some other (Holiday) Mini Catalog products!

Check out this plaid DSP!  It is from the Plaid Tidings DSP on page 57 in the (Holiday) Mini!  What a great variety of colors this pack has in it!!  I like every single sheet in it!

I love warm drinks & so any time a stamp set has a cup or mug in it, you can almost guarantee that I will get it!!  This 'Press On' stamp set has several images that are both larger & smaller, plus some great words!

stamp set:  'Press On'

card stock:
  • Cinnamon Cider- 4 1/4 x 11"- score at 5 1/2"- fold in half for card base; 1 1/2" strip- stamp cup & fussy cut out with your scissors; 5/8 x 2 3/8"- stamp words on to
  • Cajun Craze- 3 3/4 x 5"; 1 1/2 x 3 1/2"- stamp coffee bean onto; 2 3/4" strip- die cut scalloped circle
  • Basic Black- 1/2 x 3 3/4"; 2 3/4" strip- die cut circle; 1 1/4 x 3 3/4"
  • Whisper White- 2" strip- die cut circle; 4 x 5 1/4"- for inside of card
designer paper: Plaid Tidings DSP- 2 x 3 1/2"; 1" strip- stamp center of cup onto, stamp words in center & fussy cut out with your scissors
ink: Memento

other:  Stampin' Cut & Emboss Machine; Layering Circle Dies; Paper Snips; Cinnamon Cider ribbon; dimensionals; glue dots

I hope you have a great Thursday!
Happy Stamping!
Hugs-
SUSIE

Wednesday, September 2, 2020

Stampin' Up! Lots to Celebrate with Jar Punch

 I used my 'Lots to Celebrate' stamp set & the coordinating Jar Punch to make this card!
 
This is a fun fold card!!!
AND
Check out the stars that are pouring from the jar!
I chose to use the Season's Greetings wording....although you could just 
change the color & the words & this could be used for lots of occasions.
 
I love this traditional colored holiday DSP called Heartwarming Hugs!
It has so many cool patterns in it using greens & red.
The different patterns can be used for many occasions though, just not Christmas.
stamp set:  'Lots to Celebrate' & 'Gift Wrapped'
card stock:
  • Real Red- 5 1/2 x 8 1/2"- score at 4 1/4"- then fold corner back, aligning it with the fold edge; 3 x 3"
  • Old Olive- 3 1/4 x 3 1/4"- emboss with Wrapped in Texture Embossing Folder; 4 x 1"
  • Whisper White- 2 3/4" strip- stamp jar & punch out; 1" strip- stamp lid & fussy cut out; 1 1/2" strip- stamp bow & fussy cut out; 1 1/2" stamp words & cut out with Tasteful Textures Dies; 4 x 5 1/4"- for inside of card
designer paper:  Heartwarming Hugs DSP- 3/4 x 3 3/4"
ink:  Old Olive & Real Red
other:  Stampin' Cut & Emboss Machine; Tasteful Textures Dies; Paper Snips; Wrapped in Texture Embossing Folder; Jar PunchRed Rhinestones; dimensionals; glue dots

I hope you like this card as much as I do!
Have a wonderful Wednesday!!
Happy Stamping!
Hugs-
SUSIE

Tuesday, September 1, 2020

NEW ITEMS ON THE CLEARANCE RACK NOW!

WOO HOOO!!!

NEW items have been added to the Clearance Rack in the online store! Supplies are limited, and with discounts up to 60%, products will go quickly.  

Order on line by going to my on-line store at: susiewood.stampinup.net then CLICK ON CLEARANCE RACK!  Or you can CLICK HERE! Or you can EMAIL ME!

You can use hostess code:   V2SB9A4A


Stampin' Up! Gather Together fall card

 
Here is another pretty fall card, that is a totally Susie card!
I just love it!!
And it was so fun to make!
 
NOTE:  You wouldn't have to use stamped images on these 3 strips on the card front.  You could use DSP too!  All of these 3 strips could be different, like I did here.  Or they could all be the same too!   I have done several different cards in various colors and with various images over the year, with this layout!  It is one that I never get tired of.  And it has endless possibilities! 
 
How did I do it?
#1.  Take 3 strips of different colors of card stock, that measure 3 1/2 x 1 1/2" each.
#2.  The bright orange square below is actually a post it note.  I used it with the sticky end up & laid the 3 card stock pieces, side by side, along it to hold them all together.
#3.  Now carefully stamp the leaf images onto these strips of card stock, being very careful to not move them.  You want them to line up perfectly & not omit any part of the stamped image when you stamp them. 
 #4.  Flip the pieces over & write numbers on them- so that you can keep them in order when you are assembling them.
 
#5.  Now adhere these strips (in order of 1-3), directly onto a piece of Early Espresso card stock that measures 5 x 3 3/4".   Start by putting the 2 outside pieces on first. 
 #6.  Then lastly, adhere the center one- leaving approximately a 1/8" edge around & in between all of the strips. 
#7.  This is what it looks like when all of them are adhered. 
 
#8.  When I got it all done, I added a combination of approx. 1/8 tsp of Champagne Shimmer paint to a Stampin' Spritzer with rubbing alcohol in it.  Be sure you SHAKE THIS WELL in between each use!  Hold the spritzer about 5" away from your card stock when you spray it!  And then check out the awesome sparkle that it adds!  
NOTE:  Start with a LITTLE shimmer, as you can always add more!  You will need to let you card stock dry too.  So be sure you don't over spray it! 
I then added some words & braided linen trim to finish it off!
 
I hope you like this card as much as I do!  
Have fun creating with this layout, by following my step-by-step tutorial directions!
stamp sets:  'Gather Together' (leaves & dots) & 'Beautiful Autumn' (words)
card stock:
  • Sahara Sand- 4 1/4 x 11"- score at 5 1/2"- fold in half for card base; 3 1/2 x 1 1/2"; 3 1/2 x 3/4"- stamp words onto
  • Early Espresso- 3 3/4 x 5"; 5 x 1/4"
  • Cajun Craze- 3 1/2 x 1 1/2"
  • Terracotta Tile- 3 1/2 x 1 1/2"
  • Whisper White- 4 x 5 1/4"- for inside of card
ink:  Early Espresso
other:  Braided Linen Thread; Banners Pick A Punch; Dimensionals; Champagne Shimmer Paint; Stampin' Spritzer; dimensionals; glue dots
 
You can change the words & shapes of the word.....to make it look totally different!  
I love them both!
 
I hope you have a TERRIFIC Tuesday!! 
Happy Stamping! 
Hugs- 
SUSIE

Monday, August 31, 2020

Starburst card

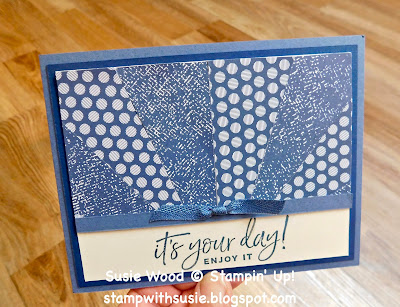
Here is another starburst card that I made!
This was a lot of fun to make & it was so easy to do!
 On this starburst card I added a couple of balloons to it.
As this is the card that I made for Masen's 5th birthday!
 
NOTES:  For the Balloons- I punched them out using the Balloon Bouquet Punch.  And the strings are just 2 very thin strips of card stock that I curled by wrapping around a pencil.  The asterisks on the balloons are from the 'Nothing Better Than' stamp set.  

HOW DID I DO IT?
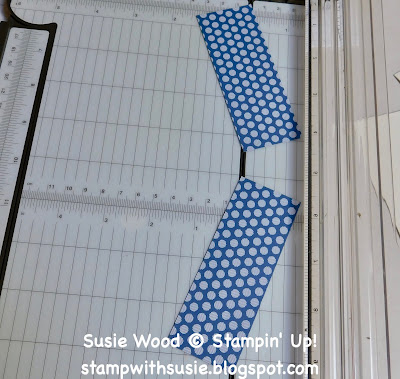
I laid these strips in my paper cutter, at opposite diagonals- like shown below & cut them both at the same time.
#1.   1 1/2 x 4" each- diagonal cut these 2 strips.
#2.  1 1/2 x 4" each- diagonal cut these 2 strips.
#3.  Take a piece of 2 3/4 x 5"- Whisper White card stock & lightly mark it in the center top, along the 5" side, at the 2 1/2" mark.
 
#4.  Now start adhering these diagonal strips to the 2 3/4 x 5" piece of Whisper White card stock, by starting in the center, on the mark you made, like this.
 
#5.  Alternate DSP pattern/colors.  And when you are done it should look like this. 
 #6.  Flip it over so that you can see the strips that are hanging over the edges. 
#7.  Using your Paper Snips (scissors), cut along the Whisper White card stock edges, removing the dsp that is hanging over the edges.  
 #8.  Flip it over to the front side & it looks like this! 
#9.  You now need to stamp the words, along the bottom edge of the 3 3/4 x 5" piece of card stock & adhere the starburst piece of card stock to it! 
#10.  Now adhere is all together & it looks like this!  I love it!  And I hope you do too! 

And then check out how I decorated the inside of his card!
I added cookies to it!
 
Sarah did different kind of cookies for Masen's birthday party, instead of cake.
So I thought that this was very fitting for this special celebration!
Masen liked It!
And I thought it turned out cute too!
All of our kids are cookies monsters!!!  
And grandma makes them home made warm cookies almost every day!
 
stamp set: 'Nothings Better Than' (cookies & inside words); 'Happiest of Birthdays' (outside words) & 'Itty Bitty Greetings' (Happy Birthday words on inside)
card stock:
  • Misty Moonlight- 4 1/4 x 11"- score at 5 1/2"- fold in half for card base; 5 x 1/4"; 2 1/2 x 1/8" strips (x2) for balloon strings
  • Night of Navy- 4 x 5 1/4"
  • Whisper White- 2 3/4 x 5"- make starburst on this piece; 3 3/4 x 5"- for front of card- stamp words along the bottom; 4 x 5 1/4"- for inside of card; 2" strip- punch out 2 ballons; 2" strip- stamp cookies onto & die cut out
designer paper:  2020-2022 In Color DSP (Misty Moonlight)
ink:  Misty Moonlight, Memento, Soft Suede
other: Stampin' Cut & Emboss Machine; Love You More Than Dies; Balloon Bouquet Punch; 
 
I hope you have a MARVELOUS Monday!
Happy Stamping!
Hugs-
SUSIE

Sunday, August 30, 2020

Try this Sketch!!

Check out this weeks sketch!!  
And have fun creating with it!
 
Basic Black- 4 1/4 x 11"- score at 5 1/2" & fold in half for card base
Basic Gray- 5 x 2 3/4"; 5 1/2 x 3/4"
Whisper White- 4 3/4 x 2 1/2"; 3 1/2 x 1"
These are the cards I made for the twins!
They turned 9 years old yesterday!!
I tried to make them look like lightening bugs in a jar!
And this is what I ended up making!
Here are some of the supplies I used in creating this card.
If you look closely at the jar, can you tell that I punched out a jar image- using a Window Sheet?
I wanted to make it look like a true glass jar!
stamp sets:  'Lots to Celebrate' & 'Field of Flowers'
card stock:
  • Basic Black- 4 1/4 x 11"- score at 5 1/2"- fold in half for card base
  • Granny Apple Green- 5 x 2 3/4"' 5 1/2 x 3/4"
  • Whisper White- 4 3/4 x 2 1/2"- stamp grass & bugs onto; 4 x 5 1/4"- for inside of card; 1" strip- stamp jar lid onto & fussy cut out using Paper Snips; 2 3/4" strip- stamp jar onto & punch out with Jar Punch
  • Bumblebee- 1 1/4" strip- stamp words onto & die cut out using Tasteful Labels Die
  • Window Sheet- 2 3/4" strip- punch out with Jar Punch
inks:  Memento, Granny Apple Green & Bumblee
Stampin' Write Marker- Basic Black (to draw on antennas)
other: Stampin' Cut & Emboss Machine; Tasteful Label Dies; Clear Epoxy Droplets; Jar Punch; sponge dauber; Paper Snips (to fussy cut out jar lid)
 
I HOPE you have a SUPER Sunday!!
Happy Stamping!
Hugs-
SUSIE

Saturday, August 29, 2020

Simple Saturday!

  Hello!!
Today I'm sharing a quick & simple card I made with some left over pieces on my counter.

What a fun card huh!
I just love this 'Press On' stamp set!
 
How did I I do that?
Did you notice how I made the piece that the words are stamped onto- smaller?
#1.  Punch out scalloped rectangle, using the Rectangle Postage Stamp Punch.
#2.  I lightly attached it to a scrap strip of card stock, so that I had a "handle" to hang on it.
#3.  Slide it into the top side of the punch & line up the grooved notches & PUNCH again to make smaller.

#4.  This is what you get.  2 thinner pieces to use!!  Neat huh! 

You can CLICK HERE to see another CUTE card using the 'Press On' stamp set!


stamp set:  'Press On'
card stock:
  • Thick Whisper White- 4 1/4 x 11"- score at 5 1/2"- fold in half for card base
  • Poppy Parade- 4 x 5 1/4"
  • Crumb Cake- 3 x 3"
  • Whisper White- 2" strip- stamp cup onto & fussy cut out with Paper Snips; 1 1/4" strip- punch out rectangle punch, stamp words onto & then put back into the punch & make a little smaller
designer paper:  Trimming the Town3 x 4""
ink:  Crumb Cake & Poppy Parade
Stampin' Blend:  Dark Crumb Cake
other:  Rectangle Postage Stamp Punch; Paper Snips; Wink of Stella; dimensionals

We have a jam packed weekend!!  I have some friends coming this morning to stamp.  And then we have the twins 9th birthday party this afternoon.  Grandma has their cake to bake, cards to make & lots to do yet!!  I still can't believe that Brody & Drake are going to be 9 years old today!!  Time just flies!

Gotta run.....
I hope you have a SPECIAL Saturday!!
Happy Stamping!
Hugs-
SUSIE

Friday, August 28, 2020

Stampin' Up! So Much Happy Bundle

WOO HOO!!
Check out these CUTE cards using the 'So Much Happy Bundle'!
I can't decide which one I like better!
They are just both super cute!
 I do think that this one with the big bow on the top, is just totally adorable though!
 
This bow is from the 'Gift Wrapped Bundle'!
Yes- the bow is a punch!!
And you know I'm a punch girl- so I think it is pretty cool!

This card is a fun fold!
 And here is what it looks like when it is opened up.
Check out the words that I used for the inside greeting.
They are from the 'Happiest of Birthdays' stamp set. 
This is another one of my favorite stamp sets!
 
 
stamp set:  'So Much Happy'; 'Happiest of Birthdays' & 'Gift Wrapped
card stock:
  • Misty Moonlight- 5 1/2 x 5 1/2"- score at 4 1/4" for card base; 3 x 4 1/4"- emboss using the Dainty Diamonds 3D Embossing Folder; 1/2 x 3"
  • Whisper White- 2 3/4 x 4"- die cut words out of the center of this using the Happy Dies; 1" strip- stamp words onto & punch out using the Classic Label Punch; 4 x 5 1/4"- stamp inside greeting words on
designer paper:  Flowers for Every Season- 1 x 5 1/4"
ink:  Misty Moonlight
other:  Bow Builder Punch; Classic Label Punch; Stampin' Cut & Emboss Machine; Happy Dies; Dainty Diamonds 3D Embossing Folder; dimensionals; glue dots

+++++++++++
Last weekend was Nathan's birthday.
His card was very similar to these.
Here it is.
This was my inspiration for the cards I posted above.
++++++++++++

I hope you have a FABULOUS Friday!!
Happy Stamping!
Hugs
SUSIE

Thursday, August 27, 2020

Stampin' Up! Gather Together

 I love this card!!! 
It is such a neat fall card!
This could be used for so many different occasions.
 
I used the wheat image from the 'Gather Together' stamp set 
on page 47 in 2020 August-December Mini (Holiday) Catalog.  

Check out how I stamped the wheat onto the Rectangle Postage Stamp Punch.
I stamped the wheat in 3 different colors- Cinnamon Cider; Bumblebee & Crumb Cake
stamp set:  'Gather Together' & 'Celebration Tidings'
card stock:
  • Cinnamon Cider- 4 1/4 x 11"- score at 5 1/2"- fold in half for card base
  • Crumb Cake- 3 3/4 x 5"- emboss using the Tasteful Textures Embossing Folder; 1/2 x 3 1/2"- stamp words onto & punch both ends using the Banners Pick A Punch
  • Bumblebee- 4 1/4" strip- die cut using the Stitched Rectangle Die
  • Very Vanilla- 2 3/4" strip- punch out 3 rectangles, using the Rectangle Postage Stamp Punch; 4 x 5 1/4"- for inside of card
designer paper:  Flowers for Every Season-
inks:  Cinnamon Cider; Bumblebee & Crumb Cake
other:  Stampin' Cut & Emboss Machine; Tasteful Textile 3D Embossing Folder; Stitched Rectangle Dies; 2020-2022 In Color Enamel Dots (Cinnamon Cider); Banners Pick A Punch; Rectangle Postage Stamp Punch; Linen Thread; dimensionals; glue dots
 
I hope you a have a great Thursday!
Happy Stamping!
Hugs-
SUSIE

Wednesday, August 26, 2020

Stampin' Up! Beautiful Autumn

 Check out today's fun fall card!
I used the Gilded Autumn Suite to make this card.
You can find this suite on pages 44-46 in the 
2020 August- December Mini (Holiday) Catalog.

I love the 'Beautiful Autumn' stamp set, especially the wording & the font.
Isn't this Gilded Autumn DSP pretty!

You know I love fall!!
So I think that this is just a great suite!

stamp set:  'Beautiful Autumn'
card stock:
  • Cajun Craze- 5 1/2 x 8 1/2"- score at 4 1/4"- fold in half for card base; 3 1/4 x 4 1/4"; 4 1/4 x 1 1/2"
  • Mint Macaron- 4 x 5 1/4"
  • Very Vanilla-  2 3/4" strip- die cut Tasteful Labels Die & stamp words/leaves onto; 4 x 5 1/4"- for inside of card
designer paper:  Gilded Autumn Specialty DSP- 3 x 4"
inks:  Cajun Craze & Crumb Cake
other:  Stampin' Cut & Emboss Machine; Tasteful Textures 3D Embossing Folder; Tasteful Labels Dies; Basket Weave Mint Macaron Ribbon; Elegant Faceted Gems; dimensionals; glue dots

I hope you have a WONDERFUL Wednesday!
Happy Stamping!
Hugs!
SUSIE

Tuesday, August 25, 2020

Stampin' Up! Press On

Check out some of the new products from the Holiday Mini Catalog 
I used when creating this card!
 
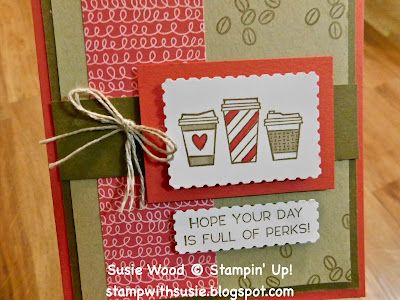
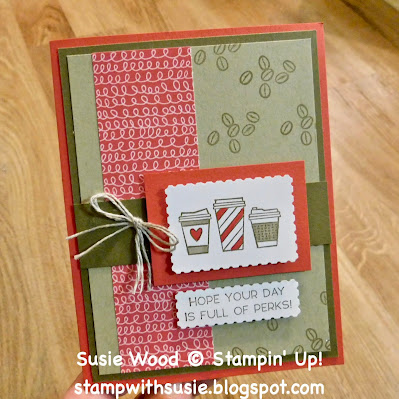
This is a fun card using the 'Press On' stamp set!
And I combined it with the Poppy Parade DSP that 
is in the Trimming The Town DSP pack.  

I am a hot drink lover (not a Starbucks fan)-
but I think that this stamp set is totally adorable & totally me.
Notice how I stamped the coffee beans in the background, doing a 
tone on tone look with Crumb Cake card stock & Crumb Cake ink. 

Check out how I used the Rectangle Postage Stamp Punch in 2 different ways!
It is the normal (regular punch) size with the coffee cups.
And then for the words I punched it, slid it back into the punch (from the top side, 
so that I could hang onto it) & punched it again to make it narrower.

stamp set:  'Press On'
card stock:
  • Poppy Parade- 5 1/2 x 8 1/2"- score at 4 1/4'- fold in half for card base; 1 3/4 x 2 1/2"
  • Soft Suede- 4 x 5 1/4"; 1 x 4"
  • Crumb Cake- 3 3/4 x 5"
  • Whisper White-2 3/4 " strip-; 4 x 5 1/4"- for inside of card
designer paper:  Trimming the Town DSP- 1 1/2 x 5"
ink:  Soft Suede & Crumb Cake
Stampin' Blends:  Dark Poppy Parade & Dark Crumb Cake
other:  Rectangle Postage Stamp Punch; Linen Thread; Dimensionals; Glue Dots
 
I hope you have a TERRIFIC Tuesday!!
Happy Stamping!
Hugs-
SUSIE