Pages

Showing posts sorted by relevance for query birthday card. Sort by date Show all posts

Thursday, February 25, 2021

Stampin' Up! Hey Birthday Chick

 Here is a fun birthday chick!
It this chick a she?  Or a he?
I think it could be either!
I will call "her" curious!
She sure is checking out this birthday cupcake!
 
This chick is from the 'Hey Birthday Chick' bundle!

This is what the images in the stamp set- 'Hey Birthday Chick'- #154464= $21.00
& coordinating dies- Birthday Chick Dies- #158200= $27.00 look like.
Save 10% when you buy them together as a bundle-
#158631- Hey Birthday Chick= $43.00 
This stamp set is not in any catalog.
You'll just find it on a flyer, as a special deal available until June 30th, 2021! 

You can these links to see more info & cards I have made with this
'Hey Chick Bundle'!
This gorgeous ombre DSP is from the Oh So Ombre DSP pack.
It is a Sale-a-bration choice that you can get for FREE 
with a $50 product order right now.  
 
NOTE:  Sale-a-bration ends on Sunday, February 28th, 2020.....
so it only lasts for a few more days.
Don't miss out!
 
Here are the supplies & measurements so that you can make this card too!
stamp set:  'Hey Birthday Chick'
card stock:
  • Blackberry Bliss- 5 1/2 x 8 1/2"- score at 4 1/4"- fold in half for card base
  • Basic White-3 3/4 x 3 3/4"
  • Basic White- 3 1/2 x 3 1/2"- die cut out of the center of this using the scalloped square die to make a 'window'
  • Basic White- 2" strip- stamp chick onto, color & die cut out
  • Basic White- 4 x 5 1/4"- for inside of card
designer paper:  Oh So Ombre DSP- FREE SAB choice with a $50 product order
  • 4 x 2"- dotted pattern
  • 3 x 3"- piece in the white frame that I stamped onto
ink:  Blackberry Bliss & Memento
Stampin' Blends:  Dark Blackberry Bliss & Dark Daffodil Delight
other:  Stampin' Cut & Emboss Machine; Layering Square Dies; Birthday Chick Dies; Wink of Stella; Artistry Blooms Adhesive Backed Sequins; Blackberry Bliss Striped Ribbon; dimensionals; glue dots; Foam Adhesive Strips- #141825= $8.00
NOTE:  I have the chick popped up on a wobbly so that she moves too!  
 
I hope you have a great Thursday!!  
Happy Stamping!
Hugs-
SUSIE

Friday, May 1, 2020

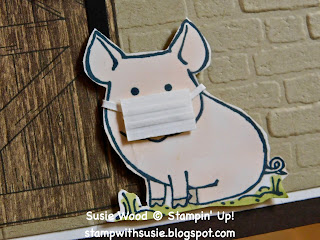
This Little Piggy with his Covid-19 Mask!

Awhh......this is totally a Susie card!!  Me & my little piggies!  This is an adorable stamp set that is dear to my heart!  I can't wait for the kids to see this card today.  I know that they will all love it!  As I have a feeling we might be making more of these piggy cards!

So.....I put a little Covid-19 mask on my 'This Little Piggy' card today.  

How did I make the mask?
  • It is a TINY piece of white card stock that measures- 3/8" x 5/8"- & I score it every 1/8" on my Simply Scoring Tool.  I then cut 1/8" strips of white card stock for the straps.  
  • The mask has a dimensional behind it.  
  • The straps are adhered with a glue dot on the end of them & tucked in under the mask (since it is popped up with the dimensional).  
  • I bend the ends of the straps to the backside of the pig & then used Tear & Tape to hold those ends down.
  • This mask is easy to make!  
  • And I think it turned out so cute!
Check out the words on this card.  The words are a download you can purchase from the Covid-19 SU! digital stamp set. 
Purchase this- Share Sunshine PDF Download. 
Buy it by CLICKING ON THE LINK BELOW!
Price= $12.00 plus tax

How can you get this download?
*Click on the link above to purchase it.  
*You can then download it, print it from your printer and use it right away!
*Why is this a PDF & not a stamp? Because it saves times & shipping costs & you can use it right away, without waiting on.
*Some of the words are so funny! Some of them I love & some of them I will not personally use. But I LOVE this idea & can't wait to make more cards using them!
*This PDF is a SU! copyright PDF/images.
*You can NOT share the actual PDF with others. It is for your use only to make cards /gifts/projects with. 
*100% of the money earned from this PDF purchase, with go to supporting Covid-19 charities! 
*If one of your friends wants the words, then she will have to purchase the PDF!
stamp set:  'This Little Piggy'-RETIRING
PDF for words- You can purchase by clicking here- 
https://covid19.stampinup.com/products/giving-back-us-ca
card stock:
  • Early Espresso- 5 1/2 x 8 1/2"- score at 4 1/4"- fold in half for card base; 1 1/4" strip- die cut using Stitched Rectangle dies
  • Whisper White- 3/8 x 5/8"- score lines every 1/8" to make mask; 1/8" strip (2) for straps; 2 1/2" strip- stamp pig onto this & fussy cut out with Paper Snips; 3 3/4 x 5"- for outside; 3 3/4 x 5"- for inside of card
  • Crumb Cake- 3 1/2 x 4 3/4"- emboss using Brick & Mortar Embossing Folder
  • Real Red- 1/2" strip- punch out hearts using Dog Builder Punch
  • Basic Black- scraps for barn door handle & hinges- that I just cut with my Paper Snips
  • PDF for words- printed on Whisper White card stock....using Stitched Rectangle dies & cut out the words
designer paper:  Pressed Petals Specialty DSP- (woodgrain image on the barn door)- 2 3/4" strip- stamp barn door onto this, using Memento ink & use the die or fussy cut out with Paper Snips
ink:  Memento 
Stampin' Blends:  Light Petal Pink, Light Old Olive, Dark Crumb Cake
other:  Paper Snips (to cut out the door & make the hinges & door handle)

Today is Brayden's birthday!  Can you believe that he is 12 years old already!  WOW!!  He will be in the 7th grade (Jr. High) next fall when school starts.  What a great young man he is!  We are so proud of him!  
His birthday card is very similar to my pig card above.  I have his card posted below.  I used the words from the 'Bonanza Buddies' stamp set.  I can't wait for him to see this.  I think he'll love it!  As he has 12 4-H pigs again this year.  They are right behind our house.  And all of the kids are lovin' being with these pigs each day!  Our piggies are pretty tame!  And it is so cute watching the kids spend time with them. 
I hope you have a FABULOUS Friday!!
Happy Stamping!
Hugs-
SUSIE

Monday, July 25, 2016

Stampin' Up!- 'Styliized Birthday'!

Here is a fun fold birthday card.  It is bright & clean cut!  The black designer paper on it just makes it pop with color & boldness!
The fun fold is a double "Z" fold card with a twist!  Don't you just love it!

You can see another card I created with that fold BY CLICKING HERE!
  • I cut the base card in Flirty Flamingo- 4 1/4" x 11"- score at 2 3/4" & 5 1/2".
  • I cut the flip middle part in Flirty Flamingo at 1 1/2" x 11"- score at 2 3/4" & 5 1/2" & flipped it so that it folded the opposite of the card base.    
  • The designer paper- 4" x 2 1/2".
  • Happy Birthday is stamped on Very Vanilla card stock- 3 x 2 3/4"; Flirty Flamingo- 3 1/4 x 3"; Basic Black- 3 1/2 x 3 1/4".
  • I used 1 3/4" strips of Flirty Flamingo to stamp the flowers onto & then punched them out.  
  • The inside layer piece is Very Vanilla- 4 x 5 1/4".
stamp sets:  'Stylized Birthday' & 'Grateful Greetings'
card stock:  Flirty Flamingo, Basic Black, Very Vanilla
designer paper:  Playful Palette 6x6 Paper Stack
ink:  Black Memento Pad
other:  White Perfect Accents, Dimensionals, Simply Scored Scoring Tool, Blossom Bunch Punch

NOTE**I used a Black Sharpie Marker to color the White Perfect Accents with so that I had black dots! 
++++
Yesterday morning we were up bright & early to eat breakfast, load the car & head home from Champaign.  We had a fun time!  It was a long drive home, but the company was great!  I am glad we got to all catch up on things, as we don't see each other often.  The air conditioner in my car broke- so we had a hot ride!

Last night I didn't do much.  I had been fighting off a migraine all day & it just got the best of me.  I laid down & tried to sleep it off.

Deke went to Nathan & Sarah's & helped them pack up things in the basement.  We have a busy week ahead of us getting them all packed up & moved to their new home.  They bought a home that is only 1/2 mile from our house- so they will be our neighbors! 

This morning Deke is off early to chore & head to the office for his weekly board meeting.  I'm up to walk & get ready for Masen to spend the day with me.  Grandma needs to be a busy bee finishing up his birthday cards, so that we can get them in the mail.

I hope you have a MARVELOUS Monday!!
Happy Stamping!
Hugs-
SUSIE

Wednesday, November 19, 2014

Happy, Happy, Happy, Happy Birthday!!

Here is the card that I whipped up on Monday morning to give to Manda for her birthday!  I wanted it to be a clean & simple card & look like her.  I must have succeeded as she said she loved it!  These words are 'my sayings', that I use often when I wish someone a Happy Birthday- so I thought this was a perfect set to use for her birthday card.  These words are from the set- 'Amazing Birthday'.

stamp set:  'Amazing Birthday'
card stock:  Smoky Slate, Calypso Coral & Whisper White
designer paper:  Park Lane
ink:  Basic Gray, Calypso Coral
supplies:  1 1/4" Circle Punch, Calypso Coral Ribbon, Dimensionals, Glue Dot, Paper Snips, 2 Way Glue Pen, Dazzling Diamonds Glitter
+++++++++
I enjoyed my day with the boys yesterday.  Since it has been so cold & we can't go outside to play, we've been working on some educational games on the IPads.  Brayden & Papa had fun at Boy Scouts last night, while I got my hair cut.  When I got home I worked on cutting more Christmas card kits all evening.  I'm gaining- but still have a few more to do.

Deke is gone to meetings again today & tonight.  Drake picked out pancakes & ham for lunch yesterday since Papa wasn't here to eat with us.  Brody gets to pick out our lunch for today- so I wonder what we'll have?  He loves sugar- so he'll probably just want cookies knowing him.

I'm planning to be home tonight- finally.  And I hope to get more Christmas card kits cut.

I hope you have a WONDERFUL Wednesday!!
Happy Stamping!!
Hugs!
SUSIE

Saturday, June 23, 2018

A fun guy card!

Check out this tool box card I made.  This is the Father's Day card that I gave to Steve last weekend.
It wouldn't have to be just for Father's Day!  This card could be a birthday card or any type of guy card.

stamp set:  'Itty Bitty Greetings'
card stock:  Real Red, Basic Black, Silver Foil
ink:  Black Stazon
other:  Classic Label Punch, Dimensionals, Cookie Builder Punch, 1/2" Circle Punch 
+++++++++
This has been a killer of a week.  We have had so much going on.  I have been going 100 mph & haven't had much sleep.
 
Yesterday was a busy day with the kids.  We ran errands yesterday morning.  Last night Nathan & Sarah took their family, the Seeley family & us out for supper to celebrate the 4 June birthday's we've had the past 1 1/2 weeks.
 
When we got home I worked on things for Ainslee's birthday party.  I made mints & Deke helped me.  
 
This morning I'm up early to finish up things for her party- her banner, card, cake, etc.  We'll then pick up the 2 Wood boys & meeting the Seeley family in Hedrick for their Annual BBQ Day's Parade.  We'll hurry home from that & go to Ainslee's 1st birthday party!  Then home to chore & go to a wedding reception.
 
I hope you have a SENSATIONAL Saturday!!
Happy Stamping!
Hugs,
SUSIE


Tuesday, July 7, 2020

So Much Happy bundle card

Check out this CUTE birthday card using the 'So Much Happy' Bundle!!  
These Happy Dies are just awesome!!  
And so easy to use!

How Did I do it?

  • 5 1/4 x 1 1/2" strip of Magenta Madness card stock- for pink card above OR Bermuda Bay card stock- for Blue card below
  • Line up the Happy die
  • Cut it using your Die Cutting Machine
  • Punch out the pieces 

Isn't this cool how the letters all stay connected when they are cut out!!!
I just love the bright & cheery colors of this card!
It is the perfect bundle for any occasion!!
It has endless possibilities!

stamp set:  'So Much Happy'
card stock:

  • Magenta Madness-4 1/4 x 11"- score at 5 1/2""- fold in half for card base; 1" strip- die cut out 3 stars; 5 1/4 x 1 1/2"- de cut HAPPY words
  • Whisper White-  1/2" strip- die cut out balloon string; 1" strip- stamp birthday words onto it & die cut out using the Tasteful Labels stitched Banner die; 4 x 5 1/4"- for inside of the card;
  • Daffodil Delight- 2" strip- stamp balloon onto & die cut out
  • 5 1/4 x 1 1/8"- goes behind the HAPPY words; 
  • Mango Melody- 4 x 5 1/4"- for front of card- emboss using the Tasteful Textile 3D Embossing Folder
designer paper:  Artistry Blooms DSP- 5 1/4 x 1"
ink:  Magenta Madness
Stampin' Blend:  Dark Daffodil Delight- I colored a few of the stars that are in the Balloon.
other:  Die Cutting & Embossing Machine; Happy Die; Tasteful Labels Dies; Tasteful Textile 3D Embossing Folder; Dimensionals

I hope you have a TERRIFIC Tuesday!!
Happy Stamping!
Hugs-
SUSIE

Monday, August 31, 2020

Starburst card

Here is another starburst card that I made!
This was a lot of fun to make & it was so easy to do!
 On this starburst card I added a couple of balloons to it.
As this is the card that I made for Masen's 5th birthday!
 
NOTES:  For the Balloons- I punched them out using the Balloon Bouquet Punch.  And the strings are just 2 very thin strips of card stock that I curled by wrapping around a pencil.  The asterisks on the balloons are from the 'Nothing Better Than' stamp set.  

HOW DID I DO IT?
I laid these strips in my paper cutter, at opposite diagonals- like shown below & cut them both at the same time.
#1.   1 1/2 x 4" each- diagonal cut these 2 strips.
#2.  1 1/2 x 4" each- diagonal cut these 2 strips.
#3.  Take a piece of 2 3/4 x 5"- Whisper White card stock & lightly mark it in the center top, along the 5" side, at the 2 1/2" mark.
 
#4.  Now start adhering these diagonal strips to the 2 3/4 x 5" piece of Whisper White card stock, by starting in the center, on the mark you made, like this.
 
#5.  Alternate DSP pattern/colors.  And when you are done it should look like this. 
 #6.  Flip it over so that you can see the strips that are hanging over the edges. 
#7.  Using your Paper Snips (scissors), cut along the Whisper White card stock edges, removing the dsp that is hanging over the edges.  
 #8.  Flip it over to the front side & it looks like this! 
#9.  You now need to stamp the words, along the bottom edge of the 3 3/4 x 5" piece of card stock & adhere the starburst piece of card stock to it! 
#10.  Now adhere is all together & it looks like this!  I love it!  And I hope you do too! 

And then check out how I decorated the inside of his card!
I added cookies to it!
 
Sarah did different kind of cookies for Masen's birthday party, instead of cake.
So I thought that this was very fitting for this special celebration!
Masen liked It!
And I thought it turned out cute too!
All of our kids are cookies monsters!!!  
And grandma makes them home made warm cookies almost every day!
 
stamp set: 'Nothings Better Than' (cookies & inside words); 'Happiest of Birthdays' (outside words) & 'Itty Bitty Greetings' (Happy Birthday words on inside)
card stock:
  • Misty Moonlight- 4 1/4 x 11"- score at 5 1/2"- fold in half for card base; 5 x 1/4"; 2 1/2 x 1/8" strips (x2) for balloon strings
  • Night of Navy- 4 x 5 1/4"
  • Whisper White- 2 3/4 x 5"- make starburst on this piece; 3 3/4 x 5"- for front of card- stamp words along the bottom; 4 x 5 1/4"- for inside of card; 2" strip- punch out 2 ballons; 2" strip- stamp cookies onto & die cut out
designer paper:  2020-2022 In Color DSP (Misty Moonlight)
ink:  Misty Moonlight, Memento, Soft Suede
other: Stampin' Cut & Emboss Machine; Love You More Than Dies; Balloon Bouquet Punch; 
 
I hope you have a MARVELOUS Monday!
Happy Stamping!
Hugs-
SUSIE

Monday, June 22, 2015

Here is Trey's Birthday card!

Here is the card that I made for Trey & gave to him at his party yesterday.  The birthday theme was Dr. Suess- 'Thing Three' since he is the third child.  The colors I used to make his card are the same colors we used to make his birthday invite.  
I used lots of new things from the new catalog here & think it turned out pretty cute!
I also made it a 'Z fold' card.....as I love this fun fold!

stamp set:   'Build A Birthday'
card stock:  Tempting Turquoise, Real Red, Whisper White
designer paper:  Brights Designer Series Paper Stack
ink:  Tempting Turquoise, Real Red, Daffodil Delight
other:  Real Red 1/4"Cotton Ribbon, Dimensionals, Glue Dots, Banner Triple Punch

+++++
Yesterday I was up bright & early & went to Manda's to help her get ready for Trey's party!  It was a warm day, but all turned out perfect!!!  He loved his cake!!  It was precious!
 
All of our hard work in getting everything ready paid off!  The food was all yummy, the weather was good & it was a nice celebration with our families for both Trey's birthday & Father's Day too! Plus yesterday was also my Aunt Virginia's birthday too- so we sang "Happy Birthday" to her & sent her home with several pieces of chocolate cake (her favorite). 

I hope you have a MARVELOUS Monday!!
Happy Stamping!
Hugs-
SUSIE

Friday, July 7, 2023

Circle Sayings Fun Fold

Check out these fun birthday cards!
 
Which do you like better?
THIS- the Fresh Freesia one?
OR
THAT- the Azure Afternoon one?
 
Everyone attending my July monthly classes will get to make one of these cards!
This is the pattern on how I cut it.
*8 1/2 x 11" of card stock.
*Measure & lightly mark at 3" on both ends as shown.
*Then diagonally cut from mark to mark.
*You'll now have 2 card bases.
*Using the Simply Scored Scoring Tool- 
score your card base as shown @ 4 1/4" & 8".
 
Below shows how I cut the layers at a diagonal-
For the diagonal fun fold birthday card here is how I cut dsp at the angle-
  1. Cut dsp, slid up about 1/2” from bottom of card stock;
  2. Carefully flipped over so didn’t move dsp & drew line along top edge;
  3. Cut off top little triangle piece with paper cutter.
*4 x 5 1/4"- lay inside card & slide upward- leaving about 1/2" showing at bottom.
*Flip this over & using a pencil- draw a line along the edge.
This is the part that you'll use your paper cutter & cut off!
*Now this is what it looks like!
It makes the perfect layer!
 
*You will "repeat" this process for both DSP layers too!
*2 3/4 x 3 1/2"- front of card flap (stars)
*3 1/2 x 4 1/4"- for middle front of card (squiggly lines)
 

Here are the supplies & measurements.
stamp set:  'Circle Sayings'
card stock:
  • Fresh Freesia- 8 1/2 x 11"- mark at 3" on both ends as shown in photo above & diagonally cut, getting 2 card bases
  • Fresh Freesia- 2 3/4" strip- stamp words & punch out with 2 3/8" Circle Punch
  • Fresh Freesia- 1" strip- punch edge using the Handmade Tag Punch
  • Basic White- 2" strip- stamp cupcake & die cut circle using Reach For the Stars Dies
  • Basic White- 4 x 5 1/4"- for inside of card (diagonally cut top edge)
designer paper:  Bright & Beautiful DSP-
  • 3 1/2 x 2 3/4"- for front panel (diagonally cut top edge)
  • 3 1/2 x 4 1/4"- for middle panel (diagonally cut top edge)
ink:  Memento
Stampin' Blends: Fresh Freesia 
other:  Stampin' Cut & Emboss Machine; Reach For the Stars Dies; Glitter Organdy Ribbon; Tensil 3 Gem Pack (Fresh Freesia); 2 3/8" Circle Punch; Handmade Tag Punch; Wink of Stella; dimensionals; glue dots
 
I hope you have a FABULOUS Friday!
Happy Stamping!
Hugs-
SUSIE

Sunday, June 14, 2020

A graduation card using the So Much Happy Bundle!

Yesterday I posted a Birthday card (you can click here to see it), using a NEW Bundle, that includes the 'So Much Happy' stamp set & coordinating Happy Dies!!   
 
But check out today's graduation card that I made, using this same bundle & layout!  I just changed the colors of the card stock & the words!  As we had a graduation party to go to last night & this is the card that I made for Nate.  Our school colors are Black & Yellow!  Check out the NEW Bumble Bee In Color card stock that I used! 

Here are the NEW products:
  • 'So Much Happy' stamp set 
  • Happy Dies
  • Tasteful Label Dies
  • Tasteful Texture Embossing Folder
  • Playing With Patterns DSP
  • Bumble Bee Card stock
Here are the supplies & the measurements I so that you can make this card too!
stamp set:  'So Much Happy'
card stock:
  • Basic Black- 4 1/4 x 11"- score at 4 1/4" & fold in half for card base; 4 1/4 x 1/2"; 4 1/4 x 1/2"
  • Bumble Bee- 4 x 5 1/4"- for card front.  I used the Happy Die & cut out the letters.  Then added the DSP behind them; 1" strip- die cut balloon strings; 1" strip- die cut 2 tiny stars; 1 1/2" strip- stamp balloons & die cut out; 1/2" strip- stamp graduation words onto & die cut out
  • Whisper White- 4 x 5 1/4"- for inside of word
designer paper:  Playing with Patterns- 3/4 x 4"
ink: Memento
other:  Big Shot; Magnetic Platform; Tasteful Label Dies (cut out birthday words); Happy Dies; Standard Platform; Tasteful Texture Embossing Folder; dimensionals; glue dots
 
I hope you have a SUPER Sunday!!
Happy Stamping!
Hugs-
SUSIE

Monday, September 2, 2013

A 'Gorgeous Grunge' birthday card......for Steve!

Good morning!
Here is Steve's birthday card......another 'Gorgeous Grunge' one.
You might call this a quickie.
It is clean & simple.
 'Gorgeous Grunge' & 'Bring on the Cake'
cs:  Whisper White, Smoky Slate & Basic Gray
ink:  Basic Gray
supplies:  2 1/2" Circle punch, Label Bracket punch, Extra Large Oval punch, dimensionals

NOTES: 
* I rounded the top corner of the card using the 1 3/4" circle punch.  
* I used 4 of the Label Bracket punch outs to create the layer behind the works- Birthday Wishes.

We had a nice, but busy day yesterday!
The twins went home about 9:00 & I did laundry & cooked meat.
I then worked in my stamp studio a couple of hours, cleaning off my table some 
& I made Steve's birthday card.
My sister-in-law & brother-in-law (Sheryl & Dan) stopped to visit a bit.
(which was awesome!)
Then we went to the Seeley's home for the twins birthday supper/party!
It was a nice time had  by the Seeley & Wood combined families!
 The boys opening their gifts.
 The twins got a bubble machine (you can't see the bubbles).
Too bad you couldn't hear all of the laughs & have seen them trying to 
catch the bubbles....it was super cute!

 I'm off to my studio with my coffee to continue to clean up.
Then heading to town in a bit to go on a walk & visit with my sister-in-law Sheryl.
Then I'll be back home to spend the rest of the day/night in my studio cleaning & stamping!
I have LOTS to get done today for my upcoming workshops this week!
So that means I'll be drinking lots of coffee too.

I hope you enjoy a wonderful Labor Day- whatever you may be doing!
Happy Stamping!
Hugs!
SUSIE

Friday, July 21, 2023

Country Side Inn Fun Fold

I made another fun fold z card using the
#161467- Countryside Inn DSP= $12.50- pg. 129.
 This is what the card looks like when opened up!
 
 Here is the pattern on how I cut it.
*8 1/2 x 11" of card stock.
*Measure & lightly mark at 3" on both ends as shown.
*Then diagonally cut from mark to mark.
*You'll now have 2 card bases. 
 *Using the Simply Scored Scoring Tool- 
score your card base as shown @ 4 1/4" & 8".
 
Below shows how I cut the layers at a diagonal-
For the diagonal fun fold birthday card here is how I cut dsp at the angle-
  1. Cut dsp, slid up about 1/2” from bottom of card stock;
  2. Carefully flipped over so didn’t move dsp & drew line along top edge;
  3. Cut off top little triangle piece with paper cutter.
     
    *4 x 5 1/4"- lay inside card & slide upward- leaving about 1/2" showing at bottom.
    *Flip this over & using a pencil- draw a line along the edge.
    This is the part that you'll use your paper cutter & cut off!
    *Now this is what it looks like!
    It makes the perfect layer!
     
    *You will "repeat" this process for both DSP layers too!
    *2 3/4 x 3 1/2"- front of card flap (stars)
    *3 1/2 x 4 1/4"- for middle front of card (squiggly lines)
Here are the supplies & measurements.
stamp set:  'Translucent Florals' - words (NEW in upcoming Holiday Catalog- available September 2023!)
card stock:
  • Misty Moonlight- 8 1/2 x 11"- mark at 3" on both ends as shown in photo above & diagonally cut, getting 2 card bases
  • Boho Blue- 1" strip- punch out oval with Double Oval Punch
  • Basic White- 1/2 x 2 1/4"- stamp words onto & diagonally cut ends with Paper Snips
  • Basic White- 4 x 5 1/4"- for inside of card (diagonally cut top edge)
designer paper: Countryside Inn DSP-  
  • 3 1/2 x 2 3/4"- for front panel (diagonally cut top edge)
    3 1/2 x 4 1/4- for middle panel (diagonally cut top edge)
ink:  Misty Moonlight
other:  Boho Blue Ribbon; Double Oval Punch; Simply Scored Scoring Tool; Iridescent Rhinestones; dimensionals; glue dots
 
I hope you have a FABULOUS Friday!
Happy Stamping!
Hugs-
SUSIE