Pages

Tuesday, August 18, 2020

Lots to Celebrate- a Halloween card!

 
 Halloween is one of my favorite holidays to create cards, treats & home decor for!
So I had lots of fun making this.
 
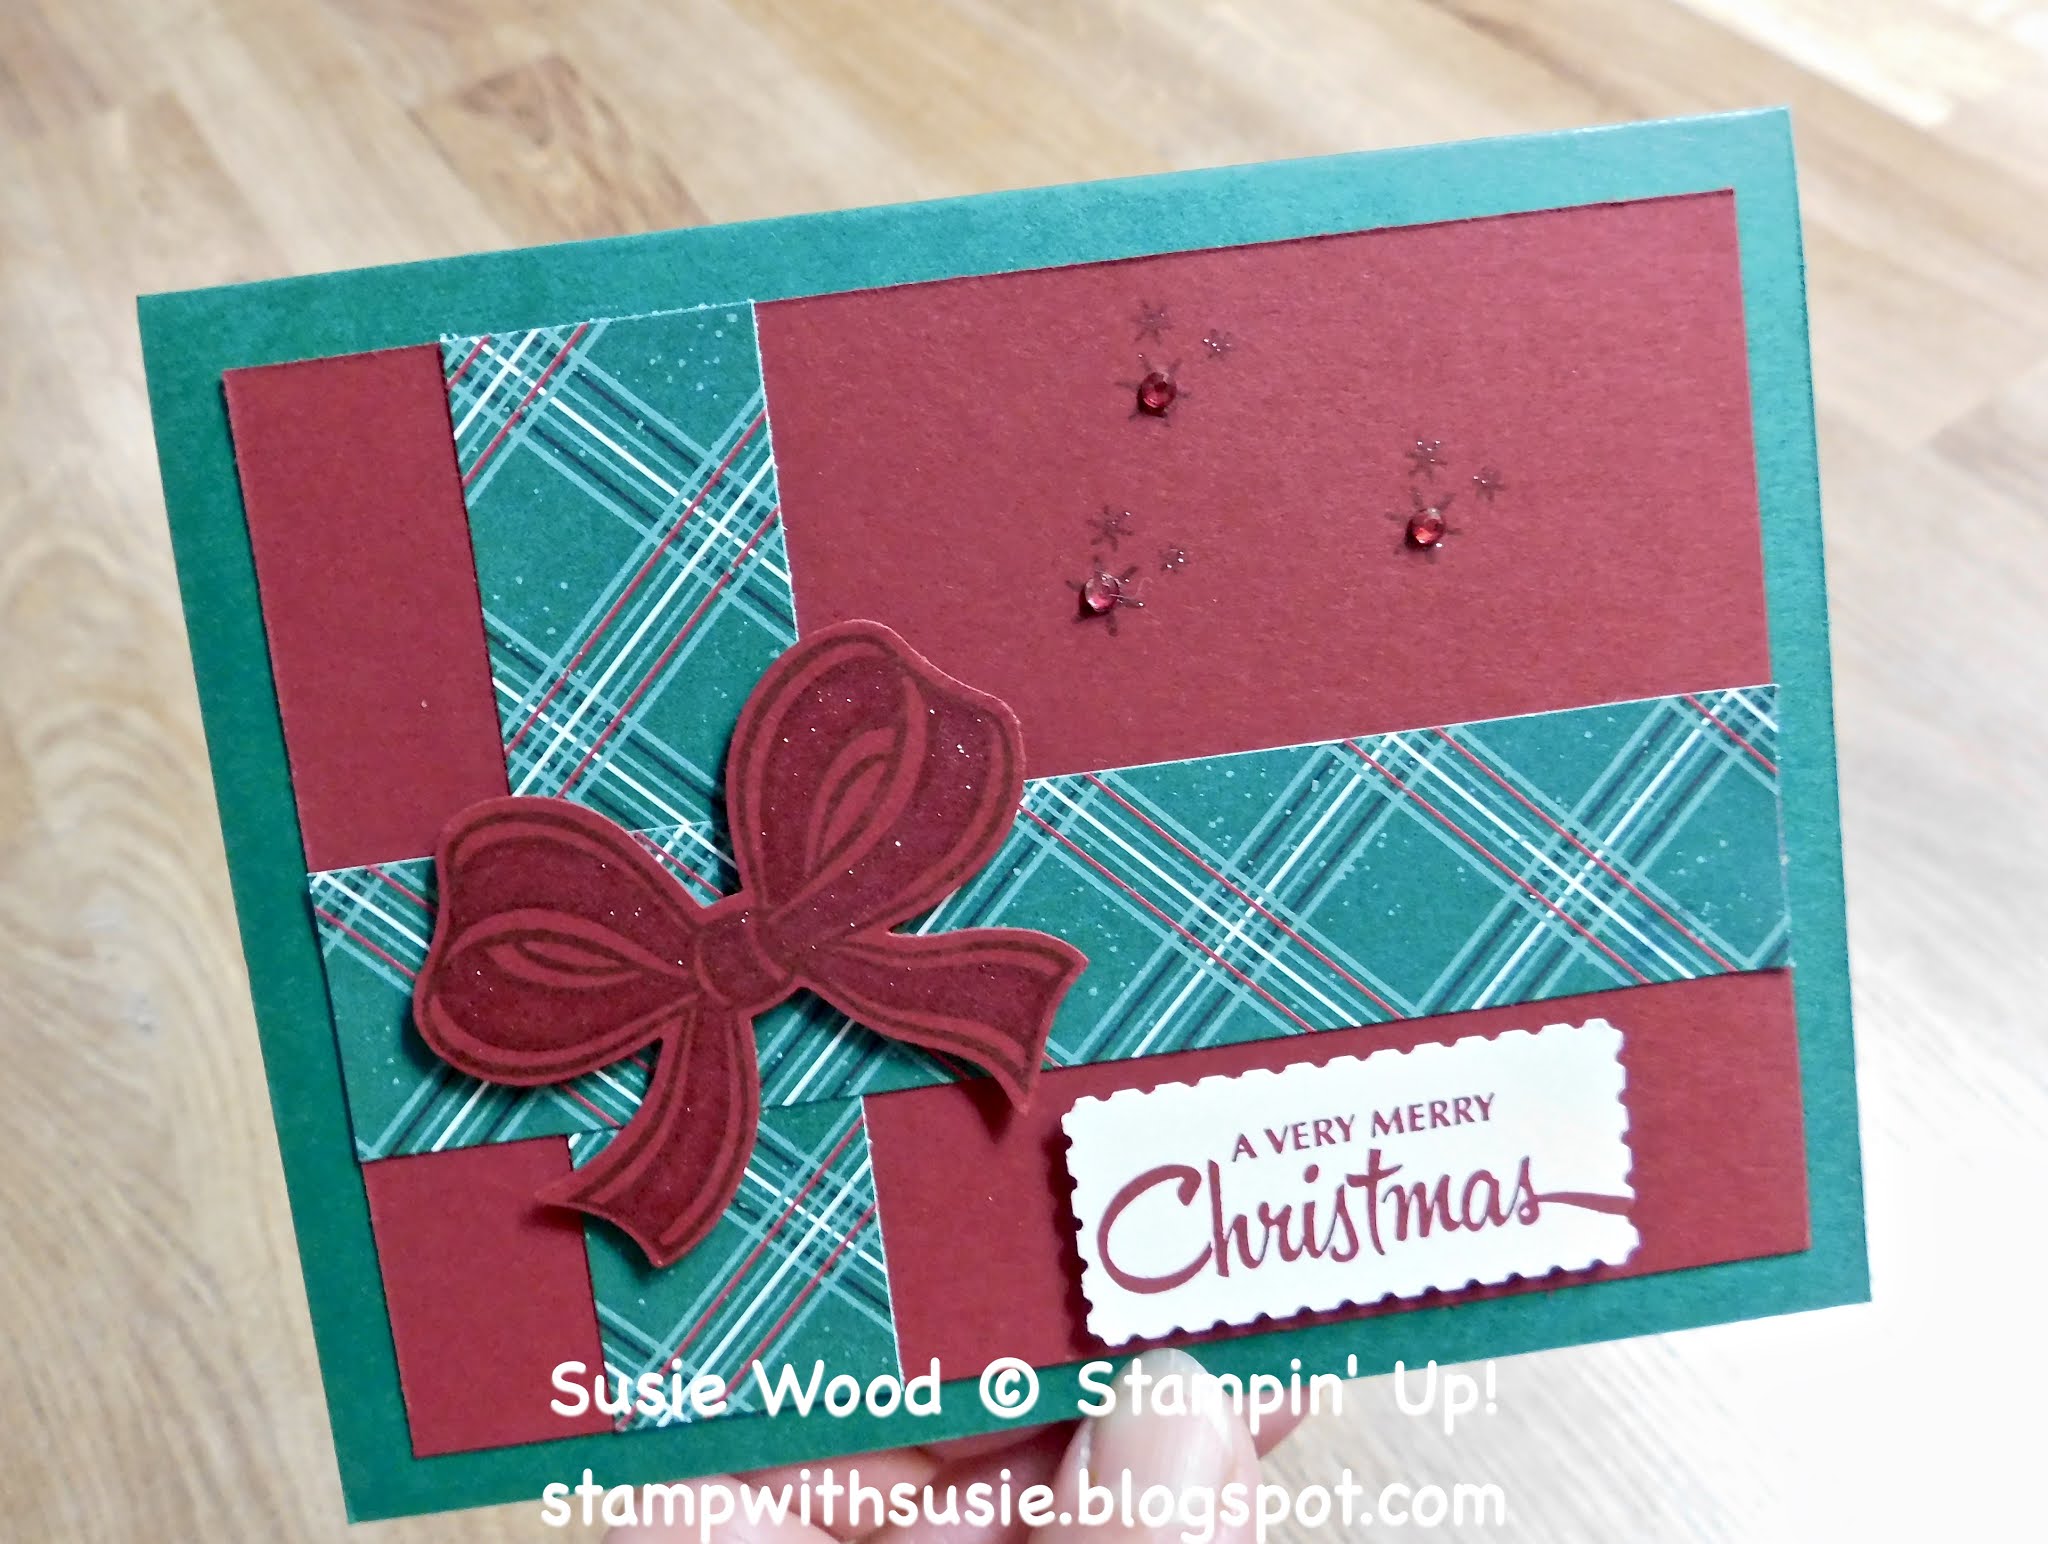
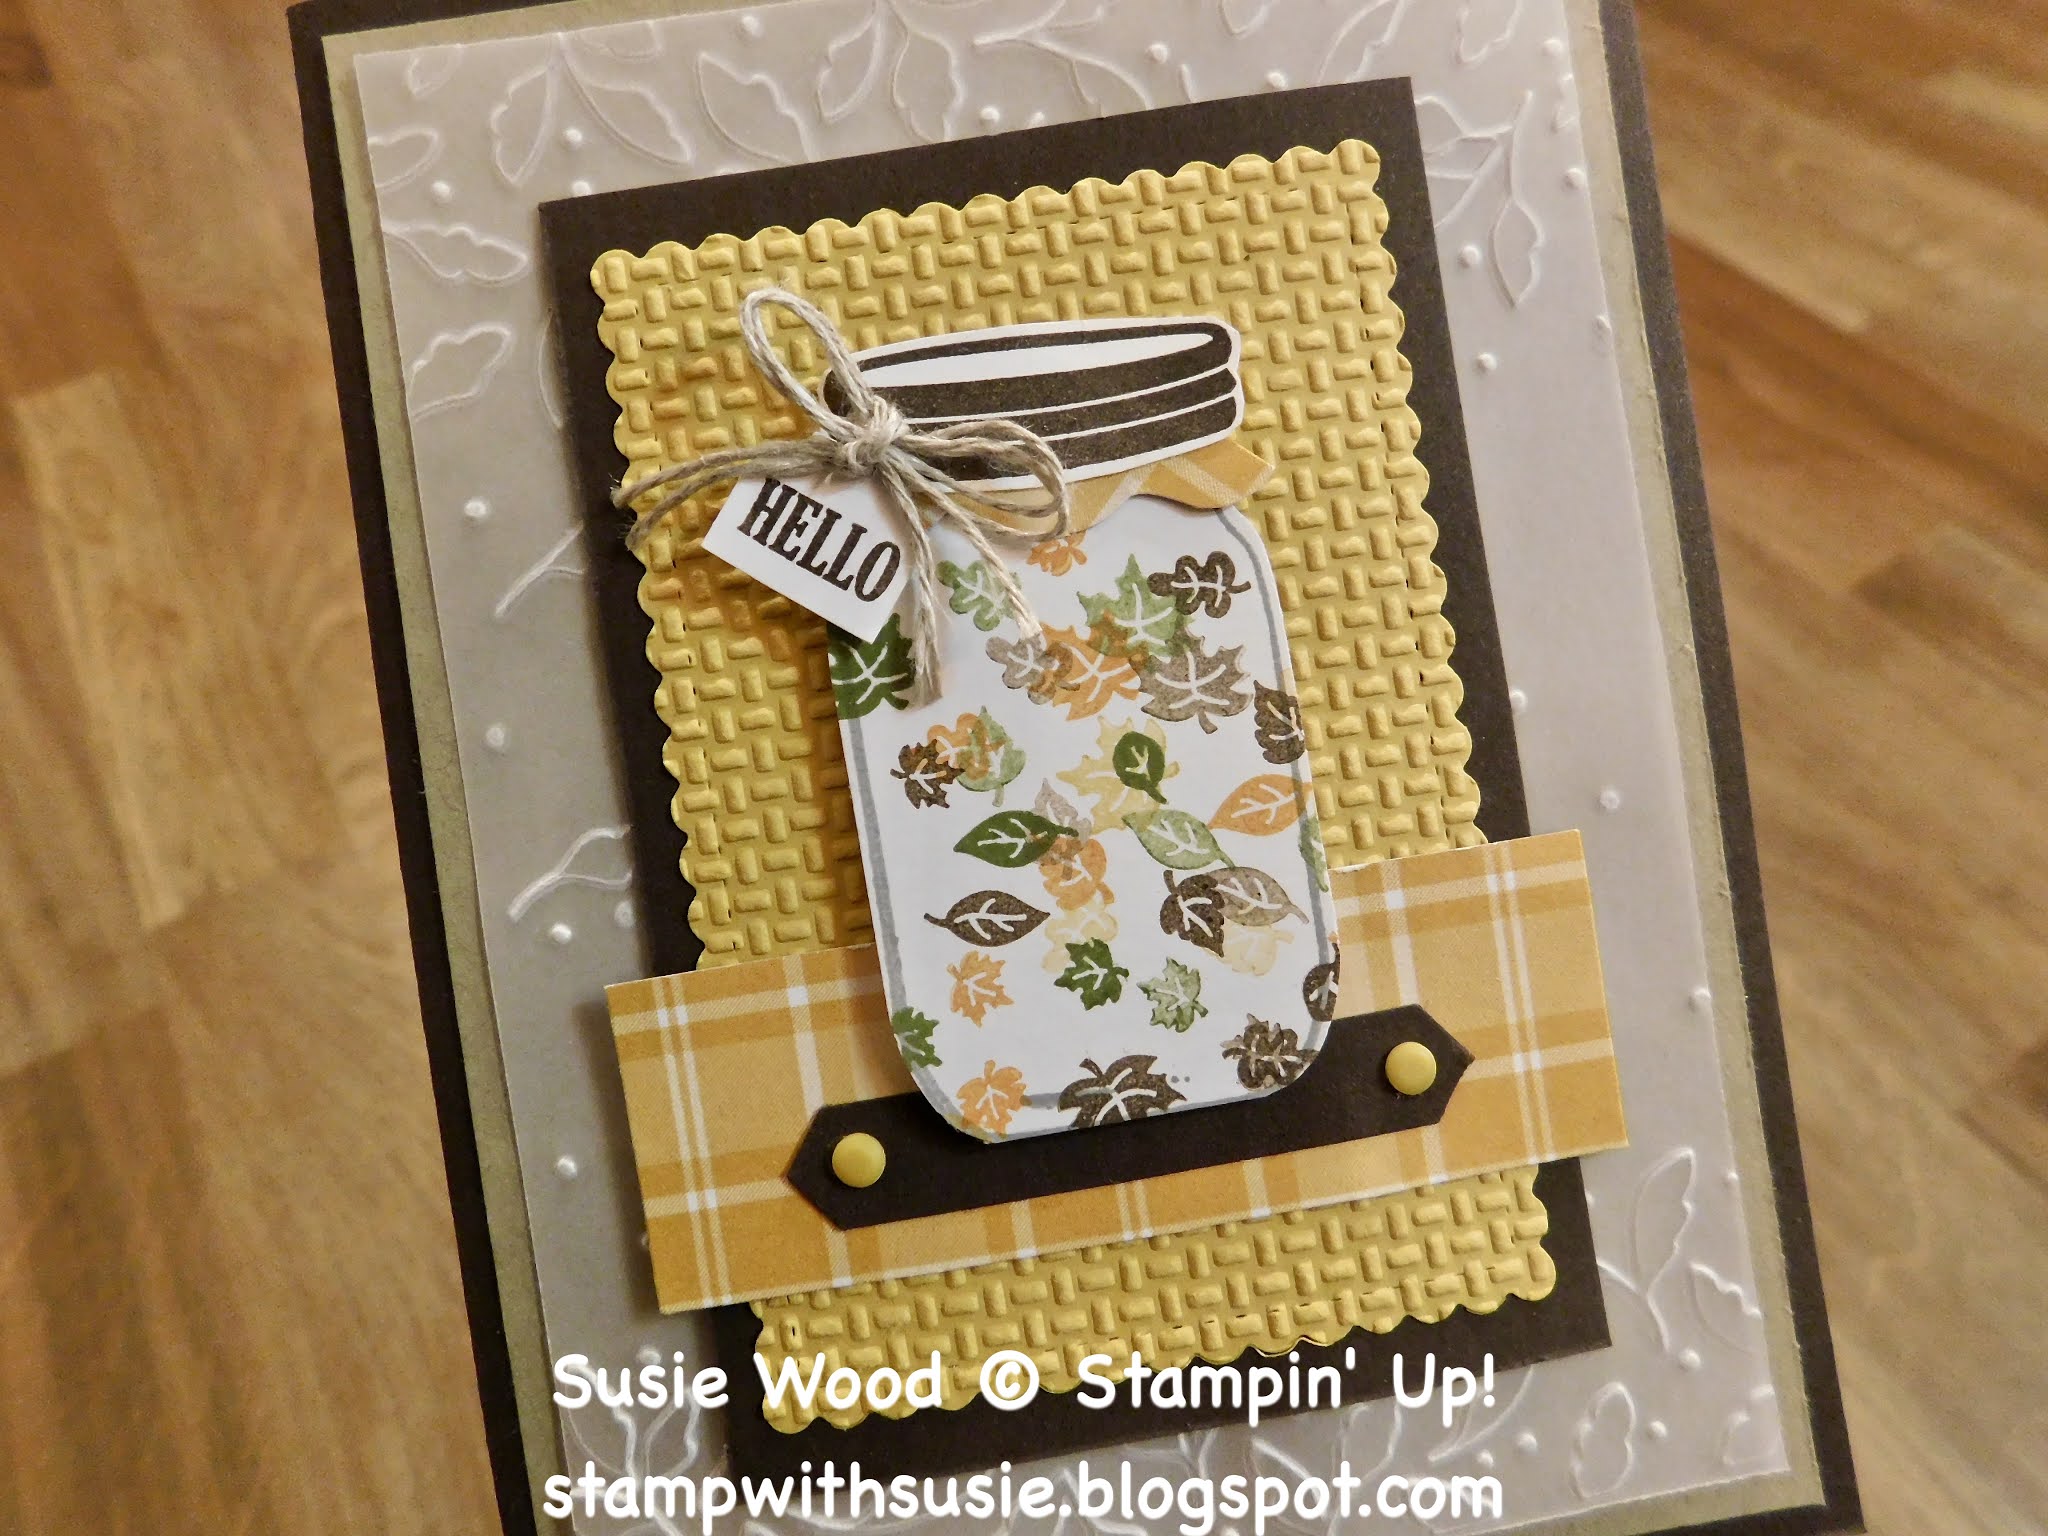
I used the jar image from my 'Lots to Celebrate' stamp set & made this super cute Halloween card! 
Check out these spiders!!!
They are from the 'Festive Corners' stamp set!
What great "All Occasions" stamp set both of these stamp sets are!
Don't these spiders work great for hanging in this jar!
 
Notice how I stamped the spiders upside down to get a longer 'string' on them.
This way they could be different lengths.
And those upside down spiders at the top of the jar will be covered up by the lid!
So you will never see them!  
 
Check out this awesome plaid DSP called- Plaid Tidings!
I have 2 NEW Embossing Folders too-
  • Cobwebs 3D Embossing Folder
  • Wrapped in Texture Embossing Folder
 Isn't this just sooo cute!
I love it!!!
It is a totally Susie card! 
 
stamp set:  'Lots to Celebrate' (jar & lid); 'Festive Corners'; 'Gift Wrapped' (bow); Banner Year (Boo words)
card stock:
  • Thick Whisper White- 5 1/2 x 8 1/2"- score at 4 1/4"- fold in half for card base
  • Basic Black- 5 1/4 x 4"
  • Basic Black-5 1/4 x 2"- emboss
  • Pumpkin Pie- 3 3/4 x 5"- stamp cobweb & words along outside right edge
  • Pumpkin Pie- 1/2" strip- stamp words onto & punch out with Classic Label Punch & then cut ends off to desired length
  • Bumblebee- 2 x 3 1/2"- punch using Fancy Tag Topper Punch
  • Whisper White- 2 3/4" strip- stamp jar onto & punch out
  • Whisper White- 1 1/2" strip- stamp bow onto & fussy cut out with scissors
  • Whisper White- 1/2" strip- stamp lid onto & fussy cut out with scissors
  • Window Sheets- 2 3/4" strip- punch out with Jar Punch
designer paper:  Plaid Tidings- 5 x 1/2"
ink:  Memento
Stampin' Blends:  Dark Pumpkin Pie (to color the bow)
other:  Stampin' Cut & Emboss Machine; Cobweb 3D Embossing Folder; Wrapped in Texture Embossing Folder; Fancy Tag Topper Punch; Classic Label Punch; Paper Snips; Jar Punch; dimensionals; glue dots;

I hope you have a TERRIFIC Tuesday!!
Happy Stamping!
Hugs-
SUSIE

Monday, August 17, 2020

Field of Flowers

I used the 'Field of Flowers' stamp set when creating for today's card.  I was thinking that we needed some flowers & sunshine, when I was stamping this last night!!  I am hoping it makes you smile!  And I hope we all have a good week!    

Iowa got hit hard last week with lots of storm damage.  So many people have lots & lots of damage to their homes, businesses, farms, crops, etc.  It has just been a huge disaster!   I know that we got some damage here, but ours was mostly just trees, house shingles & some downed corn, as we were on the bottom edge of the storm.  But several of my customers & some of our family- were hit very hard by the storm.  They have all been in my thoughts & prayers.  What a year 2020 has been!

I used the Wink of Stella over the dragonflies & over the little flowers that I didn't add pearls onto.

stamp set: 'Field of Flowers'
card stock:
  • Pretty Peacock- 5 1/2 x 8 1/2"- score at 4 1/4" & fold in half for card base
  • Pretty Peacock- 3/4 x 3 3/4"
  • Mint Macaron- 3 1/2 x 4 3/4"
  • Petal Pink-3 1/4 x 4 1/2"
  • Whisper White-1 5/8 x 3"- stamp grass, flowers & dragonfly onto
  • Whisper White- 1 5/8 x 3"- stamp words & dragonfly onto
  • Whisper White- 4 x 5 1/4"- for inside of card
ink: Mint Macaron, Pretty Peacock & Petal Pink
other:  3/8" Reversible Old Olive/Pretty Peacock Ribbon; Basic Pearls; Wink of Stella; dimensionals; glue dots

Sunday, August 16, 2020

TRY THIS SKETCH!

Look at this weeks sketch!
I hope you have a fun time creating with it! 
  • Basic Black- 5 1/2 x 8 1/2"- score at 4 1/4"- fold in half for card base
  • Basic Gray- 3 3/4 x 5"
  • Smoky Slate- 1 x 4 1/4"
  • Whisper White- 3 x 3"
  • Whisper White- 1" strip to punch out words
 
Here is the card that I created for today, with my version of this weeks sketch!
And I changed it up some.

I used the 'Lots to Celebrate' stamp set, along with the coordinating Jar Punch
 
And I made this cute fall card!! 
As you know I love fall & everything about it!
We are getting closer to fall all of the time! 
I can't believe that we are half way through the middle of August!
And last night the crisp, damp air- sure felt like fall!
 

I also used a couple of my favorite embossing folders!
  1. Meadow Moments Embossing Folder- leaves along the top of the card.
  2. Wrapped in Texture Embossing Folder- weave look for the Crumb Cake square
And isn't the little tag just so cute!  
It is from the Gift Bow Builder Punch!
 
 This is a totally Susie card!
 
stamp set:  'Lots to Celebrate' & 'Beautiful Autumn'
card stock:
  • Early Espresso- 5 1/2 x 8 1/2"- score at 4 1/4"- fold in half for card base
  • Early Espresso- 1 x 4 1/4"
  • Whisper White- 4 x 5 1/4"-for outside layer of card
  • Whisper White- 4 x 5 1/4"-for inside of card
  • Bumble Bee- 3 3/4 x 5"-emboss the top using the Meadow Moments Embossing Folder & then stamp words towards the bottom
  • Crumb Cake- 2 1/4 x 2 1/4"- emboss using Wrapped in Texture Embossing Folder
  • Crumb Cake- 1" strip- Stamp leaf & punch out
  • Whisper White- 2 3/4" strip- stamp jar & punch out
  • Whisper White- 1" strip- punch out tag using Gift Bow Builder Punch
  • Whisper White- 1/2" strip- stamp lid & fussy cut out with scissors
inks:  Soft Suede, Pumpkin Pie, Old Olive, Bumble Bee, Smoky Slate
other:  Stampin Cut & Emboss Machine; Meadow Moments Embossing Folder; Wrapped in Texture Embossing Folder; Linen Thread; Autumn Punch Pack; Gift Bow Builder Punch; Elegant Faceted Gems; dimensionals; glue dots
 
I hope you have a SUPER SUNDAY!!!!
Happy Stamping!
Hugs-
SUSIE

Saturday, August 15, 2020

Simple Saturday!

 
I used the 'Fancy Phrases' stamp set for the flower/leaves image on this card.  And the words are from the 'Beautiful Autumn' stamp set!
 
This is clean & simple & so pretty!!  I had lots of "happy mail" to send out this week, so I made alot of this card design.  It was a great one to make for mass producing!

Check out this new ribbon!!  It is Very Vanilla in color & so soft & easy to tie.  It is from the Forever Greenery Trim Combo Pack!!  I frayed the ends of it on purpose & really like the way it looks!

stamp set: 'Fancy Phrases' & 'Beautiful Autumn'
card stock:
  • Soft Suede- 5 1/2 x 8 1/2"- score at 4 1/4" & fold in half for card base
  • Soft Suede- 3/4 x 4 1/4"
  • Very Vanilla- 1 3/4" strip- stamp words onto & die cut out using Tasteful Labels dies
  • Very Vanilla- 3 3/4 x 5"- stamp flowers/leaves onto top part of this for the card front
  • Very Vanilla- 4 x 5 1/4"- for inside of card
ink:  Soft Suede
other:  Stampin' Cut & Emboss Machine; Tasteful Labels Dies; Forever Greenery Trim Combo Pack; dimensionals
 
I hope you have a very special Saturday!!!
Happy Stamping!
Hugs-
SUSIE

Friday, August 14, 2020

A fun fold using Press On!

 
WOO HOO!!  Look at this fun fold card.
I am a coffee drinker.....so I just fell in love with this 'Press On' stamp set.
And I LOVE fall colors.....so I combined this stamp set, 
along with the Plaid Tidings DSP, when creating this.
 
Check out the NEW products I used:
  • 'Press On' stamp set
  • Plaid Tidings DSP
  • Cinnamon Cider Ribbon
  • Tasteful Labels Dies
  • Dainty Diamonds Embossing Folder
using the 'Zany Zebra's stamp set! 
Did you notice the DSP wrap I added around the cup?
So what do you think?
I hope you like it as much as I do.

Do you want to make this card?  
Here are the supplies & measurements you'll need.
 
stamp set:  'Press On'
card stock:
  • Basic Black- 4 1/4 x 11"- score at 2 1/2" & 6 3/4"- 
  1. Adhere DSP to this top part.
  2. On the left side, center the circle exactly with the fold.
  3. Die cut the circle out to make the 'window'.
  • Basic Black- 3" strip- die cut scalloped circle; 3 x 1/4"
  • Cajun Craze- 4 x 4"- emboss using Dainty Diamonds 3D Embossing Folder
  • Cajun Craze- 2 3/4" strip- die cut circle
  • Cinnamon Cider- 1 1/2" strip- stamp cut onto & fussy cut out with scissors
  • Whisper White- 1" strip- stamp words onto & die cut out using Tasteful Labels Dies
  • Whisper White- 2 3/4" die cut out with circle dies
  • Whisper White- 4 x 2 3/4"- for inside of card
designer paper:  
  • Plaid Tidings DSP- 2 1/4 x 4"; 3/4 x 1 1/2"- for the cup wrap
ink:  Black Memento
other:  Stampin' Cut & Embossing Machine; Tasteful Textures Dies; Layering Circle Dies; Dainty Diamonds 3D Embossing Folder; Cinnamon Cider Ribbon; dimensionals; glue dots
 
I hope you have a FABULOUS Friday!!
Happy Stamping!
Hugs-
SUSIE

Thursday, August 13, 2020

Gift Wrapped Bundle

I am just lovin' this Gift Bow Builder Punch!
Checkout this fun 'fall' card I made with it.

The words are from the 'Beautiful Autumn' stamp set on page 46 
in the Holiday Mini Catalog.
 
You can CLICK on the links below to see other cards made with this 
GIFT WRAPPED BUNDLE!
stamp set:  'Gift Wrapped' & 'Beautiful Autumn'
card stock:
  • Old Olive- 4 1/4 x 11"- score at 5 1/2"- fold in half for card base; 2" strip- stamp bow & & punch out; 1 x 3 3/4"; 1 x 5"
  • Bumblebee- 3 3/4 x 5"; 1/4 x 3 3/4"; 1/4 x 5"
  • Crumb Cake- 3 1/2 x 4 3/4"- emboss top of this using the Meadow Moments Embossing Folder
  • Whisper White- 4 x 5 1/4"- for inside of card
ink:  Old Olive
Stampin' Blends:  Dark Old Olive (color center stripe in bow)
other:  Stampin' Cut & Emboss Machine; Meadow Moments Embossing Folder; Gift Bow Builder Punch; dimensionals
 
I hope you have a great Thursday!!
Happy Stamping!
Hugs-
SUSIE

Wednesday, August 12, 2020

Field of Flowers

I decided I needed to see some flowers today.......so whipped up this card this morning to share.  It is bright, cheery & cute!!  It made me smile- I hope it does you too!  

I used the 'Field of Flowers' stamp set & coordinating Confetti Flowers Border punch!   And I thought that the Ornate Garden Embossing folder went well with this too! 

I also used 2 of the new In Colors too- 

  • Magenta Madness
  • Just Jade
 
So what do you think?  
 
stamp set:  'Field of Flowers'
card stock:
  • Just Jade- 4 1/4 x 11"- score at 5 1/2"- fold in half for card base
  • Just Jade- 2 3/8 x 3 3/4"
  • Magenta Madness- 3 x 4"- emboss using Ornate Floral 3D Embossing Folder
  • Magenta Madness- 1 x 5 1/2"
  • Magenta Madness- 1" strip- punch out little flowers
  • Whisper White- 4 1/4" strip- die cut stitched Rectangle- stamp onto this
  • Whisper White- 4 x 5 1/4"- for inside of card
  • Whisper White- 1/2" strip- stamp words onto, punch out with Classic Label Punch & then I used my scissors & flagged the ends of it.
inks:  Memento, Just Jade & Smoky Slate
other:  Stampin' Cut & Emboss Machine; Stitched Rectangle Dies; Ornate Floral 3D Embossing Folder; Confetti Flowers Border Punch; Classic Label Punch (flagged the ends with my scissors); Flowers for Every Season Ribbon; Basic Pearls; Wink of Stella; dimensionals; glue dots

I hope you have a WONDERFUL Wednesday!!
Happy Stamping!
Hugs-
SUSIE

Tuesday, August 11, 2020

Lots to Celebrate Jar with leaves!

 
You know that I love fall! 
I love the colors, leaves, pumpkins, holidays, weather, activities.....
just everything about it!
 
I used the 'Lots to Celebrate' stamp set, along with the coordinating Jar Punch!
 
So what do you think of this card?  
It is a totally Susie card.
 I combined the leaf embossing folder from the Meadow Moments combo pack,
along the right edge.
And check out the adorable punched out little leaves.
They are from the Autumn Punch Pack.
Don't they just all go so well together.

Did you notice all of the different colors of leaves in the jar!
 
stamp set:  'Lots to Celebrate'
card stock:
  • Old Olive- 5 1/2 x 8 1/2"- score at 4 1/4"- fold in half for card base
  • Old Olive- 3 3/4 x 1 1/4"
  • Old Olive- 1" strip- punch out leaf
  • Bumble Bee- 4 x 5 1/4"
  • Bumble Bee- 3 3/4 x 1 1/2"
  • Bumble Bee- 1" strip- punch out leaf
  • Crumb Cake- 3 3/4 x 5"
  • Whisper White- 2 3/4" strip- stamp jar & punch out
  • Whisper White- 1" strip- punch out tag using Gift Bow Builder Punch
  • Whisper White- 1/2" strip- stamp lid & fussy cut out with scissors
  • Soft Suede- 1" strip- punch out leaf
designer paper:  Trimming the Town DSP- 1 x 5"
inks:  Soft Suede, Pumpkin Pie, Old Olive, Bumble Bee, Smoky Slate
other:  Stampin Cut & Emboss Machine; Meadow Moments Embossing Folder; Linen Thread; Autumn Punch Pack; Gift Bow Builder Punch; Playing with Patterns Resin Dots; dimensionals; glue dots
 
I hope you have a TERRIFIC Tuesday!!
Happy Stamping!
Hugs-
SUSIE

Monday, August 10, 2020

Gift Wrapped Bundle- Christmas card

 Is it too early for Christmas?  Nope.....I don't think so.....as it will be here sooner than we think.  And since our NEW August-December (Holiday) Mini Catalog is out, I just couldn't resist using this awesome new bundle.  It is called- 'Gift Wrapped'!  I love punches- so I'm lovin' this!

 
Yesterday I posted a TRY THIS SKETCH!!  
 This is what the sketch was.  
I posted a birthday card yesterday using this stamp set & sketch!
And today's card is a Christmas card!

Look how I used the Rectangle Postage Stamp Punch for the words.

I didn't want the words to be quite as big as the original punch image was.  So I made it smaller.
So HOW DID I DO IT?
  • Punched out a Whisper White Rectangle Postage Stamp Punch.
  • Stamped the words in the top 2/3rd of this,
  • Then slid the punched out piece, back into the punch & re-punched it.
  • It is so easy!  AND it gives you another option for a smaller fun punch!
This is what it now looks like & how much I punched off!  Neat huh!

I colored some Basic Rhinestones (that are clear) with my Dark Cherry Cobbler Stampin' Blend.  
And I also colored the center stripe in the bow with my Dark Cherry Cobbler Stampin' Blend too- to make it more defined.  And then I added some Wink of Stella over the top of it.  It is tone on tone- but sure make it pop & look different!!  I love the way it changed the whole look of the bow. 

stamp set:  'Gift Wrapped'
card stock:
  • Shaded Spruce- 4 1/4 x 11"- score at 5 1/2"- fold in half for card base
  • Cherry Cobbler- 3 3/4 x 5"
  • Cherry Cobbler- 2 3/4" strip- stamp bow & punch out
  • Whisper White-   2" strip- stamp words onto & punch out
  • Whisper White- 4 x 5 1/4"
designer paper:  
  • 'Tis the Season- 1 x 5"
  • 'Tis the Season- 1 x 3 3/4"
ink:  Cherry Cobbler
Stampin' Blends:  Dark Cherry Cobbler
other:  Gift Bow Builder Punch; Basic Rhinestones; Rectangle Postage Stamp Punch; Wink of Stella; Dimensionals
 
I hope you have a MARVELOUS Monday!!
Happy Stamping!
Hugs-
SUSIE

Sunday, August 9, 2020

TRY THIS SKETCH!

Woo hoo!
 Use this basic layout & have fun creating!! 

Check out today's sketch!!! 

  •  4 1/4 x 11"- card base
  • 1 x 5 1/2"- strip
  • 1 x 4 1/4" strip
  • circle 
  • words 
 Check out the card I made today, using this sketch!
I used the FUN NEW BUNDLE called- 'Gift Wrapped'!
This card could be used for so many different occasions!
 
Look at the bow!! It is a punch!!
And there are 3 different images of the bow in this stamp set, 
so that you can choose which one you want!
I know a little girl that purple is her favorite color & this would make 
a perfect birthday card for her!
 
Notice the rhinestones?  
I colored them purple, using my Dark Highland Heather Stampin' Blend.
 
stamp set:  'Gift Wrapped'
card stock:
  • Highland Heather- 4 1/4 x 11"
  • Highland Heather- 1 1/4 x 5"
  • Highland Heather- 1 1/4 x 3 3/4"
  • Purple Posy- 3 3/4 x 5"
  • Whisper White- 2 3/4" strip- stamp bow onto, using the Highland Heather ink & punch out with the Gift Bow Builder Punch.  Then Color some of the strips, using the Dark Highland Heather Blend.  And then add Wink of Stella over the top of it for some sparkle!
designer paper:  
  • Playing with Patterns DSP- 1 x 5"
  • Playing with Patterns DSP- 1 x 3 3/4"
ink: Highland Heather
Stampin' Blend:  Dark Highland Heather
other:  Gift Bow Builder Punch; Basic Rhinestones; dimensionals; Wink of Stella
 
I hope you have a SENSATIONAL Sunday!
Happy Stamping!
Hugs-
SUSIE

Saturday, August 8, 2020

Forever Fern Bundle

Hello- here is a quick card & quick post for Simple Saturday Stamping!

I used the some of the products from the Forever Greenery Suite to make this card.
  • 'Forever Fern' stamp set
  • Forever Flourishing Dies
  • Forever Greenery Designer Paper
Old Olive is my favorite color of green!!  
So I combined it with the a little bit of Pretty Peacock!  
Look closely & see the splatters of ink around the fern images.
This is just a stamp included in this 'Forever Fern' stamp set. 
stamp set:  'Forever Fern'
card stock:
  • Old Olive- 5 1/2 x 8 1/2"- score at 4 1/4"- fold in half for card base
  • Old Olive- 3 3/4 x 3/4"
  • Pretty Peacock- 2 5/8 x 3 5/8"
  • Whisper White- 3 3/4 x 5"
  • Whisper White- 2 1/2" strip- stamp berries onto & die cut out
  • Whisper White- 4 x 5 1/4"- for inside of card
designer paper:  
  • Forever Greenery DSP- 5 x 1"
inks:  Old Olive & Pretty Peacock
other:  Cut & Emboss Machine; Forever Flourishing Dies; Old Olive Ribbon; All the Trimmings Embellishments; Dimensionals; Glue Dots

I hope you have a SUPER Saturday!!
Happy Stamping!
Hugs-
SUSIE

Friday, August 7, 2020

Zany Zebra's fun fold!

 
Check out this cute fun fold card, using the 'Zany Zebras' stamp set!
 
This little zebra makes me smile!
He is so cute & playful!
 This is what it looks like when you flip up the front flap
 This is what it looks like all of the way opened up.
stamp set:  'Zany Zebras'
card stock:
  • Basic Black- 4 1/4 x 11"- score at 2 1/2" & 6 3/4"- 
  1. Adhere DSP to this top part.
  2. On the right side, center the circle exactly with the fold.
  3. Die cut the circle out to make the 'window'.
  • Basic Black- 2 3/4" strip- die cut scalloped circle; 3 x 1/4"
  • Pretty Peacock-4 x 4"- emboss using Dainty Diamonds 3D Embossing Folder
  • Pretty Peacock- 3" strip- die cut circle
  • Whisper White- 1" strip- stamp words onto & die cut out using Tasteful Labels Dies
  • Whisper White- 2 3/4" strip- stamp zebra onto & die cut out with circle dies
  • Whisper White- 4 x 2 3/4"- for inside of card
designer paper:  
  • Artistry Blooms DSP- 2 1/4 x 4"
ink:  Black Memento
other:  Cut & Embossing Machine; Tasteful Textures Dies; Layering Circle Dies; Dainty Diamonds 3D Embossing Folder; Old Olive/Pretty Peacock Ribbon; All the Trimmings Embellishments (little yellow star); dimensionals; glue dots

I hope you have a FABULOUS Friday!
Happy Stamping!
Hugs-
SUSIE

Thursday, August 6, 2020

Life it Beautiful


Check out this cool all occasions stamp set!
I just love it!
It is called- "Life is Beautiful" & on page 51 in the Holiday Mini Catalog.

It is a fun z fold card. 

I used the Greenery Embossing Folder along the outside edge of the card front.
This is what it looks like from the side view, when standing up.

It is clean simple & so cute!
I love the whimsical style of the tree & the font of the words.
And don't you think that the bird house hanging from the branches just finishes it off!

I shadow stamped the grass & the leaves. 
What does that mean when I say that I shadow stamped them?
It means that I inked them, stamped them onto my card stock
& then I stamped them again without re-inking them.
This gives me dark & light shades of a color, by just using one ink pad.
stamp set:  'Life is Beautiful'
card stock:
  • Garden Green- 5 1/2 x 8 1/2"- score at 2 1/8" & 4 1/4"- fold for card base
  • Crumb Cake- 5 x 3 3/4"
  • Whisper White- 4 3/4 x 3 1/2"- for card front (stamp tree/leaves/grass/words on this)
  • Whisper White- 4 x 5 1/4"- for inside of card
ink:  Garden Green & Soft Suede
other:  Cut & Emboss Machine; Greenery Embossing Folder; dimensionals

I hope you have an AWESOME Thursday!!
Happy Stamping!
Hugs-
SUSIE

Wednesday, August 5, 2020

A Fall card with Lots to Celebrate


I love fall & neutral colors! 
So I had fun making this card. 
I actually made it with some left overs that I found on my
stamping table & just added a few things.
It is a totally Susie card & I love the way it turned out.

Check out the little tag! 
Where did that come from?
It is from the NEW Gift Bow Builder Punch.
I thought it worked perfectly to add that little touch to the jar!
*Note- I did take my scissors & cut some off the end of it, to shorten the tag length.
So what do you think of me adding the Classic Label Punch
for a "shelf" for the Jar to sit on?

Check out the fabric under the jar lid.  How did I do that?
  • I used a small scrap piece of the Plaid Tidings DSP.
  • I stamped on the back side of the DSP.
  • Using that stamped pattern, I then took my scissors & fussy cut it out.
  • So the plaid showing on my card doesn't have any stamped part on it- but it has the same pattern as the stamped image (that is on the reverse side).  

stamp set:  'Lots to Celebrate'
card stock:
  • Early Espresso- 5 1/2 x 8 1/2"- score at 4 1/4"- fold in half for card base; 1/2" strip- punch out using Classic Lablel Punch; 2 3/4 x 4"
  • Crumb Cake- 4 x 5 1/4"
  • Bumble Bee- 4 1/4" strip- die cut Stitched Rectangle & then emboss using the Wrapped in Texture Embossing Folder
  • Whisper White- 2 3/4" strip- stamp the jar onto & punch out using the Jar Punch.  Then stamp leaves into the jar; 1/2" strip- stamp jar lid & cut out with scissors; 1" strip- punch out tag & stamp words into it (I shortened the tag, but cutting off the bottom part of it with my scissors)
  • Vellum- 3 3/4 x 5"- emboss along the top & bottom edges, using the Meadow Moments (leaves) Embossing Folder
designer paper:  Plaid Tidings- 1 x 3"; 1/2" scrap
inks:  Early Espresso; Mossy Meado; Crumb Cake; Pumpkin Pie; Smoky Slate
other:  Jar Punch; Gift Bow Builder Punch; Classic Label Punch; Linen Thread; Paper Snips; Die Cutting/Embossing Machine; Stitched So Sweetly Dies; Wrapped in Texture Embossing Folder; Meadow Moments (leaves) Embossing Folder; Playing with Patterns Resin Dots; dimensionals; glue dots

I hope you have a TERRIFIC Tuesday!!
Happy Stamping!
Hugs-
SUSIE