Pages

Sunday, April 12, 2020

Happy Easter Blessing!

Happy Easter!!
Sending many blessings to each of you on this blessed Easter day!  

It is such a different Easter than normal with this distancing.
It is sad that we can't be with our church families & families, 
to celebrate the resurrection of Jesus from the tomb.   
Thank goodness for technology, that we can listen to church services on the radio, tv or face book!
stamp set:  'Easter Promise'
card stock:
  • Thick Whisper White- 4 1/4 x 11"- score at 5 1/2"- fold in half for card base
  • Gorgeous Grape- 1 1/2" strip- die cut narrow stitched Rectangle; 4 1/4'- die cut large Stitched Rectangel
  • Whisper White- 4 x 5 1/4"- for inside of card; 2 3/4" strip- stamp words onto & die cut out with the Stitched Oval Die; 1 1/2" strip- stamp cross onto 2 different times.  Die cut one out & layer over the top of the other cross.  Then fussy cut out with your scissors. 
designer paper:  Best Dressed 6x6 DSP- 3 1/4" strip- die cut with Stitched Rectangle
ink:  Gorgeous Grape
other:  Big Shot, Magnetic Platform, Cross of Hope Dies, Stitched Rectangle Dies; Stitched Shapes- large oval; Basic Pearl, Glue Dot, Dimensionals, Mini Dimensionals, Polka Dot Tulle Ribbon
 NOTE:  Check out the great 'Cross of Hope' Dies on page 192 in the Annual Catalog! 

How did I do it?
Look at what I did with the stitched rectangle.....I die cut it out!
And then I cut it in half with my scissors.  Adhered it to the center of the card, wrapped ribbon around it and then adhered the Stitched Oval 'Happy Easter' words over it.
Look at the cross.  It has lots of layers to it!
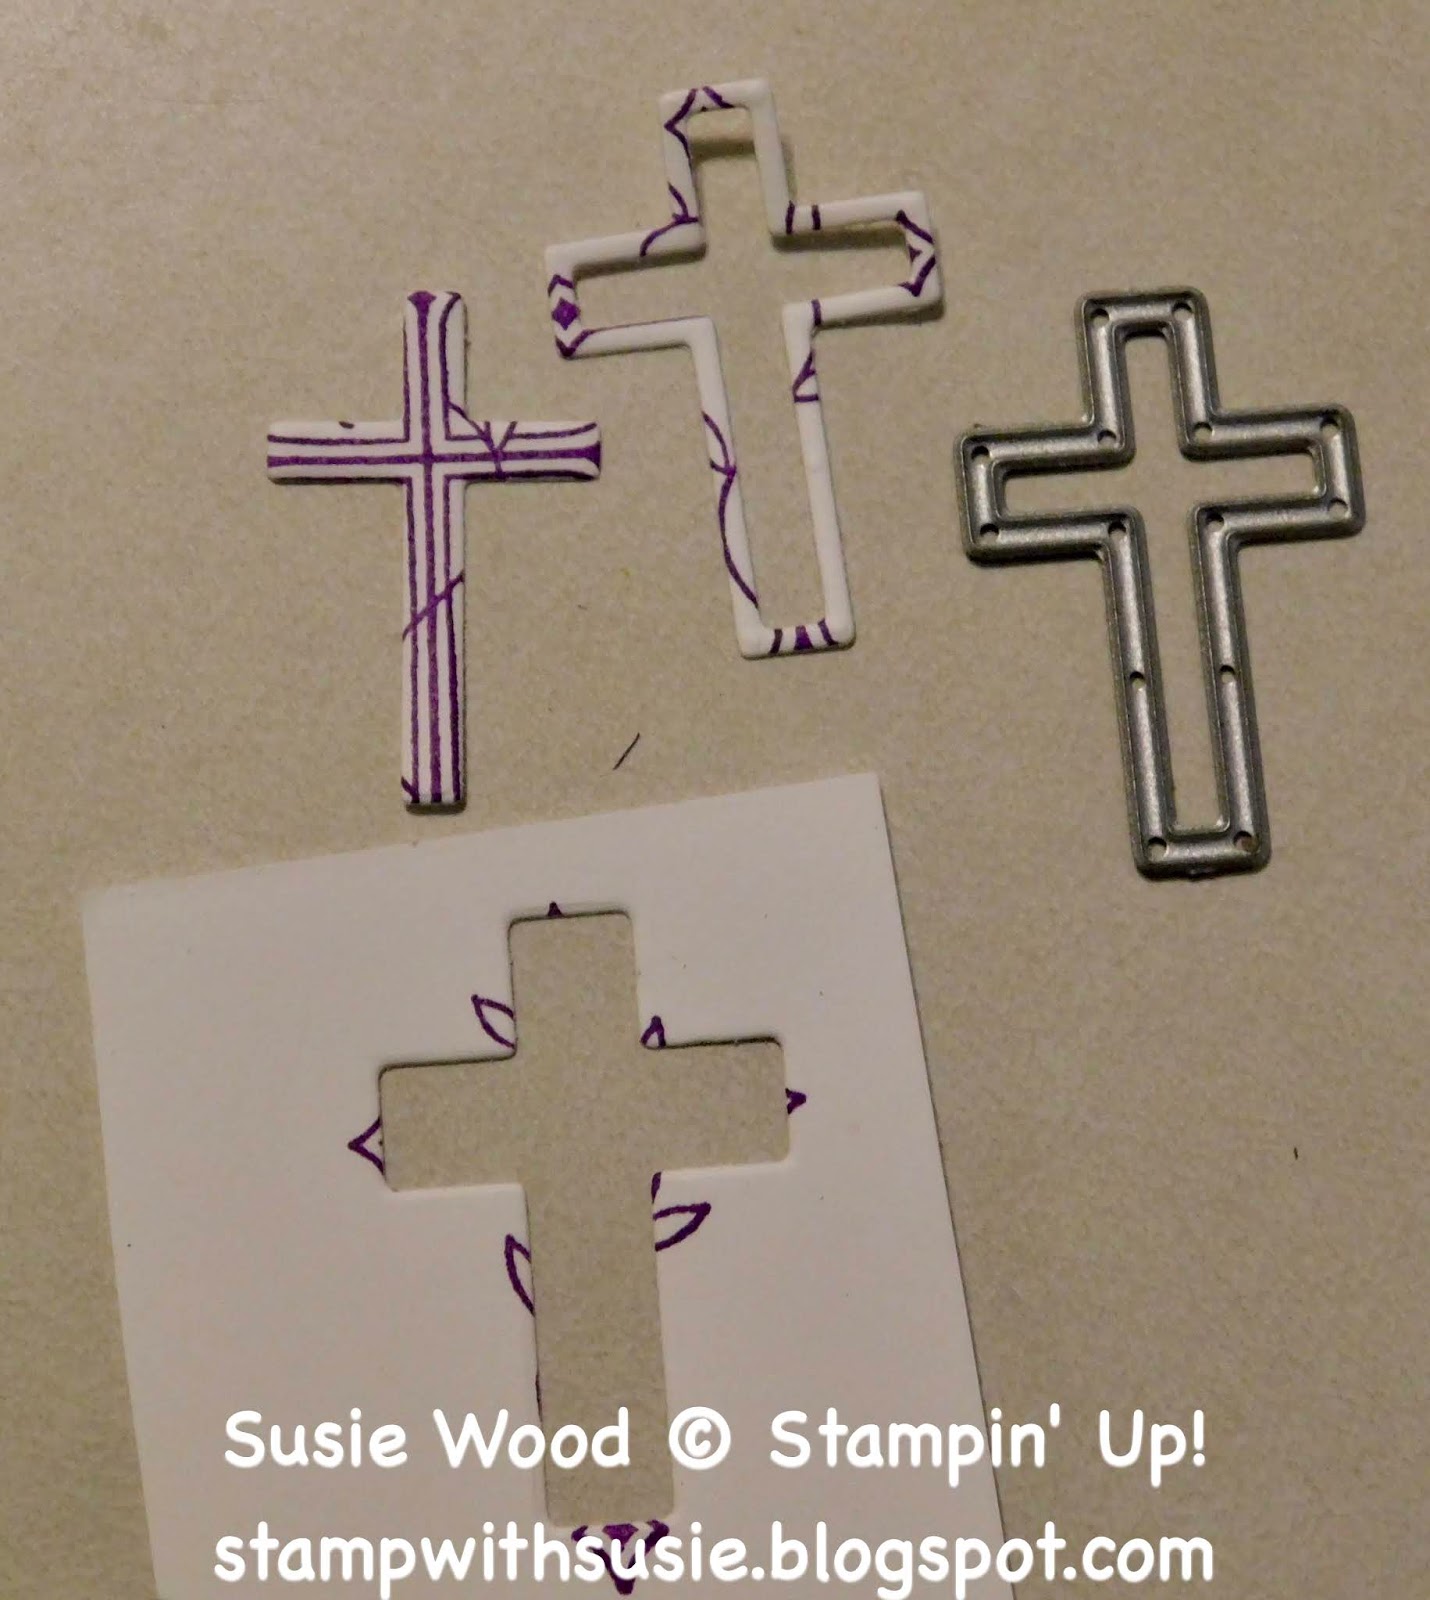
  • I stamped the cross & die cut it out.  This die cuts these two images at one time!  
  • I then stamped the cross again & adhered these 2 die cut images over the top of it.
  • See what it looks like when I got it layered!  I adhered the outside cross die with snail adhesives, directly onto the stamped cross.  I then cut mini dimensionals in half & attached them to the center of the stamped cross.
  • I then took my scissors & fussy cut out around the cross/vine/leaves image.
  • And then used mini dimensionals on the back side of the cross & stuck it onto the card front- in the upper right corner of the Happy Easter wording.  
Have a SPECIAL Sunday!
Blessings-
SUSIE 

Saturday, April 11, 2020

Easter Bunny!

This little bunny is just totally adorable!!!  

I made this card a few weeks ago, one day after Drake & I were stamping!!  We actually made this bunny banner that I've posted below!  And then I made the card with the left over pieces, after he went home that night!  I need to get 5 more of these bunny cards made yet today, as they will be the kids' Easter cards for this year!
Here is Drake with the Easter/Bunny Banner he made!
His smile says it all- doesn't it! 

How did I make the bunny?  
You won't believe it- but I used the Snowman Builder Punch for the bunny body!

  • Bunny- I used the Snowman Builder Punch, I took my Paper Snips & cut off the top circle (ball) of the snowman.
  • Ears-The large Daisy Punch, using 2 petals.
  • Carrot- The stick hands on the the Snowman Builder Punch for the carrot top & a small heart from the Dog Builder Punch cut in half for the carrot. 
  • Tail- Assorted pompom

stamp set:  'Welcome Easter'
card stock:
  • Balmy Blue- 5 1/2 x 8 1/2"- score at 4 1/4"- fold in half for card base
  • Smoky Slate-2 3/4" strip- die cut scalloped Oval; 2 3/4" strip- punch out Snowman with Snowman Builder Punch; 2 3/4" strip- punch out Large Daisy
  • Whisper White- 2 3/4" strip- die cut Stitched Oval; 2 3/4 x 1"- stamp Happy Easter onto it; 4 x 5 1/4"- for inside of card
  • Mossy Meadow- 1/2" strip- punch out stick arm from the Snowman Builder Punch
  • Terracotta Tile- 1/2" strip- punch out heart from the Dog Builder Punch
designer paper:  So Very Vellum- SAB Choice- 5 1/4 x 2" strip- NOT available now; Pleased to Punch DSP- 5 1/2 x 1" strip- NOT available now- SO SORRY!
ink:  Balmy Blue
other:  Big Shot; Magnetic Platform; Layering Oval Dies; Stitched Shapes Dies (oval); Dog Builder Punch; Large Daisy Punch; Pom Pom (from Assorted PomPoms in Bonanza Buddies Suite); Glue Dot; Dimensionals

I hope you have a SUPER Saturday!!
Happy Stamping!
Hugs-
SUSIE

Friday, April 10, 2020

Another Ornate Garden card!

This Ornate Garden Suite is an "Early Release" from our upcoming 2020-2021 Annual Catalog! 
 
You can CLICK HERE to download the PDF & see more info about this Ornate Garden Suite!


You can order on line at- susiewood.stampinup.net


Or contact ME here!  Here is my April HOSTESS CODE: 
F9QVDU64

NOTE:  The Ornate Border Dies are on back order already!  WOW!  What a popular product it is!  But you can still order these dies & this suite.  This back ordered die will be available at the SU! warehouse around May 4th, 2020.  And there are LOTS of these dies on the way! But don't delay too long in ordering this if you want them sooner than later!!  

I hope you aren't getting tired of seeing all of the cards I'm been making & posting using this awesome suite!
As today I'm sharing ANOTHER Ornate Garden Suite card!!  I am using different colors & one of the other Ornate Garden Specialty DSP!  
So what do you think?  
Check out these products that are in this Ornate Garden Suite-
  • 'Ornate Thanks' & 'Ornate Style' stamp sets
  • Ornate Layers Die
  • Ornate Garden Ribbon Combo- Terracotta Tile
  • Ornate Garden Specialty Designer Paper
  • Gilded Gems 
  • Ornate Floral 3D Embossing Folder 
Here are all of the supplies & the measurements for you!

stamp sets:  'Ornate Thanks' & 'Ornate Style'
card stock:
  • Terracotta Tile- 5 1/2 x 8 1/2"- score at 4 1/4"- fold in half for card base; 3 7/8" x 3/4"; 2 1/2" strip- die cut ornate rectangle
  • Early Espresso- 5 x 2 1/2"
  • Mint Macaron-3 7/8 x 5 1/8"- emboss using the Ornate Floral 3D Embossing Folder
  • Whisper White- 1 1/2" strip- stamp words onto & die cut out using the Stitched Rectangle Die.  Then stamp the flowers randomly around the edge. 
designer paper:  Ornate Garden Specialty DSP- 2 1/4 x 3 7/8"
inks:  Terracotta Tile & Mint Macaron
other: Big Shot; Magnetic Platform; Ornate Layers Dies; Stitched Rectangle Dies; Standard Platform; Ornate Floral 3D Embossing Folder; Blue 3D Plate; Terracotta Tile Ornate Garden Ribbon- 7"- tie in bow; Gilded Gems; dimensionals; glue dots

I hope you have a FABULOUS Friday!!
Happy Stamping!
Hugs-
SUSIE

Thursday, April 9, 2020

A Lattice fold card- using the Ornate Garden suite!

This Ornate Garden Suite is an "Early Release" from our upcoming 2020-2021 Annual Catalog! 
You can CLICK HERE to download the PDF & see more info about this Ornate Garden Suite!


You can order on line at- susiewood.stampinup.net
Or contact ME here! 
Here is my April HOSTESS CODE: 
F9QVDU64

NOTE:  The Ornate Border Dies are on back order already!  WOW!  What a popular product it is!  But you can still order these dies & this suite.  This back ordered die will be available at the SU! warehouse around May 4th, 2020.  And there are LOTS of these dies on the way! But don't delay too long in ordering this if you want them sooner than later!!  
WOO HOO......check out today's card!!!  Last night I whipped up this quick card for today's post.  I had this Flirty Flamingo lattice base, in my scrap box....and decided it would go great with this flowery Ornate Garden DSP!  

I learned to do this lattice fold many years ago! It was probably one of the first technique type things I ever did. I remember adding a little piece of cardstock to the inside of the card, behind the lattice, to make it complete!  Humm.....my mind still thinks that way I guess, because as soon as I added the card stock inside the card- "I was pleased with how it all seemed to pull together"!
So I think that is gorgeous!  Don't you think so too?

You can't tell by the photo, but I added Wink of Stella onto all of the White Flowers in this DSP on the card front.  
stamp set: 'Ornate Thanks'
card stock:
  • Flirty Flamingo- 5 1/2 x 8 1/2"- score at 4 1/4"- fold in half for card base
  • Old Olive- 5 1/2 x 1 1/2"- score at 3/4" (in middle); 3 1/4 x 5 1/4"; 1 x 3 1/2"
  • Whisper White- 2" strip- stamp words onto & cut out with die; 3 1/4 x 5 1/4"- for inside of card
designer paper:  Ornate Garden Specialty DSP-
ink:  Old Olive
other:  Big Shot; Magnetic Platform; Ornate Layers Die; Ornate Garden Ribbon Combo (Old Olive); Basic Pearls; Paper Snips; dimensionals; glue dots; Wink of Stella
Over the years I have posted a few lattice cards on my blog.
You can click on the links below to see those cards that I created!
And.....after I got this all ready for my blog post, I decided I had better go back & recreate the steps on how I did the lattice.  As now I hope you'll want to make one too!  
Just keep reading.......and let me show you how you can make a lattice edge card like this!

How did I do it?
**If you would like the lattice template I used, you can click on this link to get it!   
Susie's Template
  •  5 1/2 x 8 1/2"- score at 4 1/4"- fold in half for card base. 
  • Take a paper template & put along the FOLDED edge for the card front.  I used paper clips to keep it in place.
  •  With your scissors, CUT on all of the lines, on the template.  
  • Open up your card & lay it down, with the FRONT of the card up- like this.
  • Then you will FOLD down each of the tabs.  It will look like this!  Notice how you have a triangle top/point in between each tab you fold down.  You want to make sure you have those triangle points- so be sure it looks like how I have mine folded down as shown in the photo!
  • With your scissors snip off this bottom tab.
  • It will then look like this at the bottom of your card.  BE SURE that you SAVE this tab.......as you are going to glue it onto the top, front of the card next!
  • Add glue to the tab like this.
  • Put it directly onto the top front of the card.  It will then look like this photo, once you have glued it on.
  • Now take each one of the tabs (yes all of them) & tuck them downwards, so that they are now underneath the triangle top points.  It will then look like this photo when you have them all tucked down. 
  • Then fold the card base in half again.  This is what it looks like now that you have gotten your lattice fold done!!  YAY!
  • So those of you that stamp with me each month, know that I'm type A.  Yup....and I just thought I had to add this 5 1/2 x 1 1/2" strip to the inside of the lattice to make my card complete.  So I score this strip down the center (at the 3/4" mark).
  • I open the card back up.....add a little bit of adhesive to the center (as shown).  I chose to use liquid glue again to do this.  And then I add this folded strip inside this lattice.
  • This is what the inside of the card will now look like with this strip glued into it!
  • Fold your card shut & this is what the outside of your lattice card will now look like!  
  • You are ready to finish it, by decorating it however you choose to do!
WOO HOO!!  

I hope you have fun making a lattice card!  
**If you would like the lattice template I used, you can click on this link to get it!  Susie's Template

I hope you have a great Thursday!!
Happy Stamping!
Hugs-
SUSIE

Wednesday, April 8, 2020

Another Ornate Garden card!

This Ornate Garden Suite is an "Early Release" from our upcoming 2020-2021 Annual Catalog! 
You can CLICK HERE to download the PDF & see more info about this Ornate Garden Suite!


You can order on line at- susiewood.stampinup.net
Or contact ME here! 
Here is my April HOSTESS CODE: 
F9QVDU64
NOTE:  The Ornate Border Dies are on back order already!  WOW!  What a popular product it is!  But you can still order these dies & this suite.  This back ordered die will be available at the SU! warehouse around May 4th, 2020.  And there are LOTS of these dies on the way! But don't delay too long in ordering this if you want them sooner than later!! 

Oh my gosh.......are you tired of this suite yet?  I am in love with it!  It just has endless possibilities when creating with it!!!
Check out the gorgeous Old Olive foil DSP in this Ornate Garden Specialty DSP.  WOW!
And look at this daisy stamp! Pretty sweet huh!  I stamped it in Memento ink & colored it with my Stampin' Blends!  Look how the Daisy sparkles, as I added some Wink of Stella to it!
These colors I used when creating this card are my colors!!  This is another totally Susie card!
stamp set:  'Ornate Style' & 'Ornate Thanks'
card stock:
  • Early Espresso- 5 1/2 x 8 1/2"- score at 4 1/4"- fold in half for card base; 2 1/4" strip- die cut ornate rectangle
  • Old Olive- 5 1/8 x  3 7/8"; 2 1/4 x 3 1/2"
  • Whisper White- 2 5/8 x 1 3/8"- stamp daisy onto; 1/2" strip- stamp words onto & punch out with Classic Label punch & cut size down, next to words; 4 x 5 1/4"- for inside of card
designer paper:  Ornate Garden Specialty DSP
ink:  Memento, Old Olive
Stampin' Blends:  Dark Old Olive, Dark Daffodil Delight
other:  Big Shot; Magnetic Platform; Ornate Layers Dies; Wink of Stella, Ornate Garden Ribbon (Old Olive) 4 1/2"- put around card front & 3 1/2"- tie in knot; Classic Label Punch; dimensionals; glue dot
I hope you have a WONDERFUL Wednesday!!
Happy Stamping!
Hugs-
SUSIE

Tuesday, April 7, 2020

Another Ornate Garden card!

This Ornate Garden Suite is an "Early Release" from our upcoming 2020-2021 Annual Catalog! 
You can CLICK HERE to download the PDF & see more info about this Ornate Garden Suite!
 
You can order on line at- susiewood.stampinup.net

Or contact ME here! 
Here is my April HOSTESS CODE: 
F9QVDU64
NOTE:  The Ornate Border Dies are on back order already!  WOW!  What a popular product it is!  But you can still order these dies & this suite.  This back ordered die will be available at the SU! warehouse around May 4th, 2020.  And there are LOTS of these dies on the way! But don't delay too long in ordering this if you want them sooner than later!!  
 I have another bright, cheery & spring like card again to share with you today, using the Ornate Garden Suite!

Check out the cool cut out die here on the card front!  I added some Whisper White card stock behind it to help make it pop.  Isn't it neat & so pretty!
I also combined the Coastal Weave 3D Embossing Folder with it. 

stamp set:  'Ornate Thanks'
card stock:
  • Early Espresso- 4 1/4 x 11"- score at 5 1/2"- fold in half for card base
  • Terracotta Tile- 2 1/2 x 4"- die cut along one edge; 4" strip- die cut ornate rectangle; 4 1/4 x 1/2"
  • Old Olive- 2 3/4 x 4"
  • Whisper White- 1 x 3 3/4"- behind die cut out on card front; 2 3/8 x 1"- stamp words onto; 4 x 5 1/4"- for inside of card
designer paper:  Ornate Garden Specialty DSP- 1 1/2 x 3 3/4"
ink:  Early Espresso
other:  Big Shot; Magnetic Platform; Ornate Layers Dies; Standard Platform; Coastal Weave 3D Embossing Folder; Ornate Garden Ribbon (Terracotta Tile); Gilded Gems; dimensionals; glue dot

I hope you have a great Tuesday!!
Happy Stamping!
Hugs-
SUSIE

Monday, April 6, 2020

A fun z fold card using the Ornate Garden Suite!

This Ornate Garden Suite is an "Early Release" from our upcoming 2020-2021 Annual Catalog! 
You can CLICK HERE to download the PDF & see more info about this Ornate Garden Suite!

You can order on line at- susiewood.stampinup.net

Or contact ME here! 
Here is my April HOSTESS CODE: 
F9QVDU64
NOTE:  The Ornate Border Dies are on back order already!  WOW!  What a popular product it is!  But you can still order these dies & this suite.  This back ordered die will be available at the SU! warehouse around May 4th, 2020.  And there are LOTS of these dies on the way! But don't delay too long in ordering this if you want them sooner than later!! 
Wow!  Wow!  Wow!  This card is just sooo pretty!!!
It is another totally Susie card!

Check out this awesome z fold card!!  I just am totally in love with it!!  It is bright, cheery & spring like!!  This is just what we all need right now in our lives are positive & cherry things huh!
The cool part about this card is that you use a sheet of 6" DSP & cut it into strips!  Look at it when it opened up!  See how the patterns in the DSP match up, with just a little card stock (card base) showing between each strip!  

This is super cool fold to do with patterned paper like this!!  Isn't that just so neat!! 

How did I do it?
  • 6 x 5 1/4" DSP
  • Cut at 2 3/4" & 3 7/8".
  • This leaves you 3 DSP panels that are- 
  1. 5 1/4" x 2 3 3/4"
  2. 5 1/4" x 1 1/8"
  3. 5 1/4" x 2 1/8"
  • You then adhere the first DSP panel to the front of card folded back edge.  IMPORTANT- Make sure you have your card base scored & folded back.  The whole DSP panel doesn't adhere down, just the left edge of it does.  The DSP panel will fit perfectly onto the card- just leaving a 1/4" edge on the card front & a 1/4" edge along the card base!
  • You then adhere the second DSP panel to the inside front side- along the center fold.
  • You then adhere the third DSP panel to the inside back side- along the center fold.
  • You then add a piece of card stock for your sentiment that is 5 1/4" x 1 3/4"
Size & measurements of your DSP.
DSP= 6 x 5 1/4"- CUT at 2 3/4" & 3 7/8" to make the 3 DSP panel strips.
stamp sets:  'Ornate Thanks' (for outside words) & 'A Big Thank You' (for inside words)
card stock:
  • Terracotta Tile- 5 1/2 x 8 1/2"- score at 1 1/2" & 4 1/4"- for card base; 2 3/4" strip- die cut Scalloped Circle; 1" strip- die cut flower
  • Whisper White- 2 3/4" strip- stamp words onto & die cut using the Stitched Circle Die; 3" strip- die cut Scalloped Circle; 5 1/2 x 1" strip- die cut edge
  • Old Olive- l 1/2" strip- punch out leaf
  • Daffodil Delight- 5 1/4 x 1 3/4"- for inside of card, stamp sentiment onto; 1" strip- die cut flower
  • Blushing Bride- 1" strip- die cut flower
designer paper:  6 x 5 1/4"- cut at 2 3/4" & 3 7/8"- to make 3 panels
ink:  Early Espresso
other:  Big Shot, Magnetic Platform, Ornate Border Dies; Layering Circles Dies; Stitched Shapes Dies (Circle); Leaf Punch, Gilded Gems, Ornate Garden Combo Ribbon- Terracotta Tile- 6"; dimensionals, glue dots

My dear friend Linda T., sent me a pretty Easter card that had different DSP panels in it.  So bless her for inspiring me to make this card!

Yikes- don't look too closely at my thumb & hand in the photo.  I have Early Espresso ink on me!  OH well.....guess you can just tell I'm a stamper huh!

I hope you have a MARVELOUS Monday!!
Happy Stamping!
Hugs-
SUSIE

Sunday, April 5, 2020

Using more the Ornate Garden suite!

This Ornate Garden Suite is an "Early Release" from our upcoming 2020-2021 Annual Catalog! 
You can CLICK HERE to download the PDF & see more info about this Ornate Garden Suite! 

You can order on line at- susiewood.stampinup.net

Or contact ME here! 
Here is my April HOSTESS CODE: 
F9QVDU64
NOTE:  The Ornate Border Dies are low on inventory & close to back order already!  WOW!  What a popular product it is!  But you can still order these dies.  They will be available at the SU! warehouse around May 4th, 2020.  There are LOTS of these dies on the way! 
Here is another pretty card using the Ornate Garden Suite!  

Look at how pretty this Ornate Floral 3D Embossing Folder is!  This is another fun card & so totally Susie.  I really like the way it turned out!  Don't you like it!
stamp sets:  'Ornate Thanks' & 'Ornate Style'
card stock:
  • Terracotta Tile- 4 1/4 x 11"- score at 5 1/2"- fold in half for card base; 3 1/4" strip- die cut out scalloped circle; 1" strip- die cut out flower
  • Pool Party- 3 3/4 x 5"- Emboss with Ornate Floral Embossing Folder
  • Whisper White- 4 x 5 1/4"- for outside layer of card; 4 x 5 1/4"- for inside of card; 3 3/4 x 3/4"- stamp words onto & use stitched die; 2 3/4"- die cut out with stitched circle & stamp ornate images onto
designer paper:  Ornate Garden Specialty DSP- 4 3/4 x 1 1/4"; 4 x 1/2"
ink:  Terracotta Tile & Pool Party
other:  Big Shot; Magnetic Platform; Layering Circle Dies; Stitched Shapes (Circle) Die; Ornate Border Dies (small flower); Ornate Layers Die (stitched rectangle); Standard Platform, Ornate Floral Embossing Folder; Blue 3D Embossing Plate; Triple Banner Punch; Gilded Gems; dimensionals, glue dot
I hope you have a SUPER Sunday!
Happy Stamping!
Hugs-
SUSIE

Saturday, April 4, 2020

A fun fold card using the Ornate Garden Suite!


This Ornate Garden Suite is an "Early Release" from our upcoming 2020-2021 Annual Catalog! 
You can CLICK HERE to download the PDF & see more info about this Ornate Garden Suite!

You can order on line at- susiewood.stampinup.net
Or contact ME here! 
Here is my April HOSTESS CODE: 
F9QVDU64
NOTE:  The Ornate Border Dies are low on inventory & close to back order already!  WOW!  What a popular product it is!  But you can still order these dies.  They will be available at the SU! warehouse around May 4th, 2020.  There are LOTS of these dies on the way! 
Here is another totally Susie card!!! 

I LOVE a lot about this card!  I love the daisies in this Ornate Garden Specialty DSP!  I love the fun layout of this card! I love the colors of this card!  I love the words in the 'Ornate Thanks' stamp set!  I love the Ornate Garden ribbon- it is yummy, so easy to work with & tie into a bow!  I love the Ornate Layers Die!

This is a different fold!  NOTICE how the center is open & I have it attached this center piece to the card base & then the end piece, using dimensionals!

Look closely, as I have also used the BIG flower images from the 'Ornate Style' stamp set & shadow stamped them along the 2 ends of the card front, using Early Espresso ink onto the Early Espresso card stock.  **If you click on the photo it will enlarge it.  You will then be able to see the shadow stamping of the large flowers then.  

So what do you think of this card?  Fun & cute huh!
stamp set:  'Ornate Thanks' & 'Ornate Style'
card stock:
  • Early Espresso- 6 3/4 x 4 1/4"- score at 5 1/2- fold for card base; 4 1/4 x 1 1/4"- for right edge of card front; 3 1/4 x 3 1/4"- for DSP layer piece; 4 1/4 x 1 1/4"- for word layer piece
  • Old Olive- 3 1/2 x 3 1/2"- for DSP layer piece; 4 1/2 x 1 1/2"- for word layer piece
  • Whisper White- 4 x 5/14"- for inside of card.  NOTE:  This piece does show through to the front of the card; 4 1/4" strip- stamp words onto & die cut out with the Narrow Stitched Rectangle Die that is in the Ornate Layers Die.
designer paper:  Ornate Garden Specialty DSP-
ink:  Early Espresso
other:  Big Shot, Magnetic Platform, Ornate Layers Dies, Ornate Garden Ribbon Combo Pack (Old Olive), dimensionals, glue dots

I hope you have a SPECIAL Saturday!!
Happy Stamping!
Hugs-

SUSIE

Friday, April 3, 2020

More Ornate Garden!

I made this pretty card here, using some of the products from the 'Ornate Garden' suite!  And I also combined some Annual Catalog products with it!  I love it!  It is a totally Susie card.  It is just very old fashioned, stylish & elegant isn't it!

This Ornate Garden Suite is an "Early Release" from our upcoming 2020-2021 Annual Catalog!
You can CLICK HERE to download the flyer to learn more about this Ornate Garden Suite! 

Ornate Garden Suite Products:
  • Ornate Garden Ribbon Combo Pack
  • Ornate Floral 3D Embossing Folder
  • Ornate Garden Specialty DSP
  • Ornate Border Dies
For the flowers, I used this single flower die.  For the stems, I used just the end of the border die!  

Where did I get the vase?  It is from the Vases Builder Punch on page 188 in the Annual Catalog!

I made the banners with the Triple Banner Punch!

So what do you think?  It is very non traditional with all of the images you would think about using when looking at this suite!  And I think it turned out super cute!  

You can order on line at- susiewood.stampinup.net
Or contact ME here! 
Here is my April HOSTESS CODE: 
F9QVDU64

NOTE:  The Ornate Border Dies are on back order already!  WOW!  What a popular product it is!  But you can still order these dies.  They will be available at the SU! warehouse around May 4th, 2020.  There are LOTS of these dies on the way!  

stamp set:  'Ornate Thanks' stamp set
card stock:
  • Pool Party- 4 1/4 x 11"- score at 5 1/2"- fold in half for card base; 5 1/4 x 1 1/4"- flag end with Triple Banner Punch, 1" strip- punch out vase with Vases Builder Punch; 2 1/2" strip- punch out Starburst punch
  • Old Olive- 1" strip- die cut & cut off stems for flower, to put into vase; 5x 1"- flag end with Triple Banner Punch
  • Terracotta Tile- 4 x 5 1/4"- Emboss with Ornate Floral Embossing Folder; 1" strip- die cut out 4 flowers
  • Whisper White-  2 1/4"- punch out 2" Circle Punch; 1/2" strip- stamp words & punch out using Classic Label Punch- flag one end with your Paper Snips; 4 x 5 1/4"- for inside of card
designer paper:  Ornate Garden Specialty DSP- 4 1/4 x 1 1/4"- flag end with Triple Banner Punch
ink:  Terracotta Tile
other:  Big Shot, Standard Platform, Ornate Floral 3D Embossing Folder, Blue 3D Embossing Plate,  Magnetic Platform, Ornate Border Dies, 2 " Circle Punch, Starburst Punch, Basic Pearls, Ornate Garden Ribbon Combo Pack (Terracotta Tile), Vases Builder Punch, dimensionals, glue dots, Classic Label Punch, Paper Snips, Triple Banner Punch

I hope you have a FABULOUS Friday!!
Happy Stamping!
Hugs-
SUSIE

Thursday, April 2, 2020

Ornate Garden- WOW!

Here is a gorgeous card I made using the Ornate Garden Suite!  WOW- I just love this suite!  It is kinda of an old fashioned style......one that I look at & my head just spins with tons of ideas!

This Ornate Garden Suite is an "Early Release" from our upcoming 2020-2021 Annual Catalog! 
You can CLICK HERE to download the PDF & see more info about this Ornate Garden Suite!

You can order on line at- susiewood.stampinup.net
Or contact ME here! 
Here is my April HOSTESS CODE: 
F9QVDU64

This card is one that I made a few weeks ago to swap with some of my demonstrator friends from all over the US.  You can't hardly tell by the photo, but if you look closely- maybe you'll notice it.....I used the Ornate Floral 3D Embossing Folder on the Terracotta Tile card stock, that is behind the Early Espresso die cut frame. 
 Look how pretty this die cut is!   It is just a gorgeous Frame!

And this ribbon is yummy!  It ties so easily!  And I love the color of it!  It is Terracotta Tile- which is one of my favorite colors!
Here is a pile of my cards.  I made 24 of them to swap!
You know that I love yellow flowers!  And especially daisies!  And fallish colors......so this is the look I went with for this card!  I love the way it turned out!  This is a totally Susie card. 

Check out the narrow/long stitched Rectangle die that goes perfectly with the words too!  And how do you like the font of the words?  I think they are pretty neat!  This whole suite is just so cool huh!

stamp set:  'Ornate Thanks'
card stock:
  • Early Espresso- 5 1/2 x 8 1/2"- score at 4 1/4"- fold in half for card base; 4 1/4" strip- die cut ornate frame; 4 1/4 x 1 1/4"
  • Terracotta Tile- 3 1/4 x 4 3/4"
  • Whisper White- 1 1/4" strip- stamp words onto & die cut out with the stitched rectangle die; 4 x 5 1/4"- for inside of card
designer paper:  Ornate Garden Specialty DSP- 3 1/2" x 2"
ink:  Early Espresso
other:  Big Shot, Magnetic Platform, Ornate Layers Dies, Standard Platform, Ornate Floral 3D Embossing Folder, Blue 3D Embossing Plate, Ornate Garden Ribbon Combo pack (Terracotta Tile)- 6"- tie into bow, dimensionals, Glue dots

I hope you have a great Thursday!!
Happy Stamping!
Hugs-
SUSIE

Wednesday, April 1, 2020

Ornate Garden SUITE!

  
WOW!!!
Today starts a NEW month & some AWESOME NEW PRODUCTS!
Look at this gorgeous suite that is being released today!
It is called the Ornate Garden Suite!
It comes with 2 sets of dies, 2 stamp sets, gems, ribbon & designer paper!
You can get it all or you can get just any of the products separately!


Ornate Garden Suite Collection- GET IT ALL!#154153-$136.75 
Ornate Thanks Bundle#154115-$46.75
Ornate Style Bundle#154119-$52.00
Ornate Floral 3D Embossing Folder#152725-$9.00
Ornate Garden Ribbon Combo Pack #152479-$7.00
Ornate Garden Specialty Designer Series Paper #152488-$15.00
Gilded Gems#152478-$7.00
Ornate Thanks Stamp Set #149471-$18.00
Ornate Style Stamp Set#152572-$21.00
Ornate Layers Dies#152726-$37.00
Ornate Borders Dies#152724-$34.00


You can order from my on line store at susiewood.stampinup.net 
 Here is my April HOSTESS CODE: 
F9QVDU64
Be sure you check back tomorrow for I'll be sharing some cards I made using this new suite the rest of this week!

I hope you have a WONDERFUL Wednesday!
Happy Stamping!
Hugs-

SUSIE