Pages

Monday, October 21, 2019

Wrapped in Plaid Pine Tree Punch!

Today I'm sharing a card I created real quick last night with left over pieces laying on my stamping counter.  It is a true traditional Christmas card, using red & green!

This card is clean, simple & cute!  The gold foil gives it that little added "wow" to it!
I LOVE this Perfectly Plaid DSP!   It is just gorgeous!  And you know I'm a punch girl- so this Pine Tree Punch is awesome too!

stamp set:  'Itty Bitty Christmas'
card stock:  
  • Cherry Cobbler- 5 1/2 x 8 1/2"- score at 4 1/4" & fold in half for card base
  • Shaded Spruce- 4 x 2; 2 3/4 x 2 3/4"
  • Whisper White-  1" strip- stamp words & punch out using the Classic Label Punch
  • Gold Foil- 3 x 3"; 2 1/2" strip- punch out Pine Tree & then punch it out using the 2 1/4" Circle Punch
  • Gold Glimmer- 3/4" strip
designer paper:  Perfectly Plaid- 4 x 2"
ink:  Shaded Spruce
other:  Classic Label Punch, 2 1/4" Circle Punch, Pine Tree Punch, Every Season Punch (heart), dimensionals, Glue Dots
++++++++
Yesterday was a full day of stamping, as I'm getting ready for my upcoming Holiday Extravaganza.

This morning Deke is up early to chore & head to the office for his weekly board meeting.  I'm up to stamp until the kids get here.  I'll spend my day with Trey & Ainslee.  The other boys will ride the bus here after school.  And tonight I'll be burning the midnight oil again stamping!
 
I hope you have a MARVELOUS Monday!!
Happy Stamping!
Hugs-
SUSIE

Sunday, October 20, 2019

Cup of Cheer!

Here is a fun winter card where I combined the 'Cup of Cheer' & 'Frosted Foliage' stamp sets!!

I did the Triple stamping technique when I stamped these snowflakes!!  You can  CLICK HERE! to see how to do that!
What do you think?  I like the way it turned out.  I added the banner flap underneath the cup as I didn't want it to look like it was floating in mid air.

Did you notice the marshmellows in the top of the mug?  How did I make that?  I used the Scalloped Tag Punch & a 1 3/4 x 3" strip.  NOTE:  You'll need to cut it a little shorter after you punch it, before you adhere it underneath the cup.  I added Wink of Stella over the top of the the marshmellows.  You can CLICK HERE TO SEE DETAILS on how to do that!  

stamp sets:  'Cup of Christmas' & 'Frosted Foliage'
card stock:
  • Seaside Spray- 5 1/2 x 8 1/2"- score at 4 1/4" for card base; 3 1/4 x 4 1/2"; 2 1/4 x 3 1/2"; 2 1/2" strip for Circle Die; 2 1/2 " strip for Mug; 4 1/4 x 1/2"- flag ends with Paper Snips
  • Whisper White- 4 x 5 1/4"; 3 x 4 1/4"; 2 x 3 1/2"; 1 3/4 x 3"
  • Blueberry Bushel-  1 1/4" strip for snowflake
ink:  Blueberry Bushel
other:  Big Shot, Magnetic Platform, Stitched Shapes Dies (Circle), Cup of Cheer Dies, Christmas Layers Dies (for the little snowflake die), Dimensionals, Glue Dot, Basic Rhinestones, Paper Snips, Wink of Stella
 +++++++
Yesterday I stamped most of the morning & then went to pick up Brayden at his mom's.  We all went to Memphis to the races again.  Nathan got 6th in the stock car & he didn't make the Mod A main.  There were lots of cars again & it was busy night in the pits!  

This morning Deke is up  to chore, will take Brayden back to his moms & will then work on the farm all day.  I'm up to get the guys fed & I will then spend my day/night stamping! 

I hope you have a SUPER Sunday!!
Happy Stamping!
Hugs-
SUSIE

Saturday, October 19, 2019

Ho Ho Ho

Today it is simple Saturday.........and I'm sharing a CUTE wooden decor tag with you that I made!!  
We are starting our count down to Christmas- which is now only 67 days away!  OH MY GOSH!
 This is a Christmas Count Down decor that I purchased at a discount store. 
  • I painted it with some red paint & let it dry.  
  • I cut letters out of White Shimmery card stock- #101910= $10.00, using the Hand Lettered Prose Alphabet Dies- #149550= $38.00.
  • I cut the belt buckle out out of Gold Glimmer Paper- #146957= $5.00, using the Stitched Shapes (Square) Die- #145372= $30.00 & a  Layering Square Die- #141708= $35.00
  • I wrote the words- "days to go" onto the Black Chalkboard Vinyl using the White Stampin' Chalk Marker- #132133= $3.50 
  • I used my Multipurpose Glue & mini Dimensionals to adhere everything to this Wooden Door Tag
NOTE:  I used these RETIRED Stampin' Up! products:
  • The Santa's hat is a retired punch- using Red Glimmer Paper & Sparkle Glimmer Paper.
  • The Black Belt is retired Chalkboard Vinyl.
  • And then you can write the number of days left to go until Christmas inside the belt buckle.
This is what it looks like hanging on the door!

I know our grandchildren will love this!  So I'll make one for each of their families!

This project is also one of the many projects for my upcoming Holiday Extravaganza event! 
On this one I decorated it using these current Stampin' Up! products-
  • Christmas Bulb Builder Punch- #148013= $18.00
  • along with the Gold Glimmer Paper- #146958= $5.00
  • Sparkle Glimmer Paper- #146957= $5.00
  • Red Glimmer Paper #150427= $5.00
  • Whisper White Baker's Twine- #124262= $3.50
 ++++++++
Yesterday was a crazy day!!  I broke my glasses & have been having problems with my right eye.  So I took the kids & went to the eye dr.  We then went to Walmart & Fareway & got groceries & things.  And then we went to my chiropractor appointment.
Ainslee rode in the tractor with Deke a couple of rounds & Masen rode his bike- while I put away groceries & made lunch.  They took short naps & then we all took off to Memphis, Missouri to watch Nathan race.  We picked up Deke's brother- Doug on our way.  
There were LOTS & LOTS of race cars there.  In the stock car he got 2nd in his heat & finished 4th in the main. He also drove a friend A Modify- which had some mechanical problems , so he missed his heat.  He then started 10th in B heat & got 10th place- so he was finished with that car for the night, as he didn't make the main.   We got home about 1:45 this morning. 

This morning we are up early & on the go.  We are headed out to mark, sort & load a semi of hogs.  Nathan is racing again tonight in Memphis.  We are excited Brayden is coming to spend the day/night with us- so I'll go pick him up at his mom's & he will go with Deke tonight & help his dad in the pits at the races. 

And I have to share, as the Seeley family is in Des Moines this weekend to run for the Miles4TheKids Run.  They will be donating to this awesome charity at both children's hospitals that Brody has been in- University of Iowa & St. Luke's in Des Moines.  The 3 boys- Brody, Drake & Trey are all running this morning.  And Steve is running a marathon (26.2 miles) tomorrow.  All money that they have raised will be split between these to hospitals & used to purchase toys & things for the children at these hospitals.  WOW!  This is so cool!!!  I can't wait to hear all about their weekend!  And I'm so proud of them all!

Gotta run......
I hope you have a SPECIAL Saturday!!
Happy Stamping!
Hugs-
SUSIE

Friday, October 18, 2019

Cup of Christmas

You know I love fun folds!  Here I did the Peek-a-boo flip card & I used the awesome 'Cup of Christmas' stamp set!

This card is a totally Susie card.....the colors & the cup!!  I am a coffee drinker, but we also drink alot of hot chocolate around here in the winter!  It is a favorite of all of ours.   

This Cup of Christmas is a cool new set.  It comes in Photopolymer & is a reversible stamp!  This is something new & really neat.  So if you are right handed or left handed- you can personalize your cup with the stamp & the dies to work perfect for you!
Check out how the card looks when you pull out the tab.  

I used the Classic Label Punch to make a slit in the Polka Dot card front, so that the Tag could slide in it & it would pull out. 
I added another snowflake on the inside of it with the words.
Did you notice the cool polka dots on the card front?  I used my Sponge Brayer & the Basic Decorative Masks to make this.  Using the masks & a Sponge Brayer is so fun & so easy to do!!
Look at the whip cream on the top of the cup.  I made it by using the Scalloped Tag Punch.  I cut it to 1 1/2", centered it into the punch & punched the end of it.  I then added Wink of Stella to it & adhered it to the back side of the cup.
stamp sets:  'Cup of Christmas', 'Free Skate'
card stock:
  • Crumb Cake- 5 1/2 x 8 1/2"- score at 4 1/4 & fold in half for the card base; 3 x 3/4"- Stamp words & then flag end with Paper Snips
  • Early Espresso-2 3/4" strip- cut larges Stitched Square Die; 2 1/2" strip- cut 2nd to largest Stitched Square Die
  • Whisper White- 4 x 5 1/4"- for inside of the card; 3 1/2 x 5"- put Polka Dots on the card front; 1 1/2 x 4"- Punch end with Scalloped Tag Punch for whip cream (cut length down to approx. 2" after it is punched.  You will want it ti be 4" long, so that you can get it into the punch & pulled back out; 2 1/2" strip- cut 2nd to largest Stitched Square Die; 2" strip- cut 2nd to smallest Stitched Square Die; 4" strip- to die cut snowflakes & then I cut them apart using my Paper Snips;
  • Real Red- 2" strip; 2 x 6"- score @ 2 & 2 1/2" & then punch end with the Scalloped Tag Punch
inks:  Early Espresso, Crumb Cake
other:  Big Shot, Magnetic Platform, Christmas Layers Dies (snowflakes), Cup of Christmas Dies, Stiched Shapes (squares), Classic Label Punch, White Twine, Basic Rhinestones, Sponge Brayer, Scalloped Tag Punch, Dimensionals, Glue Dots, Tear & Tape, Basic Pattern Decorative Masks, Paper Snips
++++++++
Yesterday was a long day!!  Thankfully my mom came down & watched Ainslee  while we got baby pigs & Trey went with us.  The Seeley boys rode the bus out.  When everyone left I worked on stamping stuff all night.  And Deke was in the field!

This morning we are up early & on the go.  Deke will chore & then work in the field all day.  I'll spend my day with Masen & Ainslee.  Tonight Nathan is racing in Memphis.  Nathan & Sarah are going down early for practice. Deke & I will go down & later & take Masen & Ainslee with us.  

Gotta run.....I hope you have a FABULOUS Friday!!
Happy Stamping!
Hugs-
SUSIE

Thursday, October 17, 2019

So Many Stars

This is one of the cards everyone at my October monthly classes made.  I really like how it turned out!!  This is such a cute stamp set, plus the Mercury Glass Designer Acetate is super cool!

Photographing this Silver Foil was hard to do.  So the photo really doesn't show how pretty is it in person.

I chose to use the new Seaside Spray In Color for this card.  As I thought it would make a great Christmas card, but it could also be a baby card, a graduation card, a birthday card, etc.  
So what do you think?  Do you like it?  What do you think of this Mercy Glass Designer Acetate?  
It was super easy to use.  I just used my snail adhesive & stuck it directly to the card stock base.  It stuck well & the adhesive didn't show through it either.

stamp set:  'So Many Stars' & 'Itty. Bitty Christmas'
card stock:
  • Seaside Spray- 5 1/2 x 8 1/2"- score at 4 1/4" for card base: 2 3/4 x 2 3/4"
  • Whisper White- 2 1/2 x 2 1/2"- stamp star onto this; 1" strip- stamp words onto this & punch out with the Classic Label punch; 4 x 5 1/4" for inside of card
  • Silver Foil- 5 1/2 x 1/2"; 3 x 3"; 1 1/2" strip- to die cut out star
ink:  Seaside Sprayother:  Big Shot, Magnetic Platform, Stitched Stars Dies, Classic Label Punch, Basic Rhinestones, Dimensionals
+++++++
Yesterday was a busy day with the kids.  We were outside for a bit before lunch, but it was windy & chilly- so we weren't out there long.  Deke went to the field when he got home from the courthouse, so Masen & Ainslee both rode with him for a bit.  The 3 Seeley boys road the bus here after school.  When everyone was gone home I went outside & helped Deke sell hogs.  I then spent the rest of my night stamping.

This morning we are up early.  Deke will ride to town with me to pick up his truck from the repair shop, come home & chore & work in the field for awhile.  I'll take the twins to school & then spend my day with Trey & Ainslee. We get baby piggies today- so my mom is coming down to help out with Ainslee & Trey will go with us. The boys will ride the bus out after school.   And when everyone has gone home, I'll spend my night stamping.  

Gotta run......
I hope you have a great Thursday!!
Happy Stamping!
hugs-
SUSIE

Wednesday, October 16, 2019

A fall cardinal, using 'Toile Christmas'

Check out my fall bird!!!  He is actually the 'Toile Christmas' cardinal on page 8 in the Holiday Catalog.  I just colored him to be a beautiful fall bird.
This is one of the October monthly cards that everyone stamping with me this past week/weekend got to make!  If you look closely at it you can see that I used the Seasonal Wreath 3D Embossing folder- in the Annual Catalog on pg. 199.  It turned out pretty cool!

To make this wreath have more "dimensions & pop out" more I inked the Embossing folder, using my sponge brayer- before I ran it through the embossing folder so that you could see the image better.
HOW DID I DO IT?
  1. Using your foam brayer & Old Olive ink pad, roll the ink on the inside of the LID (TOP) of your embossing Folder.
  2. Carefully position your 3 3/4 x 3 3/4" piece of Old Olive card stock inside your already inked embossing folder.
  3. Run it through your Big Shot to emboss it with the wreath image.
  4. Remove the embossed wreath image & the wreath image shows all of the beautiful detail!
Can you see how much detail is in the wreath & how it shows up so much more because I added the ink to the embossing folder, before I embossed it.  
Cool huh!
Here are the supplies & the measurements I used to create this card-
stamp sets:  'Toile Christmas' & 'Itty Bitty Greetings'
card stock:
  • Crumb Cake- 5 1/2 x 8 1/2"- score at 4 1/4"- fold in half for card base; 1" strip- stamp words onto & punch out using Classic Label punch
  • Soft Suede- 5 1/2 x 2 3/4"; 4 x 4"
  • Old Olive- 3 3/4 x 3 3/4"- emboss with Wreath Embossing Folder
  • Whisper Whit- 4 x 5 1/4" stamp cardinal & branch onto & cut out using the coordinating dies; 4 x 5 1/4"- for inside of card 
  • Perennial Essence Vellum (So Saffron)- 2" strip- punch out Spring punch, cut in 1/2 & add in the branches, using Glue Dots
designer paper:  Pressed Petals Specialty DSP- 5 1/2 x 2"
ink:  Memento & Old Olive
Stampin' Blends:  Soft Suede, Daffodil, Pumpkin Pie, Calypso Coral, Bronze, Color Lifter
other:  Big Shot, Magnetic Platform, Christmas Cardinal Dies, Standard Platform, Seasons Wreath 3D Embossing Folder, Braided Linen Trim; dimensionals, Glue Dots, Spring Punch, Classic Label Punch, Champagne Shimmer Paint, Wink of Stella, Sponge Brayer, Rubbing Alcohol
++++++++
Yesterday was a busy day with the kids.  We were outside for awhile in the morning & again for awhile after lunch- to play.  It was chilly & windy- but it was fresh air.  We followed Deke to town, as he had to take his truck to the repair shop to get the break line fixed.  He left his truck there & rode home with us.  When the kids went home I worked on stamping stuff all night.

This morning Deke is up early to chore & head to his office at the courthouse.  I'm up early to walk & head to town to Manda's.  I'll take the 3 Seeley boys to school & spend my day with Masen & Ainslee.  The 3 boys will ride the bus here after school.  When everyone has gone home I'll be sorting orders.......as I have 6 boxes that need to be sorted, bagged & ready for delivery.  After supper I'll work on getting things from my monthly classes & Halloween classes all put away!  

Gotta run.......
I hope you have a WONDERFUL Wednesday!!
Happy Stamping!
Hugs-
SUSIE

Tuesday, October 15, 2019

Another Popper Treat Box!

Check it out!!  
I made another Popper Treat Box, using the Small Gleaming Ornaments Punch.  
Isn't it super cute!!  
 I love how it turned out!

Here is the pattern on how to make this one!
  • 8x8" DSP
  • score at 1 3/4", 3 1/2", 5 1/4", 7"
  • turn & score at 2 1/4" & 5 3/4"
  • FOLD on all of the scored lines with your bone folder, so that you can see them. 
  • You want to use the ornament punch & punch directly in the center of each scored lines.
  • NOTES:  Make sure you fold on ALL of the score lines good before you try to punch out with the Ornament punch & then refold them good with your bone folder, before you put the box together.  It is especially important that you fold on the 2 outside score lines (on the ends) too so that you can form the box.
  •  This photo shows where the scored lines are & how I punched in the center of each of them!
  • Add your Tear & Tape along the outside edge here!
  • Peel off your Tear & Tape, fold that edge to the center & then just shut it (close) with the other edge.  
  • Push in your ends to where it is folded.
  • Add your ribbon- I used approx. 5" on each end.
AND Ta da!! 
Your Popper Treat Box is done!!
++++++++=
Yesterday was a busy day with the kids.  It was a BEAUTIFUL day outside & we enjoyed it!  We were outside for awhile in the morning & then again after lunch too! The 3 boys- Brody, Drake & Masen- rode the bus here after school.  When the kids went home I picked up toys, did some laundry & worked on orders from the weekends classes.

This morning I'm up early to walk & then head to Manda's.  I'll take the twins to school & spend my day again with Trey & Ainslee.  Tonight when the kids have gone home I'll be working on stamping stuff!

I hope you have a TERRIFIC Tuesday!!
Happy Stamping!
Hugs-

SUSIE

Monday, October 14, 2019

A quick Poinseitta card!

I made this quick card last night for this blog post.  Does it look like a poinsettia?  Wow- I used the Good Morning Magnolia stamp set for the flower (Annual Catalog- pg. 38). And for the words I used 'Lots of Cheer' (Annual Catalog- pg. 69).
So what do you think?  It makes a simple, yet pretty card doesn't it!

I made this same card at some classes in August.  You can check that Magnolia card out by CLICKING HERE!!!
 
stamp set:  'Good Morning Magnolia' & 'Lots of Cheer'
card stock:
  • Basic Black- 5 1/2 x 8 1/2"- score at 4 1/4" for card base
  • Whisper White- 4 1/4" strip- use Stitched Rectangle Die; 4 x 5 1/4"- for outside of card; 4 x 5 1/4"- for inside of card
ink:  Memento
Stampin' Blends: Light & Dark Real Red, Light Old Olive
other:  Wink of Stella, Red Rhinestones, 3/8" Cotton Real Red Ribbon, Dimensionals, Glue Dots, Big Shot, Magnetic Platform, Stitched Rectangles Dies
++++++++
My weekend was jam packed FULL of stamping!!  It was a good time sharing & visiting with everyone that joined me!! I had 3 monthly card classes & 2 Halloween Treats classes!!!  Thank you so much to all of you that helped me in one way or another by bringing snacks, helping to set up or clean up, etc.......you are all true blessings in my life!!  I couldn't have done it all this weekend without your help.  And I need to give a BIG shout out to Deke.  I spend many, many hours this past week cutting card stock & he did LOTS of Big Shot stuff for me/us to use at these classes- which was truly appreciated.

This morning Deke is up early to chore & then to the courthouse for his weekly board meeting.  I'm up early & will get my car unloaded & head to town to Manda's.  I'll take the twins to school & spend my day with Trey & Ainslee.  Hopefully it is nice out so we can play outside.  

Gotta run......
Happy Monday!!!

Happy Stamping!
Hugs-

SUSIE

Sunday, October 13, 2019

An Ornament punch popper treat!

Are you need a quick & easy little treat?  This is a fun one that everyone coming to my upcoming Halloween Treats classes will be making this weekend.

I used a 6x6" pieces of designer paper & the Small Gleaming Ornaments punch to make this!
You just add tear & tape to the edge, seal it & then squish the ends together & tie some ribbon around each end to hold it together. 
And look- it is the perfect size to add some chocolate!
How did I make it?
SIZE:
6x6" DSP
Score at 1 3/8", 2 3/4", 4 1/8" & 5 1/2"
Using the SMALL Ornament punch- slide in as far as it will go & punch- with the center of the ornament punch being in the center of your scored line.  


LOTS of stamping this weekend.
More soon.
Wishing you a SPECIAL Sunday!
Happy Stamping!
hugs-

SUSIE

Saturday, October 12, 2019

Bone Appetit Paper Pumpkin!

This skeleton is SOOO CUTE!  Just look at him!

This card is another one of my Halloween Treats projects!!  So Everyone joining me to Halloween projects this weekend will be making this!

Many of the supplies for this card came from my September Paper Pumpkin kit!!!

This skeleton was actually all done- I just had to punch him out of a sheet of paper in the kit.  The purple tag was also just a punch out!!  And so was the Pumpkin colored foil label, that is behind the words.  And the skull is a stamp!  

WOW- this kit was jam packed with all of this for the contents:
  • a stamp set- 'Bone Appetit'
  • 20 black clips
  • 20 punch out skeletons
  • 20 punch out skeleton hand
  • 10 punch out purple tags
  • 10 punch out black tags
  • 12 punch out white spider webs
  • 18 punch out white tombstones
  • 21 punch out labels
  • 24 punch out vellum circles
  • 20 black & orange gable boxes
  • black dimensionals 
  • Gorgeous Grape Stampin' Spot
If you haven't ever tried a Paper Pumpkin kit- you might want to!  It is awesome to get a "surprise box" of stamping projects come each month in your mailbox!!  It is so much fun creating the projects in the box, but then also thinking 'outside the box' & making alternate projects with the supplies too!  And this card is an alternate project!

You can click on this link to get my PAPER PUMPKIN STORE LINK!
And don't hesitate to contact me if you have any questions about this awesome kits! 

stamp set:  'Tags Tags Tags' & 'September Paper Pumpkin- Bone Appetit'
card stock: 
  • Gorgeous Grape- 5 1/2 x 8 1/2"- score at 4 1/4" for card base
  • Pumpkin Pie- 5 x 2 1/2"
  • Basic Black- 4 1/4 x 3/4"; 5 1/4 x 2 3/4"
  • Whisper White-  2" strip
ink:  Memento
other:  Trio of Tags Die, Big Shot, Magnetic platform, Black Dimenionals, Glue DotsRetired black cord
++++++++
Yesterday was a busy day with the kids.  The weather was chilly & damp- so we were inside all day.  We read books, played games, put puzzles together & watched a movie.  When the kids went home I burnt the midnight oil cutting card stock.

I am gearing up for a weekend full of stamping!  I am looking forward to stamping with everyone joining me today to stamp!  As I have my monthly class here at our home this morning & the one of my Halloween Treats classes this afternoon. Later this afternoon we have a wedding reception to go to.  We won't stay long, as I'll be burning the midnight oil again cutting card stock & getting everything ready for tomorrow's class in Hiawatha.

Gotta run.......
I hope you have a SENSATIONAL Saturday!
Happy Stamping!
Hugs-
SUSIE

Friday, October 11, 2019

Triple Stamping- Snowflakes!

Have you ever done a triple stamping technique before?  It is so easy to do!  And I love the way it looks when you are done.  

This is one of the cards that everyone joining me for my October monthly classes will be making.  

These cool snowflakes are from the 'Frosted Foliage' stamp set.   

Here are the 3 different sizes that the Whisper White cardstock is:
  • 4 x 5 1/4"
  • 3 x 4 1/4"
  • 2 x 3 1/4
Then lay the 3 pieces of these cardstock, on top of each other, so that you have even spacing around each layer.  
NOTE:  I add a TINY bit of my snail to one corner of each of the 2 smaller Whisper White Layers, so that they don't move.  You will want to carefully pull them apart after you are done stamping.  Don't use too much adhesive- as you don't want them stuck together too tightly.  You are just trying to keep them from moving around during stamping.

Then you stamp over the top of all of them at one time- as if they are just one piece of Whisper White card stock.   

NOTE:  If you have a fine line along the edges (between the different layers of card stock) that doesn't get quite stamped well- no worries!!  When you add your Blueberry Bushel layer piece behind the Whisper White snowflake pieces- you won't be able to see that little edge that doesn't have a crisp stamped image on it.  
 This is what it looks like after you stamp onto them, when they are all together. 
And these are what all 3 layers looks like when they are separated.

You will then assemble your card by layering these 3 different stamped snowflake pieces of cardstock onto the Blueberry Bushel card stock layers. 

Here are the Blueberry Bushel layers:
  • 5 1/2 x 8 1/2"- score at 4 1/4" for card base
  • 3 1/4 x 4 1/2"
  • 2 1/4 x 3 1/2"
stamp set: 'Frosted Foliage' & 'Peaceful Boughs' (words)
card stock:
  • Blueberry Bushel- 5 1/2 x 8 1/2"- score at 4 1/4" for the card base; 3 1/4 x 4 1/2"; 2 1/4 x 3 1/2"; 1/2 x 4 1/4" (for center Banner)
  • Whisper White- for card front- 4 x 5 1/4"; 3 x 4 1/4"; 2 x 3 1/4"; for inside of card- 4 x 5 1/4"
  • Seaside Spray- 2" strip (stamp words & punch them out with the Story Label Punch
ink:  Blueberry Bushel
other:  Story Label Punch, Basic Rhinestones, Dimensionals, Tailored Tag Punch (to flag the ends of the center banner strip)
++++++++
Yesterday was a wet & chilly day outside....so we were stuck inside all day.  We read books, played games & made some 'Forky' crafts from the Toy Story 4 movie.  

Last night when the kids went home I burnt the midnight oil cutting card stock.

This morning I'm up to stamp & will then spend my day with Masen & Ainslee.  And tonight I'll be burning the midnight oil cutting card stock.  I have a jam packed weekend full of lots & lots of stamping!

Gotta run.......I hope you have a FABULOUS Friday!! 
Happy Stamping!
Hugs-
SUSIE

Thursday, October 10, 2019

'Gather Together' Bundle!

It is a beautiful fall card!  As this card warms my heart.  It combines my favorite colors & my favorite season.  Plus I love this 'Birch' background stamp & this 'Gather Together' Bundle!

This is another one of the cards that everyone will be making with me at my October classes this month!  

Look at the embossed frame image.  It from the Heirloom Frames Dies & Embossing Folder combo. I used the Rectangle images here- but also included in the combo are Oval images too!  Cool huh!

If you look closely at the leaves, I used my sponge dauber & inked the detailed/cutting side of them with my Soft Suede ink, laid them face down onto my card stock & cut them out with my Big Shot.  Using the ink on the die gives more detail on the leaves!

stamp set:  'Gather Together' & 'Birch' background
card stock:
  •  Soft Suede- 4 1/4 x 11; 4 1/4" strip
  • Whisper White- 4 x 5 1/4 (for outside); 4 x 5 1/4" (for inside); 3 x 2 1/4" (stamp wheat onto)
  • Crumb Cake- 2" strip (words); 2" strip (leaves)
  • Crushed Curry- 2" strip (leaves)
  • Pumpkin Pie- 2" strip (leaves)
  • Terracotta Tile - 2" strip (leaves)
ink:  Soft Suede
Stampin' Blends:  Dark Crushed Curry
other:  Linen Thread, Big Shot, Magnetic Platform, Standard Platform, Heirloom Frames Dies & Embossing Folder, Gathered Leaves Die, Sponge Dauber, Tailored Tag Punch, Dimensionals, Glue Dots
And here is the inside of the card.....great sentiments & some wheat too!
+++++++++
Yesterday I just ended up having Ainslee for the day.  It was different......she isn't use to be alone & she was defiantly my shadow.  Masen went to work with his mom;  Brayden, Brody, Drake & Trey were in school; Papa was gone to meetings & it was just the 2 of us.  And I still didn't get anything done.   Although we did get some caramel popcorn made to take the the games & eat. 

Last night we went to watch the twins play FB.  And then went to Brayden's FB game.  It was getting chilly out by the time the last game was over with.  I worked on stamping stuff when we got home.

This morning I'm up & out the door to Manda's.  I'll take the twins to school & spend my day with Trey & Ainslee.  Tonight I'll be burning the midnight oil again cutting card stock.

I hope you have a great Thursday!!
Happy Stamping!
Hugs-
SUSIE

Wednesday, October 9, 2019

A Snow Globe!

Wow- this cool snow globe card is one that everyone stamping with me at my October monthly classes will be making!!  Are you signed up to come stamp with me?

I designed this card so that that words could easily be changed & this could work for many different occasions.  This card would work great for a guy card, birthday, etc.

If you look closely- can you tell that I stamped the base of the snow globe using my Celestial Copper ink pad.  In person it is really pretty!

This stamp set & die come in a bundle!!  They go hand in hand as one, with endless possibilities!  As the trees & the bear that I used in the dome are a couple of the dies (not stamps).  There isn't a stamp set to coordinate with those 2 images.  So be sure you check out this bundle on page 43 in the Holiday Catalog.  It is great how so many different options are within this bundle!
Where did I get these stars?  I cut a 1/2" strip of Copper Foil & punched out the stars, using the Twinkle Builder punch.

These snow globes are so easy to assemble & use on your cards!  They aren't very thick either.  We discussed it at my class on Sunday about the mailing of them.  I honestly haven't mailed one yet.  But I think it will easily be mailable with only adding an additional ounce stamp.  I will try it, by mailing one sometime soon & let you know the results.  As I'm just as curious as you are about it!

So what do you think?  Do you like this card?  I really like it!!  And so did several of the ladies that made it at my class on Sunday!!  Guess I'll see what everyone else thinks when they come to my other October monthly classes this week/weekend.

stamp set: 'Still Scenes' & 'Itty Bitty Greetings'
card stock:
  • Night of Navy- 5 1/2 x 8 1/2"- score at 4 1/4 & fold in half for card base; 2" strip- stamp globe base onto, using Celestial Copper ink & cut out with the die
  • Garden Green-3 1/2 x 4 1/4"; 1" strip (for words), 2" strip (for trees)
  • Whisper White- 4 x 5 1/4" (for inside of the card); 3 1/4 x 4- cut out dome; 3 1/4 x 4- use to layer behind the dome
  • Early Espresso- 2" strip (for bear)
  • Copper Foil- 1/2" strip (punch out stars)
designer paper:  Brightly Gleaming Specialty DSP
inks:  Night of Navy & Celestial Copper
other:  Big Shot, Magnetic Platform, Snow Globe Snow Globe Shaker Dome,  Twinkle Builder Punch, Classic Label Punch, Denim Ribbon, Multipurpose Glue, Snowflake Sequins, Dimensionals, Glue Dots
++++++++
Yesterday was a busy day with the kids.  Trey & Ainslee & I enjoyed the beautiful fall day & were outside most of the afternoon.  Last night when the kids went home I worked on stamping stuff!

This morning Deke is up early to chore.  He'll spend awhile this morning at his office in the courthouse & then head to Mt. Pleasant for a meeting.  I'm up early to sort several boxes of stamps that came yesterday & then head to town to Manda's.  I'll take the 3 Seeley boys to school & then spend my day with Masen & Ainslee.  Tonight Brody, Drake & Brayden are all suppose have football games.  We'll see if the weather cooperates & these games happen!!  Tonight when I get home, I'll be burning the midnight oil cutting card stock!  

Gotta run......
I hope you have a WONDERFUL Wednesday!!
Happy Stamping!
Hugs-
SUSIE

Tuesday, October 8, 2019

Boo to you!

Oh my gosh......this little guy is too cute!!  He just makes me smile when I look at him!   

I colored him with my Stampin' Blends.  Then I used my Paper Snips & fussy cut him out!  And added him to this little box, using some dimensionals.
Check out the gold clip on the top of this box.  It is actually a retired clip, but it is on the clearance rack!!  It is available while supplies only.  20 of the come in the pkg for only $2.40!!  WOW!!  What a bargin!

This box is one of the many Halloween Treat projects everyone will be making with me at my upcoming Halloween Treats Classes- except I didn't add the little monster to the box.  But is you are coming to this class & you want to add him to your box- you can!!  Be sure you ask me about it. 

NOTE:  When making this box & you are using a patterned DSP with images or words that need to go in a certain direction- be sure you have your DSP going in the right direction when you are doing the cutting & scoring.  

How did I make the box?  Here are the measurements & instructions!!  Hope this helps you in making this box.   If you have any questions about it- don't hesitate to contact me. 
  • 6x6 DSP- score at 1 1/2", 2 3/4", 4 1/4" & 5 1/2"
  • Turn & score at 1" & 5"
  • Cut out the bottom tiny rectangle.
  • Cut each bottom score up to line.
  • Save the top left square & cut off the remaining part along the top.
  • I used a corner rounder from the Detailed Trio Punch to round the corners on the top flap.  
  • Apply Tear & Tape along the outside thin edge & assemble.  

stamp set:  'Boo To You' & 'The Raven' (words)
card stock:  Whisper White, Crumb Cake
designer paper:  Monster Bash
ink:  Memento
Stampin' Blends:  Dark Crumb Cake, Dark Pumpkin Pie, Ivory, Light Smoky Slate, Dark Daffodil Delight
other:  Gold Clips, Big Shot, Magnetic Platform, Ornate Frames Die, Dimensionals, Tear & Tape, Simply Scored Scoring Tool
++++++++
Yesterday was a busy day with the kids. It is fun to have them here.....we played outside alot!!  They made Pumpkin Wooden decor projects, we watched the New Aladdin Movie, read books, played on ipads, etc.  For lunch I went to plan B.  I was making spagetti & then didn't have any sauce.  So we ended up having Quesadilla's.  They were really good & the boys loved them!  

When the kids went home last night I worked outside on painting a project I'm working on.  I then placed orders & worked on stamping stuff the rest of the night.

This morning I'm up early to get some stamping stuff done & head to Manda's.  I'll spend my day with Trey & Ainslee.  And the other boys will all ride the bus here after school.  Tonight I'll be stamping again! 

I hope you have a TERRIFIC Tuesday!!
Happy Stamping!
Hugs-
SUSIE

Monday, October 7, 2019

The Raven

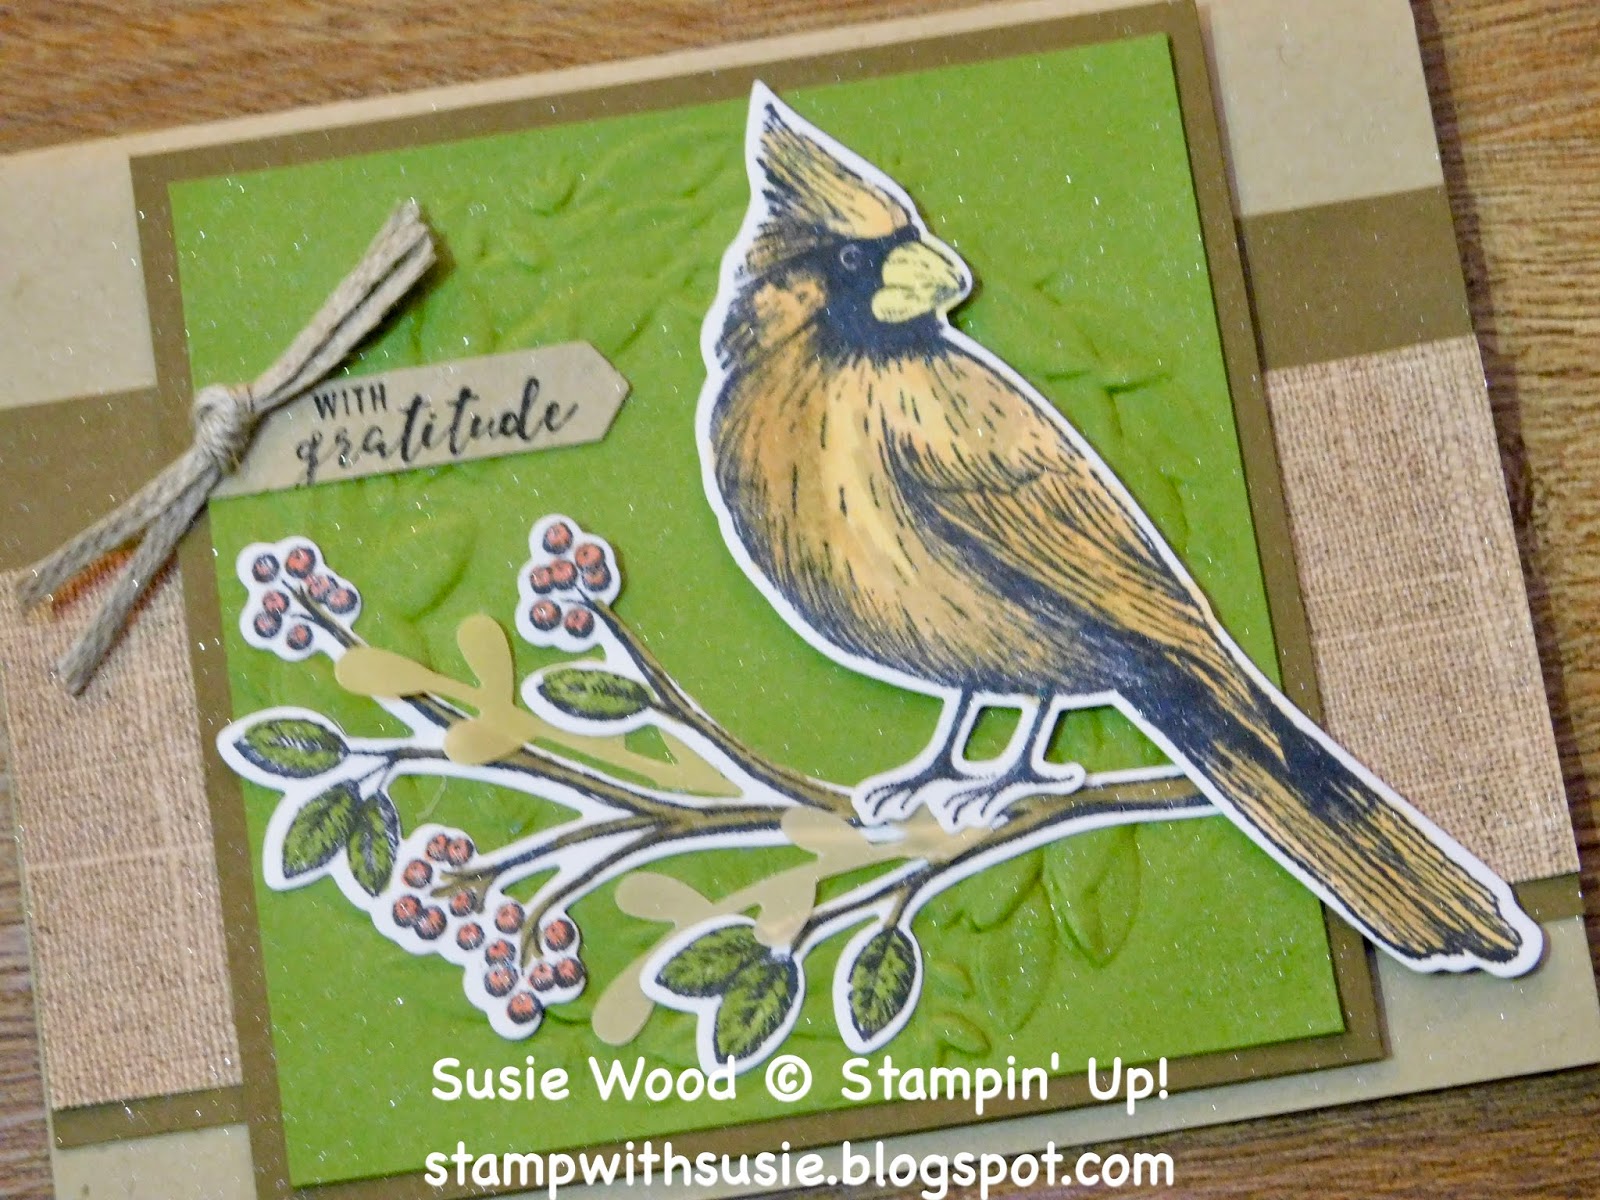
This raven is actually very cool!!  There is just tons of detail in this entire 'The Raven' stamp set.  

I really like the branch  & the words /font- that are in this stamp set too. 
Look at this fun card......I used alot of different products here.  I think it turned out pretty neat!

I stamped the Raven onto Crumb Cake card stock, using Memento ink.  I then fussy cut him out using my Paper Snips.   

How did I flag the ends of the banner that the words Beware are stamped onto?  I used my Tailored Tag Punch!  I just slid my strip into the top point of the punch & it works great!!

Look at the circle.....
  1. I used Watercolor paper.
  2. Cut a circle out of it.
  3. Wet it with water in my Stampin' Spritzer.
  4. Inked my 'Birch' background stamp with my Crumb Cake ink.
  5. Then stamped it onto my wet Watercolor paper.  
  6. I let it dry a little & then stamped the tree branch on it, using my Soft Suede ink. 

stamp set:  'The Raven' & 'Birch Background'
card stock:
  • Sahara Sand-
  • Crumb Cake-
  • Soft Suede-
  • Basic Black-
  • Water Color paper-
designer paper:  Monster Bash DSP
ink:  Crumb Cake, Soft Suede, Memento
other:  Big Shot, Standard Platform, Stylish Scroll Embossing Folder, Magnetic Platform, Layering Circles Dies, Braided Linen Trim, Dimensionals, Glue Dots, Stampin' Spritzer, Tailored Tag Punch (to flag the ends of my banner)

++++++++
Yesterday was a great day of stamping with everyone that joined me for my monthly N. Liberty stamp class.  Dena had some yummy treats & we all enjoyed the afternoon visiting & creating!!  Thanks to Dena, Brooke, Teri & Jenny for helping me to set up & then clean up afterwards too. 

As I hurried home after our class, so we could go to Elizabeth Conrad's visitation.  It was good to see her family & chat with some other friends of ours there.   The visitation was over at 7 & we walked into the church at 6:58- just in time.  There was still quite a line & it was about 7:40 when we walked out the door.  We made a quick stop at Dollar General & then picked up a Casey's Pizza for our supper.  Deke watched the baseball game for a bit & we called it a night.... we were both beat.

We are up early this morning & on the go.  Deke is off to chore & head to the courthouse for his weekly board meeting.  I have to get my car unloaded from yesterday's class.  And then I need to get my stampin' stuff picked up & everything put away before the kids get here.  It is Teacher's In Service Day today- so there is no school & the kids will all be here.  I hope the weather is nice & we can play outside.  I also have a couple Halloween projects for them to make too!  Tonight Deke has a meeting in Fairfield & I'll be cutting card stock, getting ready for my 5 stamp classes I have coming up this week. 

I hope you have a MARVELOUS Monday!!
Happy Stamping!
Hugs-
SUSIE